
|
| Maintenance, Mods, & Tips Mods | Tips | Repairs & Troubleshooting |
 |
|
 01-25-2012, 10:19 PM
|
#1321
|
|
Internet Sanitation Engineer
Join Date: Mar 2006
Location: Crawfordville, FL
Posts: 15,127
Name : Rich Zuchowski
|

Well, I decided to go ahead and put the new shaft in the passenger side today, since the knuckle came in yesterday. Cleaned up the knuckle and started putting everything back together again.
I couldn't seem to get the half shaft back in the way I took it out, however. When I took it out, I had the knuckle still attached to the lower control arm via the lower ball joint. So I mounted the knuckle w/hub to the ball joint, as without the shaft in there, I could actually torque down that ball joint stud nut. But, it just was NOT going back in that way easily, though. I was afraid to struggle with it too much, as I certainly didn't want to rip one or both of the boots. So I had to disconnect the knuckle at the lower ball joint again and pull the knuckle off completely. So much for that method of install...
So I inserted the half-shaft into the differential, which only gave me a little bit of trouble. Just had to push on it sharply enough for it to slide over the clip on the shaft in the differential. With the knuckle disconnected from everything, it was then simple to just slide the shaft through the hub and then bolt it back up to the lower ball joint on the lower control arm. I got that nut on the lower ball joint as tight as I could using an open end wrench. Spec is something like 54 ft/lbs, so I'm guessing I was pretty close..
Seems like I had to do things twice, as it was tough getting the bolts holding the hub to the knuckle torqued to spec (96 ft/lbs) without first anchoring down the knuckle to the control arms to keep it still. Of course, this had to be done before mounting the knuckle onto the lower control arm, as the stud for the lower ball joint sits right in the way of one of the bolts holding the hub to the knuckle. I guess there are better and more fluid ways to do this without so much back tracking, but I just struggled through trying to do it as best I could figure.
So I was feeling pretty good when I finally got the shaft installed into hub/knuckle and the differential, and bolted the knuckle down to the lower ball joint. That's when I noticed the emergency brake assembly laying on the floor near the old hub, and I thought, "Now how does that go back on there.....". Rats.... I had forgotten that the emergency brake assembly needs to go BETWEEN the hub and the knuckle. So that meant it all had to come back out again. Well, the half shaft could still stay in the differential, but since the other end of the shaft needed to come out of the hub, and the hub needed to come off of the knuckle, EVERYTHING else had to be undone...
But at least I hadn't put that end nut on the half shaft yet.

Oh well, I'll try that again tomorrow. I guess too much time passed between the days I took it apart and today when I wanted to put it back together, and I just plumb forgot a step. I checked the videos I took of the disassembly, and for some reason I didn't take any footage of the hub actually coming off of the knuckle and with that, the emergency brake assembly. Hopefully the orientation of everything will be easy to figure out tomorrow. Just have to make sure the wheel speed sensor cable is at the right place, as well as the cable connection for the emergency brake. Luckily I left the other side in place to look over....
__________________

|

|

|
|
01-26-2012, 07:14 AM
|
#1322
|
|
!ereH nI depparT m'I pleH
Join Date: Jan 2007
Location: 25 miles south of Boston, MA. Also have a house in Dunedin FL.
Posts: 1,927
Name : Andy Anderson
|
All of the work you've been doing on your car, and all of the learning you've been
doing leads me to believe you should change your user name from Rich Z,
to C5 Z Mech.  Keep on truckin Rich, you'll eventually get there!
Andy 
|
|
|
|
|
01-26-2012, 02:01 PM
|
#1323
|
|
Member
Join Date: Mar 2008
Location: Panama City
Posts: 369
Name : Mike Elmore
|
Rich may get a host spot on chop,cut, rebuild. 
|
|
|
|
|
01-26-2012, 03:29 PM
|
#1324
|
|
!ereH nI depparT m'I pleH
Join Date: Jan 2007
Location: 25 miles south of Boston, MA. Also have a house in Dunedin FL.
Posts: 1,927
Name : Andy Anderson
|
Quote:
Originally Posted by vetteguy61

Rich may get a host spot on chop,cut, rebuild. |
Yeah, or a gig on "OVERHAULIN'"! 
Andy
|
|
|
|
|
01-26-2012, 04:39 PM
|
#1325
|
|
Internet Sanitation Engineer
Join Date: Mar 2006
Location: Crawfordville, FL
Posts: 15,127
Name : Rich Zuchowski
|
Sorry guys, but I'm holding out for a major motion picture contract.
__________________
|
|
|
|
|
01-26-2012, 04:45 PM
|
#1326
|
|
Internet Sanitation Engineer
Join Date: Mar 2006
Location: Crawfordville, FL
Posts: 15,127
Name : Rich Zuchowski
|
I've got the hub/knuckle back on the control arms with the shaft through the hub. Got the bolts all torqued down (except that lower ball joint, which is "as tight as I can get it with an open end wrench". Just have to put the brake stuff back on and torque down that shaft end nut. That should be it, and I can then start on the other side.
Obviously I'm not rushing anything.
__________________
|
|
|
|
|
01-26-2012, 05:57 PM
|
#1327
|
|
Member
Join Date: Mar 2008
Location: Panama City
Posts: 369
Name : Mike Elmore
|
No need to rush things now Rich. Glad you are making great progress on getting your car done the right way. My hat's off to you.
|
|
|
|
|
01-27-2012, 09:26 PM
|
#1328
|
|
I have stripes
Join Date: Aug 2009
Location: Wesley Chapel
Posts: 792
Name :
|
Quote:
Originally Posted by Rich Z
Sorry guys, but I'm holding out for a major motion picture contract.
|
Over two years worth of material packed into two hours what a major drama.
__________________
2004 Z06 Corvette Z16 Commemorative Edition #770
2004 Silverado LS 5.3L SWB
1969 Camaro SS RS 396/350HP TH400

Members I have met:
LEJ_ZO6, JCB_NJB, als2052, Phil @ Tampa Tuning, Riceman, C5CHICK, Kap142
|
|
|
|
|
01-27-2012, 10:40 PM
|
#1329
|
|
Internet Sanitation Engineer
Join Date: Mar 2006
Location: Crawfordville, FL
Posts: 15,127
Name : Rich Zuchowski
|
Had to run some errands today, so didn't spend too much time on the car.
Been cleaning up the brake caliper and hardware. Lubricated the caliper pins and cleaning the old permatex gunk out of the threads on the bolts by running them through some dies. Got the e-brake cable and bracket hooked back up. There was a bit of a clearance problem with the lower bolt holding the e-brake bracket to the back of the knuckle, though. Had to slide the bracket onto the bottom bolt first, otherwise that bolt wouldn't make the angle past the bottom part of the shock absorber to slide into the hole. Have to remember that one when I'm doing the other side. Probably would be best to get that bottom bolt started before even getting the knuckle tightened down on the tie rod end so it would swivel enough to bypass the clearance problem. Wouldn't have taken much and I would have had to undo something to get that bolt back in there. This is one of those kind of things that no one tells you about to be on the lookout for doing something like this.
Also got the wheel speed sensor hooked back up. The cable is tucked up nicely against the knuckle so it won't get damaged by the half shaft like that old one did.
Simple Green worked pretty well getting the old brake dust and crud off of the caliper, so it is looking nice an shiny red now. Maybe tomorrow I'll put the rotor and caliper back on.
__________________
|
|
|
|
|
01-28-2012, 04:19 PM
|
#1330
|
|
Internet Sanitation Engineer
Join Date: Mar 2006
Location: Crawfordville, FL
Posts: 15,127
Name : Rich Zuchowski
|
Been cleaning up the brake stuff on that passenger side before putting everything together and I noticed something odd. When I took the caliper and pads off of the rotor, I noticed that there was a metal clip on the bottom that the brake pads sit on in the caliper bracket. I didn't think anything of it at the time, because the rear pad has some sort of clip at the top, and I figured maybe it didn't need this additional clip at the bottom. But today I was cleaning all the brake dust and crud off of that clip (I guess it's stainless steel as it cleans up readily) wondering what it was actually for. Best I could figure out, it looked like the pads used it as a guide to slide on when the caliper would be activated to push the two sides of the brake pads against the rotor. Just to confirm, I looked at the driver's side, and darn if there isn't an identical clip at the top of that one. So apparently the last person to take the caliper off of the rotor neglected to put that upper clip back in on my brakes.
Here's a pic of what I am talking about.
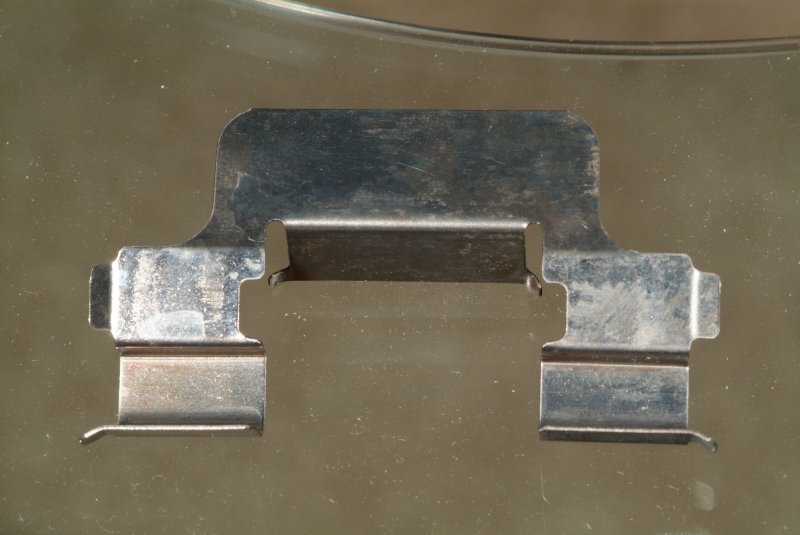
I HOPE I can pick up a replacement clip at Advance Auto or somewhere and not have to buy all new pads to get one of them.
Man, no telling how many other things I'm going to find that was done wrong on this car over the last two years. 
__________________
|
|
|
|
|
Currently Active Users Viewing This Thread: 3052 (0 members and 3052 guests)
|
|
|
 Posting Rules
|
You may not post new threads
You may not post replies
You may not post attachments
You may not edit your posts
HTML code is Off
|
|
|
All times are GMT -4. The time now is 03:28 PM.
|


 Linear Mode

