
|
| Maintenance, Mods, & Tips Mods | Tips | Repairs & Troubleshooting |
 |
|
 04-13-2012, 07:12 AM
|
#1481
|
|
Deceased
Join Date: Mar 2009
Location: Muncie, Indiana
Posts: 147
Name : John Robinson
|

Wait till you get to the part were you bring the car home. Yes that was a time of discovery and disappointment but as Paul Harvey would say heres the rest of the story. You have been methodically correcting the problems you have found. While doing that you have had many people help with parts and ideas (priceless) If you are any thing like me with each thing corrected you have had a feeling of satisfaction knowing it was now how you wanted it and you did it yourself. Your careful research has been an example to us on how to go about correcting a problem and not just jumping in with both feet. Your patience has been rewareded with success after success with your own hands. You have had the support of your wife even to her being able to give you an extra hand when you needed it (I envey you that). I believe the good will outway the bad in the end. You have said you wanted this to be a show piece car at events and meets and it will but it will also be a reflection on you and the dream you had for this car. I am waiting for the last chapter were the maiden gets the prince and they happily ride off into the sunset.
|

|

|
|
04-13-2012, 04:42 PM
|
#1482
|
|
Internet Sanitation Engineer
Join Date: Mar 2006
Location: Crawfordville, FL
Posts: 15,127
Name : Rich Zuchowski
|
Well, I guess that if I get to the point where I feel that I could confidently drive this car all the way across the country to California, like Aaron claimed he could when I picked up the car, and not worry about it breaking down on me, then I will be satisfied that it is truly fixed. But I think that is a long way away from realization at this point.
Honestly, if I could afford it, I would just rip out everything touched by Chris Harwood and Aaron Scott, send the engine back to LME to have it thoroughly checked out, and then start over from scratch. Had I known when I started this project what I know now, I would have just bitten the bullet and done all this myself. Just bought the tools and equipment necessary, find the help and expertise to guide me all along the way as needed, and just done every bit of this myself. Yeah, I would have made some mistakes, but I wouldn't have lied to myself about them and tried to blame them on someone else. If you make a mistake, just man up to it and FIX it. Even not knowing what the hell I was doing, I'm certain it would have been done a LOT quicker and it certainly would have been running by now without all the issues I have found that were done wrong, done in a slipshod manner, or just not done at all, contrary to what I was told. Even with the absolutely worst case scenarios taking place doing it myself, it certainly couldn't have been any worse than what has already taken place to date. And it certainly wouldn't have completely ruined the first couple of years of retirement for Connie and myself.
Yeah, I did learn a lot from all this. And not just about the car.
__________________

|
|
|
|
|
04-13-2012, 04:48 PM
|
#1483
|
|
Internet Sanitation Engineer
Join Date: Mar 2006
Location: Crawfordville, FL
Posts: 15,127
Name : Rich Zuchowski
|
And btw, it's just not this saga of my own car that I found so painful reading over the past displayed in this thread. It was posts made by Gannet and Mike concerning their cars when they were all excited about getting their cars finished and being able to enjoy them again that I found so discouraging. Last I heard from Gannet (Dave) he was getting rid of his car. Mike is still having problems. Perhaps we all just made very poor choices along the way. But it is depressing as hell to me and has completely put a huge damper on this whole Corvette thing for me and others.
__________________
|
|
|
|
|
04-13-2012, 09:53 PM
|
#1484
|
|
Member
Join Date: Mar 2008
Location: Panama City
Posts: 369
Name : Mike Elmore
|
I understand where you're coming from Rich. We both made some bad choices on the people we had work our Vettes. If I can't get my car to run without going into reduced engine power after all the parts I've replaced including a TAC Module I may just end up getting rid of mine. When you can't trust the car to drive any long distances what's the point of having it.
|
|
|
|
|
04-14-2012, 12:35 AM
|
#1485
|
|
Internet Sanitation Engineer
Join Date: Mar 2006
Location: Crawfordville, FL
Posts: 15,127
Name : Rich Zuchowski
|
Yeah, I know Mike. And I haven't even gotten mine to the point where I can start wringing out any lurking gremlins that will likely bite me on the ass as I begin driving the car. To say I am merely apprehensive about this is being a vast understatement. I mean, what are the chances that once I get this mechanical stuff done, and the tuning finished, that I will then be home free with this?  I feel like I still have the insult waiting to be added to the injury I've been going through.
There will have to be a time when I just have to say that enough is enough.
__________________
|
|
|
|
|
04-17-2012, 08:33 PM
|
#1486
|
|
Internet Sanitation Engineer
Join Date: Mar 2006
Location: Crawfordville, FL
Posts: 15,127
Name : Rich Zuchowski
|
While waiting for the stuff I ordered to show up, I've been doing some cleanup of the back end of the car.
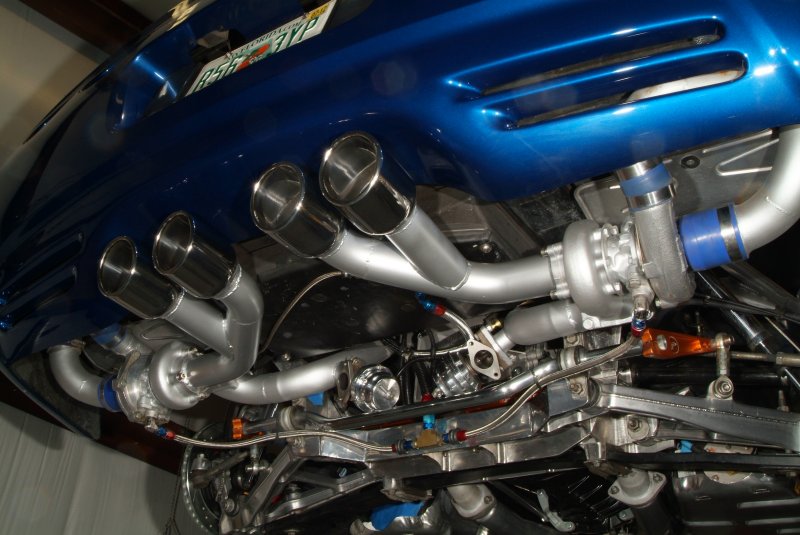
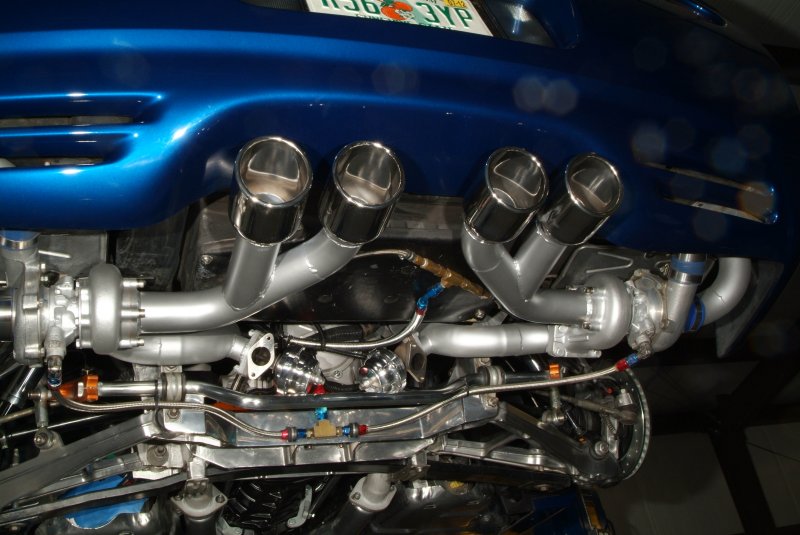
Yesterday Connie and I were poking around underneath of the car trying to figure out a good place to mount that vacuum manifold block. Was a bit perturbed by a rather large rubber hose coming out from underneath the driver side headlight area, so I took off the cover panel to see where that went. It was attached to some contraption there, and there was yet another hose attached to it with a loose end just laying up in the fender. Since it apparently wasn't doing anything, I just removed it and the hoses. Had an electrical connector and what looked like a small vacuum hose going to it, so I capped off the vacuum fitting on the hose and just tied up the electrical connector. Hopefully this isn't something that will cause the PCM to go bonkers when I start up the car again. I'm guessing it has something to do with the EGR system, but all of that stuff has been disabled in the tune anyway. Guess we'll see.
Anyway, didn't look like anyplace convenient to mount the vacuum block in there anyway so we had to look elsewhere. Connie pointed out an area that looked promising that is not far from the fuel pressure regulator. Apparently made out of plastic, but seemed quite strong and rigid... Right inside the rear of the driver side fender.
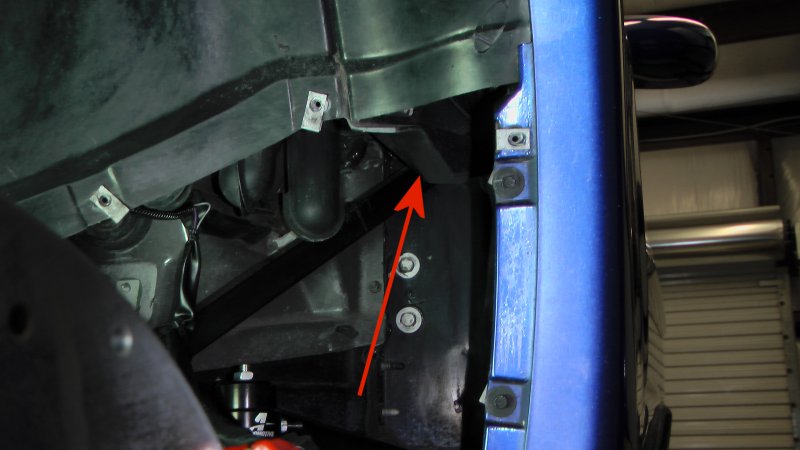
And it looked like I could get a drill in there, which wasn't the case in some spots we scoped out. So I figured that would be the spot to try.
So today I decided to mount that vacuum block, and it seemed to go remarkably well.
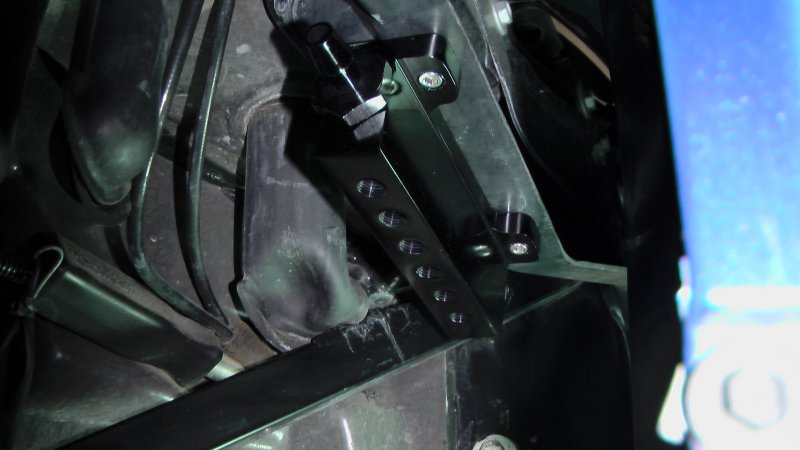
Of course, I haven't tried hooking up the vacuum lines yet to see if there is some problem doing that, that isn't apparent right now.
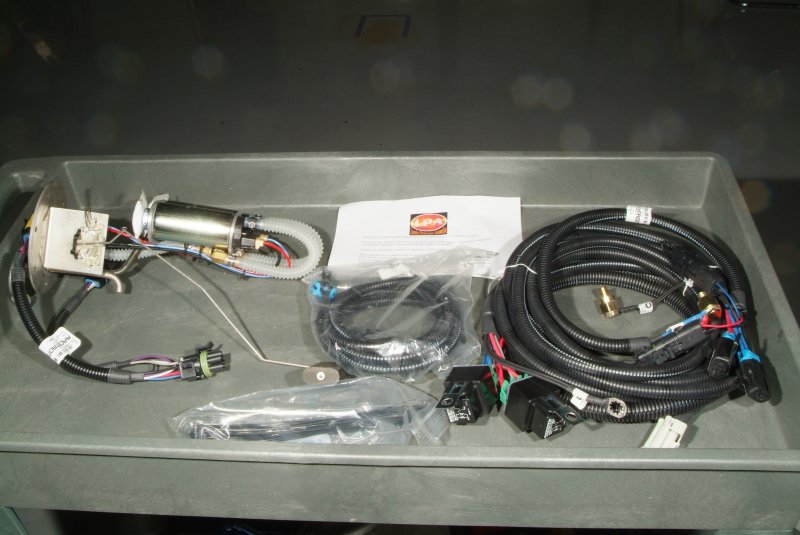
Oh yeah, the fuel pump came in today from Lonnie's Performance. Looks very well done, from my novice opinion. But the wiring harnesses do look a bit intimidating to me. Not much in the way of directions, but some of the harness ends are labelled and I guess I need to figure it out. But certainly not going to be just an easy case of putting the pump back into the gas tank and just hooking up a single cable connector.
Frankenvette is going to be getting some more new parts put into it...
__________________
|
|
|
|
|
04-17-2012, 11:43 PM
|
#1487
|
|
Internet Sanitation Engineer
Join Date: Mar 2006
Location: Crawfordville, FL
Posts: 15,127
Name : Rich Zuchowski
|
Here's a couple of pics of the fuel pump and the wiring harnesss I got from Lonnie's Performance:
I might be working on this tomorrow, I suppose....
__________________
|
|
|
|
|
04-18-2012, 08:42 PM
|
#1488
|
|
Internet Sanitation Engineer
Join Date: Mar 2006
Location: Crawfordville, FL
Posts: 15,127
Name : Rich Zuchowski
|
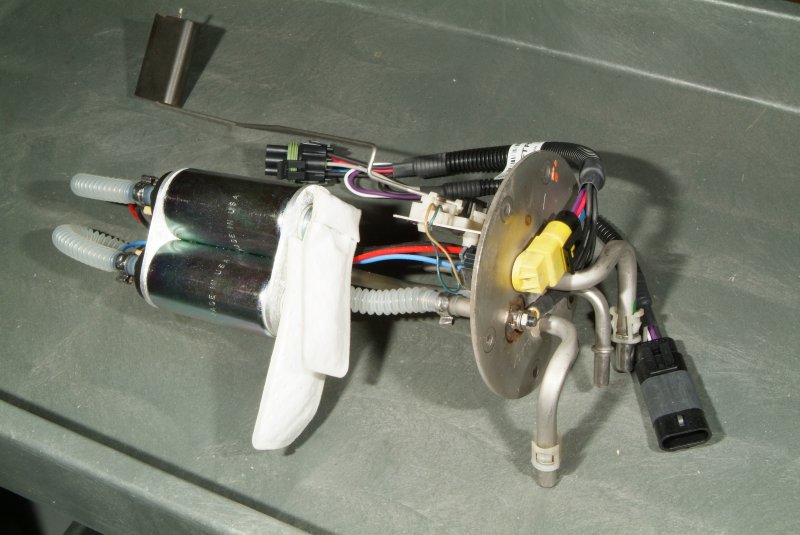
Got the fuel pump into the gas tank today. For a minute there, I didn't think it was going to go. The bracket holding the two pumps in place in the assembly was a REAL tight squeeze through that opening. Sure as heck hope I don't have to pull that sucker back out anytime.
Going to take a bit to get the wiring harnesses put in. It's not quite as "plug and play" as I had hoped. Kind of like when your doctor says you will have "minor discomfort" after your surgery.  But it will get done. The wrinkles are going to be finding how to mount the two relays in the back near the fuel tank, and then running that harness through the tunnel plate area up to the battery. There I have to mount two fuse fixtures. Then from there a two wire harness has to run over to the vacuum manifold block to tie into the Hobbs switch. So this will have to go over the drivetrain and behind the intake manifold. Supposedly that Hobbs switch is set to go on between 3 and 5 psi of boost, but I would like it to come on a little sooner than that. There is supposed to be a way to adjust that thing, but darn if I can see any way to make an adjustment.
Anyway, I took some pics, so I'll post them up later on so you can see what I am talking about.
Still haven't heard a word from the guy I am getting the throttle body from, so I'm beginning to get a bit concerned. It should have shipped by now. I'm waiting on that before I put together the engine side of the fuel system.
__________________
|
|
|
|
|
04-19-2012, 02:08 AM
|
#1489
|
|
Internet Sanitation Engineer
Join Date: Mar 2006
Location: Crawfordville, FL
Posts: 15,127
Name : Rich Zuchowski
|
I laid out the two cable harnesses underneath the car to get an idea of what I have to do to get them hooked up. Doesn't look too tough, but I've come to expect snags all along the way I guess.
Here's the overall harness layout in approximate location to where it needs to go on the car.
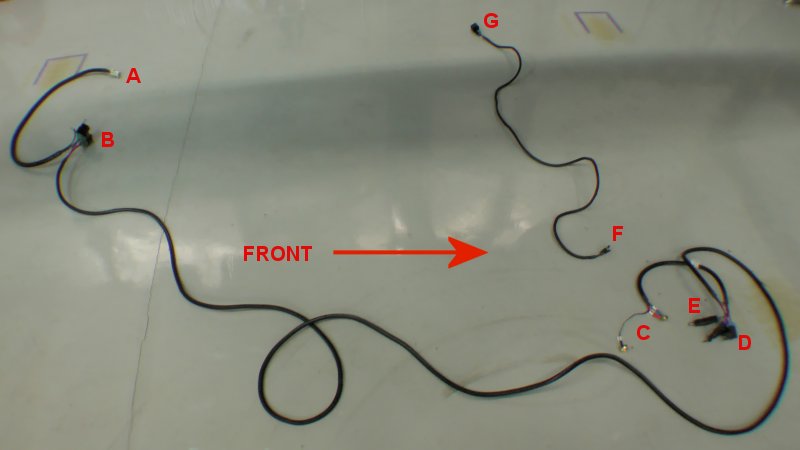
Starting at the fuel pump, there are three loose cables now shown there. The one on the right hand side pointing upwards is the original stock cable connector. That one goes to the connector not shown in the pic at the end of the cable that is going off the bottom of the picture with the purple wire showing.
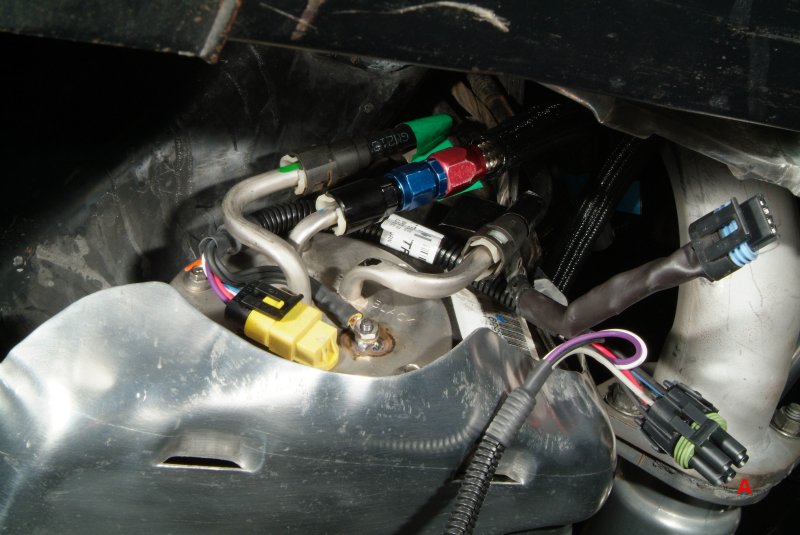
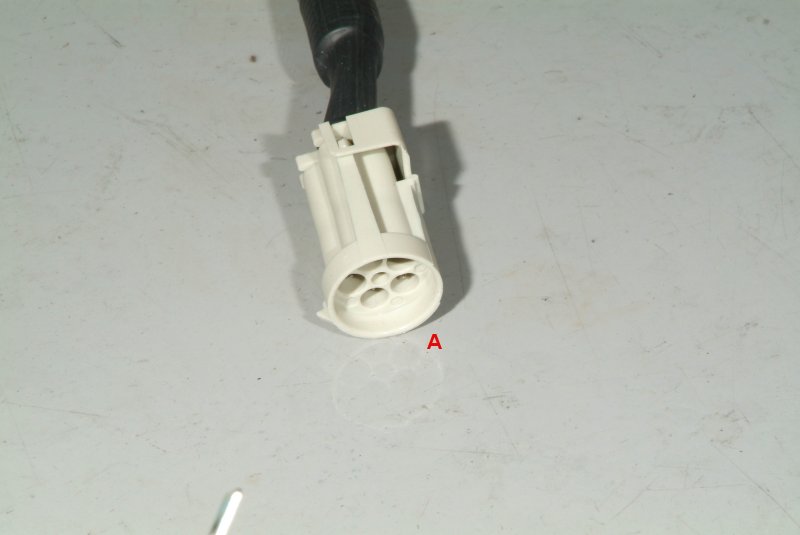
The cable labelled "A" is where the cable harness on the floor connects to on the connector there also marked "A".
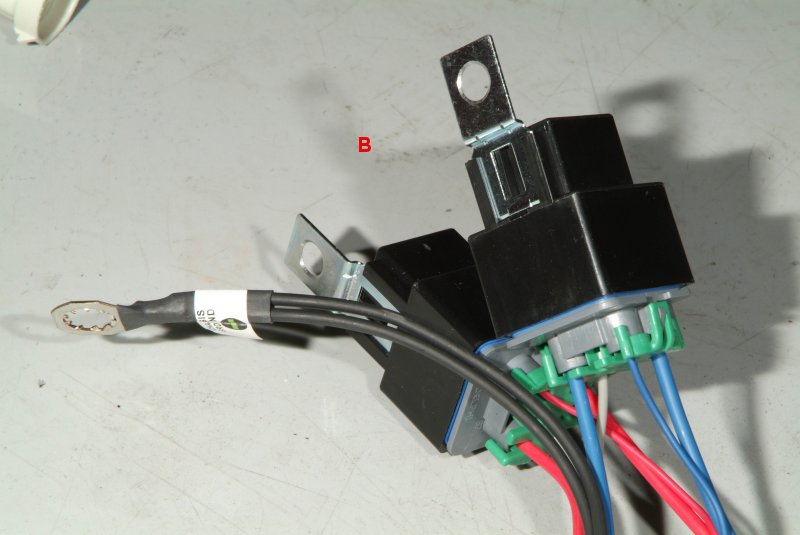
From there the harness runs to two inline relays as well as a ground strap (B).
Each of the new pumps has it's own relay to activate it.
Now after the LONG stretch of cable going up to the front and needs to wind up at the battery, there are three sections of note. (C) connects directly to the battery + and - terminals, and I assume the stock battery cables then screw into those connectors. (D) are a pair of fuse blocks, one for each pump. And (E) which is a pair of connectors, again, one for each pump. Right now they both have a loop wire connected to them, which means both pumps will be running when power is applied.
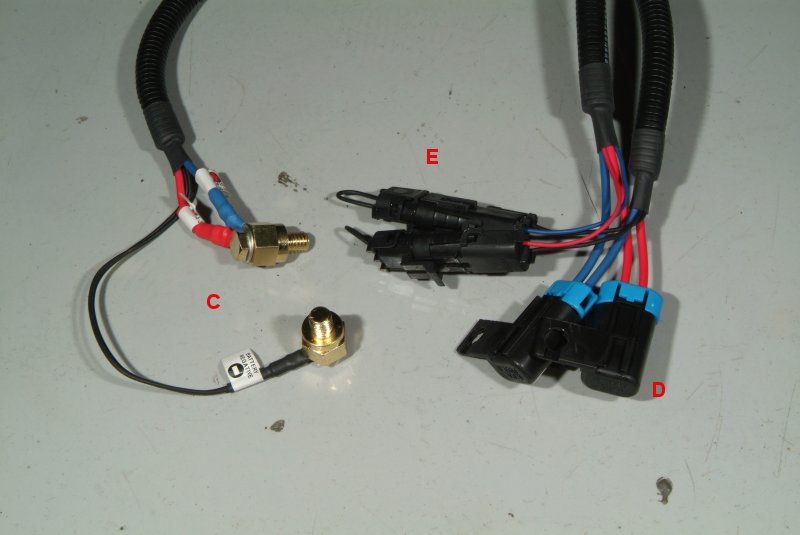
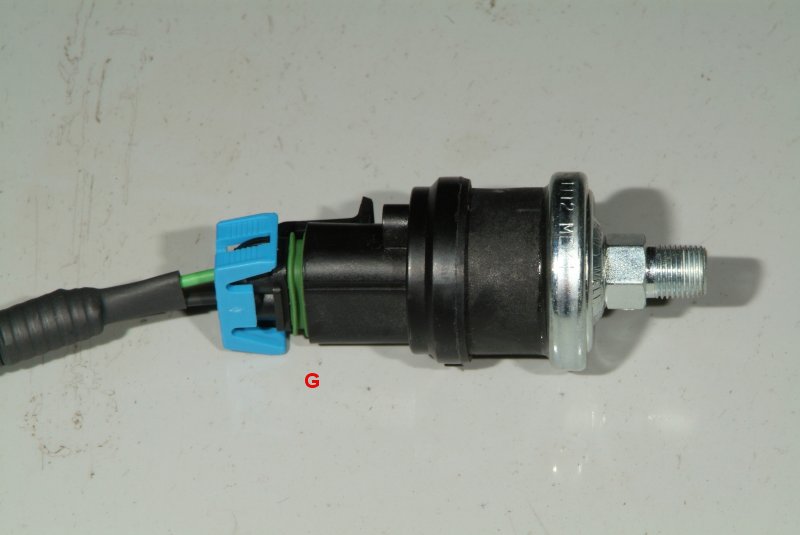
Either connector at (E) can then be connected to the other harness end (F) which goes to the Hobbs switch located on the vacuum manifold block. The connetor at E selected for this harness will then become the secondary pump that will only be activated when the Hobbs switch detects boost at somewhere between 3 and 5 psi. Also note that the connector can be switched at (E) to alternately run each pump as the main pump and thereby try to equal out the run time on each pump.
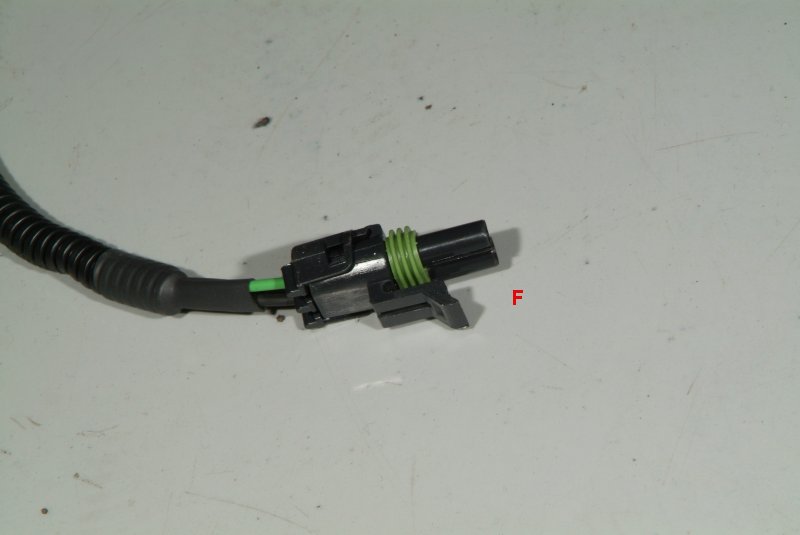
And of course this is the other end of the second harness that attaches to the Hobbs switch itself. This switch will be screwed into the vacuum manifold block I just installed recently behind the driver's side fender.
Doesn't look too tough to hook up, but I think mounting those relays near the fuel tank is going to give me some issues. Just no way to get a drill up in there to drill mounting holes while the drivetrain is installed, so I'm going to have to try to use any existing mounting points that I can. I guess I'll have to pull out the battery in order to mount the fuse blocks and those loop connectors onto the firewall where they will be somewhat accessible. I'm planning on replacing the battery anyway, as it's apparently taken a beating before the car came back home. I'll probably get a yellow top this time around, as I believe it is better for higher than stock current draws while the car is running.
So that's what I have to look forward to in the next few days.
__________________
|
|
|
|
|
04-19-2012, 01:08 PM
|
#1490
|
|
Sinister C4
Join Date: Jan 2007
Location: Largo, FL
Posts: 1,223
Name : Eric G
|
Quote:
Originally Posted by Rich Z

Now after the LONG stretch of cable going up to the front and needs to wind up at the battery, there are three sections of note. (C) connects directly to the battery + and - terminals, and I assume the stock battery cables then screw into those connectors.
|
I'm pretty sure you can take out the terminal ends on your stock cables, and these should slide/snap into place. Just had to do the cables on my 96 as i ran a 0 gauge from the alt directly to the battery and a 0 gauge from the battery to the frame. They basically pop in and out...but with a lot of cussing. Not sure if these are suppose to do that, but it looks like it from the pics. The screws on the back are for those with additional power needs like stereo amps and such.
|
|
|
|
|
Currently Active Users Viewing This Thread: 3103 (0 members and 3103 guests)
|
|
|
 Posting Rules
|
You may not post new threads
You may not post replies
You may not post attachments
You may not edit your posts
HTML code is Off
|
|
|
All times are GMT -4. The time now is 03:26 PM.
|


 Linear Mode

