
|
| Maintenance, Mods, & Tips Mods | Tips | Repairs & Troubleshooting |
 |
|
 03-08-2012, 08:36 PM
|
#1411
|
|
Internet Sanitation Engineer
Join Date: Mar 2006
Location: Crawfordville, FL
Posts: 15,139
Name : Rich Zuchowski
|

Yesterday I just spent time cleaning up some hardware on the passenger's side front suspension. Cleaned up the bolts, and put a wire brush to a steel panel that goes between the hub and the knuckle that holds the connector for the wheel speed sensor. The panel looks like it had some sort of sealant or something on it, giving it a rough texture where the hub and knuckle meet, so I wanted to smooth it out so the hub would be flush against the knuckle. Since it was steel, I went ahead and put a light coat of paint on it as well. I painted the caliper bracket, so I'm pretty much in a state of waiting for paint to dry thoroughly on those parts before I put the passenger side together and get to the driver's side.
Today I decided to start working on the fuel system. Still waiting on at least one of the new fuel filters to show up, but I figured that in the meantime I could pull out the old one and start rerouting the plumbing back there. Lucky I did, because I found out that there are two sized fittings needed for those three tubes coming out of the fuel pump. Two of the lines are 3/8ths and the other (the blue line) is 5/16ths. Since the return hose from the fuel pressure regulator was on the green line of the pump (which is not correct) it had a 3/8ths to -6AN fitting on it, which, of course, would not work on that 5/16ths tube. So I had to scramble to find one to try to get it here by this weekend. Fortunately Summit Racing carries it (although it was pretty tough to find), so it should get here on Saturday. Lately I've been learning about 10 times as much about the Corvette fuel system than I EVER really wanted to know about. 
But in any event, I got the Aeromotive pump disconnected and pulled off of the car. Pulled that funky red hot wire off of the fuse block and pulled it out of the car. The darn plastic convoluted tubing that the power and ground wire ran through to the pump OVER the turbo wastegate on the driver's side was all melted and gaping open with the wires exposed. Wonder how long it would have taken for the hot wire itself to have the insulation start melting off of it exposing a live wire right near the fuel lines? ")
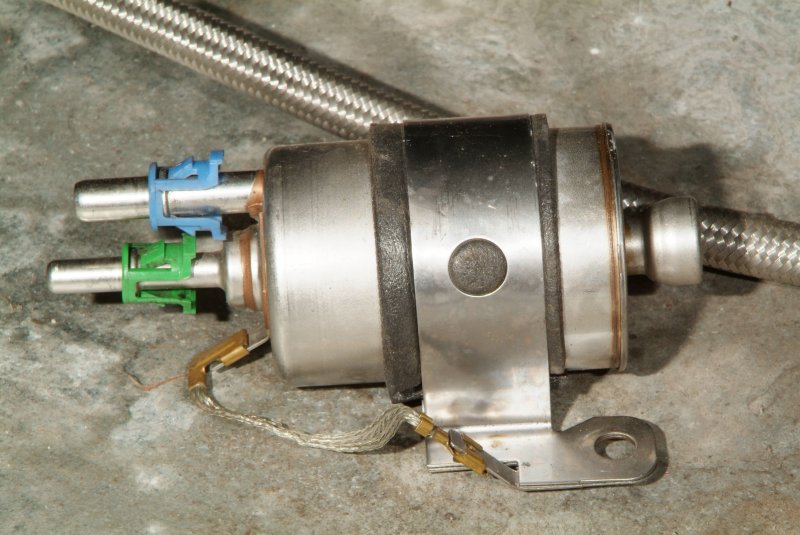
Anyway, here's the stuff I pulled off of the car today:

And here's a close-up of the fuel filter that came out:
I had read all kinds of horror stories online about getting this filter and the front line from the output separated, so I went ahead and bought the GM tools made for disconnecting these types of fuel connections. This is what they look like:
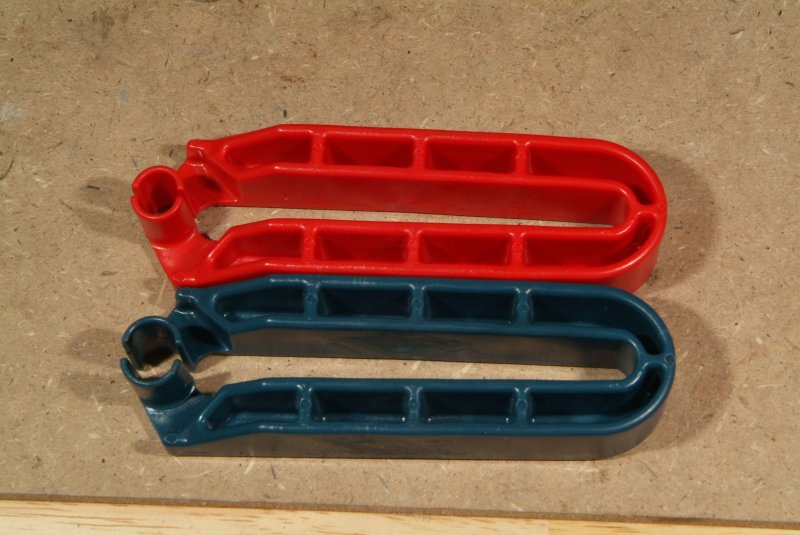
Actually it came apart very easily for me, so perhaps it was just a matter of having the right tool for the job.
Now when I was trying to figure out exactly what kind of fitting it was that I would be needing for that 5/16ths fuel tube, I decided to take apart the one that came off of the 3/8ths tube that is the fuel OUT line (black tag) coming out of the pump and had been going to the input of the Aeromotive pump. You may recall that when I took a look at the AN fitting at the Aeromotive pump end of this same fuel line, the tip of the fitting was all corroded. Well, come to find out that the fitting on the stock fuel pump side of this same fuel line looked identical.
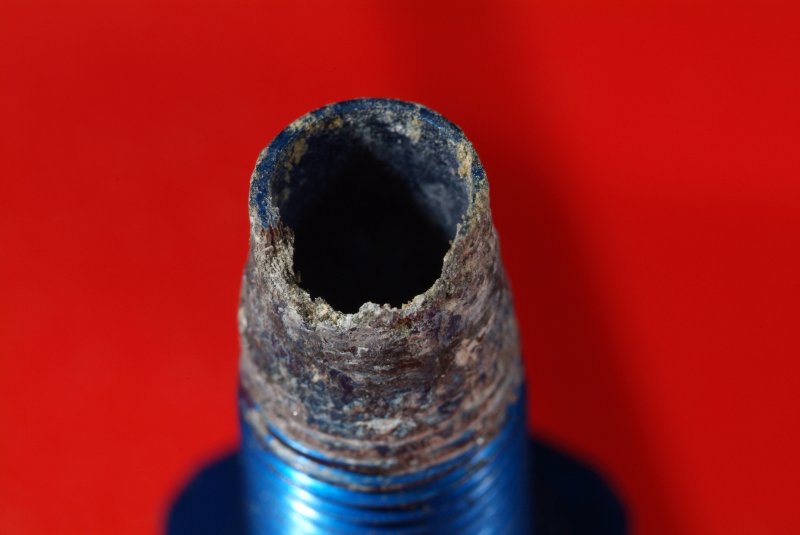
What in the world caused that to happen? I didn't see any corrosion like that on the output side of the Aeromotive pump. But when I take apart the fuel rails, I am certainly going to inspect all those fittings carefully to see what they look like. I sure am glad that I'll be getting those fuel injectors inspected and cleaned. If those fittings were shedding junk, then certainly some garbage got into the injectors since there wasn't ANY filter between those fittings and the injectors the entire time Aaron was running the engine.
Ah well... I've now got to plug those holes in my trunk where the bolts holding the Aeromotive pump were located.
__________________

|

|

|
|
03-09-2012, 11:50 PM
|
#1412
|
|
Internet Sanitation Engineer
Join Date: Mar 2006
Location: Crawfordville, FL
Posts: 15,139
Name : Rich Zuchowski
|
Today, I finally got the tool I ordered for pushing the dual brake pistons in the front calipers back into position to mount the new brake pads and new rotors, so I figured I would work on that a bit. As an aside, I got the '97 style fuel filters I ordered, but am still waiting on that fitting to mate the -06 return hose to the 5/16ths steel tube on the fuel pump. I figured I might as well get SOMETHING done today.
Anyway, first thing I wanted to do was to loosen up the bleeder screw on that passenger side front caliper I have hanging loose. Figured I might as well do that before I mounted the hub and knuckle back into place while I had more elbow room in the wheel well. The two rear ones came loose pretty easily, but this one seems a tougher nut to crack. I pulled off the rubber boot around the base of the bleeder screw and it is substantially corroded looking where the screw meets the caliper. Just for chuckles, I tried the driver side front and that one came loose with just modest effort. Looks like I'm going to have to let this passenger side one soak in some PB Blaster for a while before having another go at it.
Now the puzzler is that Harwood had all of the brake plumbing off when he put the engine (twice!) into my car, and I specifically recall him saying one day that he and Justin had bled the brakes when all the brake plumbing was put back together. But that bleeder screw on the passenger side front looks (and sure acts) like it has not been moved anytime very recently. So either it was NOT bled a year and a half or so ago, or else it was and it got corroded up in a hurry since then. Based on everything else that has happened, I think you all know which one I think is the actual case here.
Anyway, hope this isn't going to be an issue. I'm guessing that snapping off a bleeder screw in a caliper is not going to make my best day working on this car. 
I did buy some stainless steel bodied bleeder screws with the intention of replacing them anyway, but still, I was hoping that this part wouldn't be a headache.
__________________
|
|
|
|
|
03-11-2012, 01:39 AM
|
#1413
|
|
Internet Sanitation Engineer
Join Date: Mar 2006
Location: Crawfordville, FL
Posts: 15,139
Name : Rich Zuchowski
|
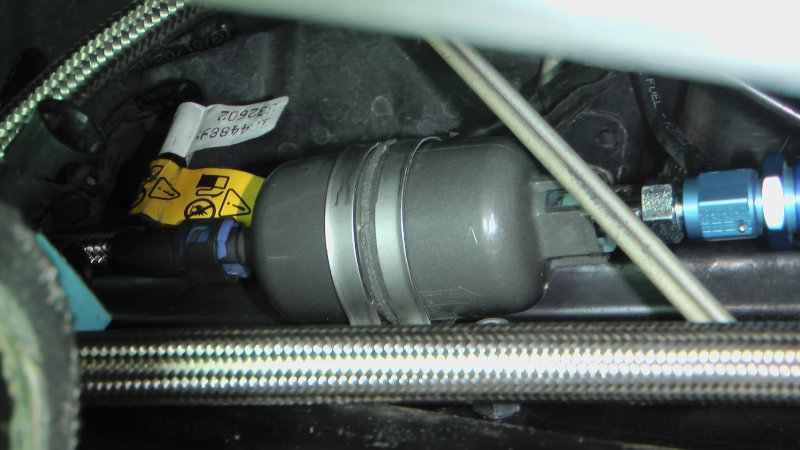
I got the fitting today that I needed to hook the return fuel line from the FPR to the correct tube on the fuel pump, so I got that done. Also hooked up the fuel filter and rerouted the -8AN fuel line to the output of the fuel filter. I couldn't get the hose exactly how I would have liked it, as it is draped over top of the transaxle and up the passenger side to the fuel rail and rather tough to get to. There was a mess of other lines that kept me from just tugging it forward as much as I would have liked to. As it was, I had to loosen up the driver side exhaust pipes to get my arm up there to move it around. I was afraid that if I actually pulled it completely out up to where it goes into the tunnel plate, I might not be able to get it back in place at all. I sure as heck didn't want to have to pull the transaxle out for this. But it doesn't have any sharp turns in the hose, so it should be OK where it is.
So here's that -97 fuel filter in place:
The output side is kind of funky because I had to use a quick connect 3/8ths to -06AN adapter, which then goes to a -06AN to -08AN adapter to mate with the -08 fitting on the braided hose.
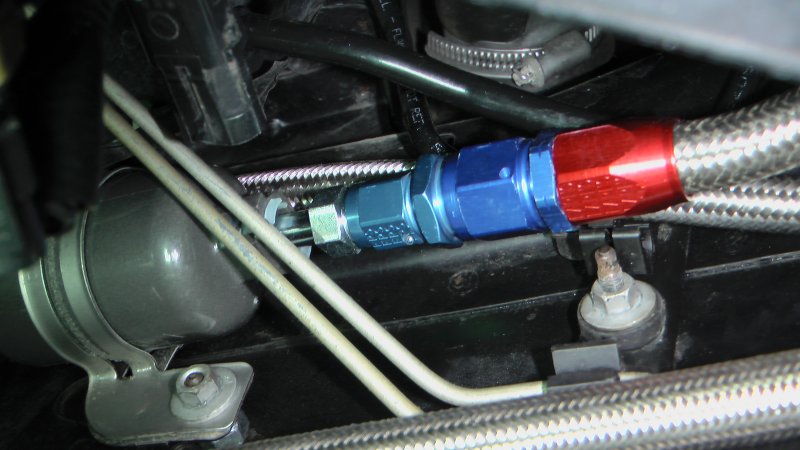
I just could not find a quick connect 3/8ths to -08AN adapter. Found this -06AN and also found a -10AN but no -08AN for some odd reason. So I had to use one more fitting in line than I would have liked to.
Just when I thought it was smooth sailing from here and I simply had to snap that hose into the output of the fuel filter, I noticed that there is a bracket sitting smack dab in the way of where that franken-fitting needs to go.
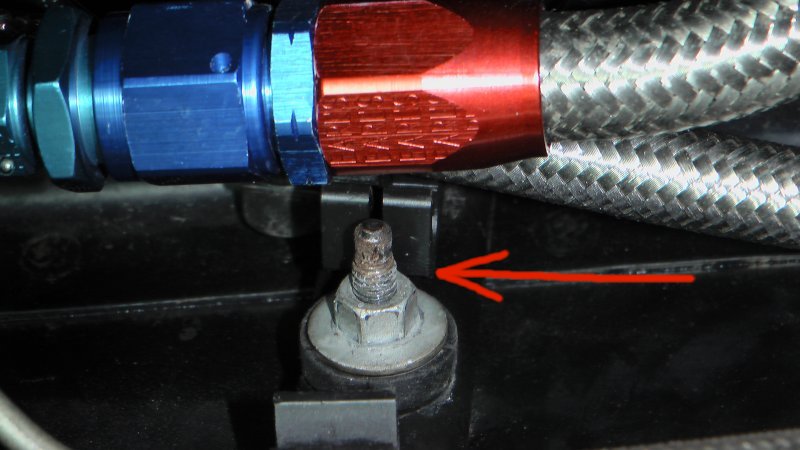
This bracket is used to hold the stock fuel line and some brake lines in place, and since it fed directly into the filter, of course it is right in the way for what I want to do. Just removing the bracket itself wouldn't help, as that mounting bolt is going into the body or frame. I figured the best thing to do would be to just use some washers between the filter bracket and the frame and bring the filter itself out from the frame. That way I could bend the filter mounting bracket slightly so that the hose line would clear the obstructing bracket with enough clearance so it wouldn't bang against it while driving. Seems to be OK now, but I'll see if it gives me any noise related problems when driving the car. Luckily GM seems to use mounting bolts like this that are about 3 times longer than actually needed.
I didn't really like the fuel feed hose going directly over top of the transaxle, not only because of the hose maybe rubbing against the transaxle, but also heat would be transferred into the fuel from it. So I ran some insulating sleeving around the hose to help protect it from abrasion and heat.
So now the fuel system is done (I hope) up to the back of the fuel rail. I didn't cut as much hose as I thought I would be able to from that -08 line to reroute it, so I may have to buy some more to be able to run from the back of the driver side fuel rail to the fuel pressure regulator. I'll have to measure it to see what I need, but if it's more than about three feet, I won't have enough. Hopefully I can get some at the local Advance Auto parts store.
Anyway, I took pics of everything, and here's what the fuel pump looks like with the lines installed correctly.
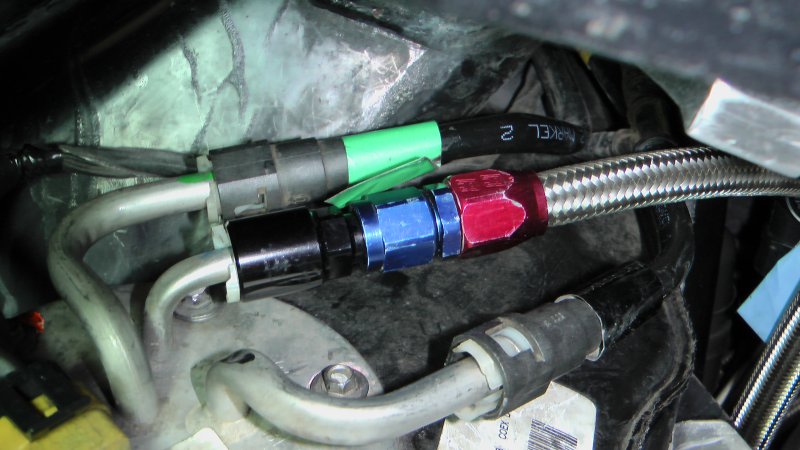
Well not COMPLETELY correct, as it's lucky I took these pics. I noticed that the green line is not seated correctly on that tube on the pump.
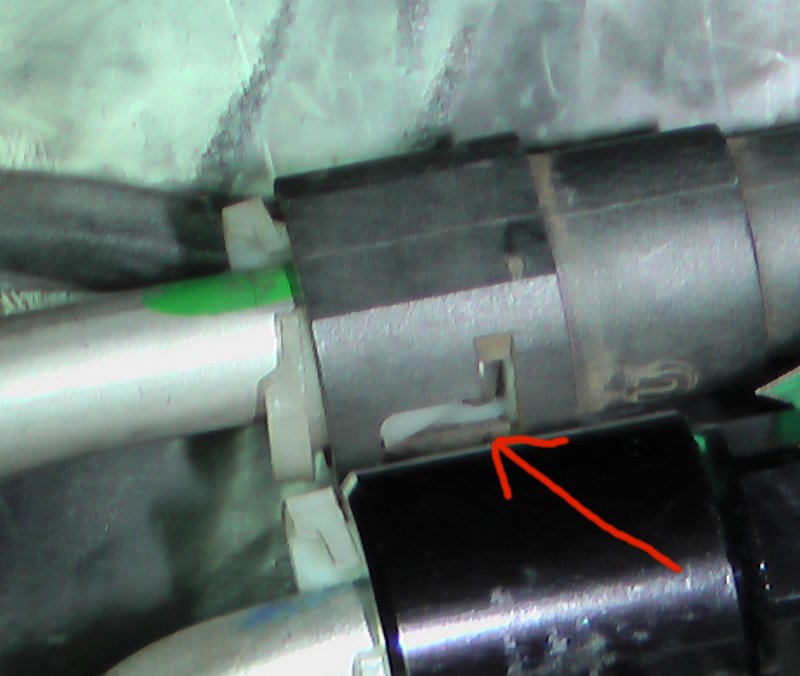
That white tab needs to be clicked into place in the slots on that fitting, and the ends should be perpendicular to the ends. Which they are not in this case. So I'll need to fix that tomorrow.
Got the exhaust pipe put back together again, and that was enough "fun" until next time.
__________________
|
|
|
|
|
03-11-2012, 11:25 AM
|
#1414
|
|
I have stripes
Join Date: Aug 2009
Location: Wesley Chapel
Posts: 792
Name :
|
Nice progress Rich. Don't you just love it when something is done right knowing you did it yourself. You probably know more about your car now than CH.
__________________
2004 Z06 Corvette Z16 Commemorative Edition #770
2004 Silverado LS 5.3L SWB
1969 Camaro SS RS 396/350HP TH400

Members I have met:
LEJ_ZO6, JCB_NJB, als2052, Phil @ Tampa Tuning, Riceman, C5CHICK, Kap142
|
|
|
|
|
03-11-2012, 12:45 PM
|
#1415
|
|
Internet Sanitation Engineer
Join Date: Mar 2006
Location: Crawfordville, FL
Posts: 15,139
Name : Rich Zuchowski
|
I made an interesting observation while doing this stuff. There are some instances where you are presented with a choice.
- Use your left hand
- Use your right hand
- See what you are doing
Pick two.

I'll be quite honest about it, I don't see how people can do this kind of stuff without a lift. Crawling in an out from under a car sitting on jack stands, needing this tool or that, would be absolute murder. It would have made doing this stuff 10 times harder. Heck, I don't know how I could have even relocated that fuel line hose that I did yesterday. As it was I had to position the car on the lift at just the right height and then still had to stretch to reach that hose with my fingers. Laying on my back on the floor trying to do it? Heck, I doubt it. At the very least I would be at the chiropractor's in emergency traction right now.
I bought that lift pretty much on a whim because I was able to save quite a bit of money by subcontracting out getting the garage built. I thought it was kind of frivolous because I was only intending to use it for oil changes and doing REAL clean up underneath the cars. Pretty much saved my bacon with this car, though. I would have gotten rid of it within a week of bringing it home from Aaron's after seeing the problems I faced. And even then, I wouldn't have known the half of them. So yeah, that frivolous decision saved my car. At least up to now, I guess, as I'm still not out of the woods yet.
__________________
|
|
|
|
|
03-11-2012, 08:38 PM
|
#1416
|
|
Internet Sanitation Engineer
Join Date: Mar 2006
Location: Crawfordville, FL
Posts: 15,139
Name : Rich Zuchowski
|
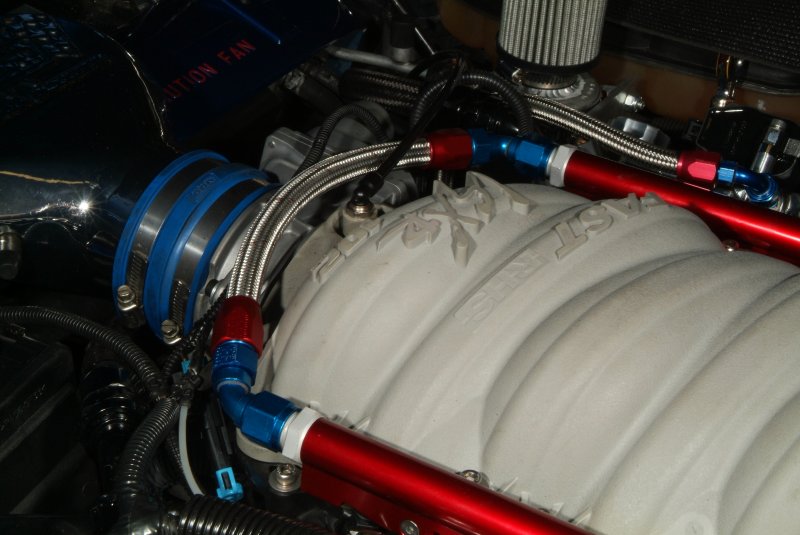
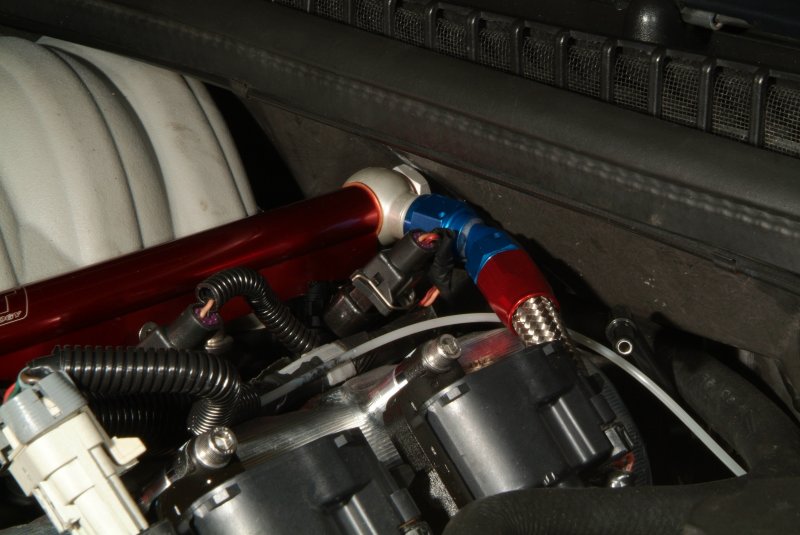
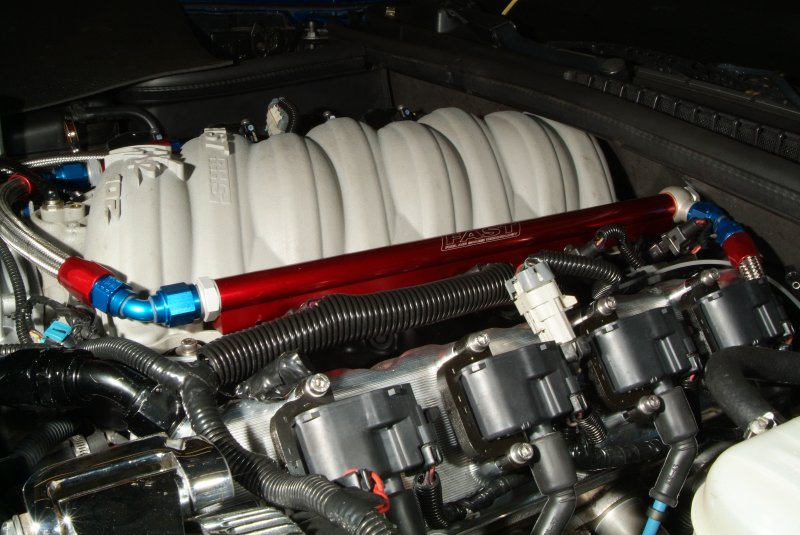
Got the fuel system plumbing done today. I decided to wait till tomorrow to run up the fuel pressure to check for leaks. Didn't want to end today on a sour note if I found any. So I decided to quit while I was ahead and end the day feeling a little upbeat about it.
The fuel rail fittings I got from NukePerformance in Sweden worked great.
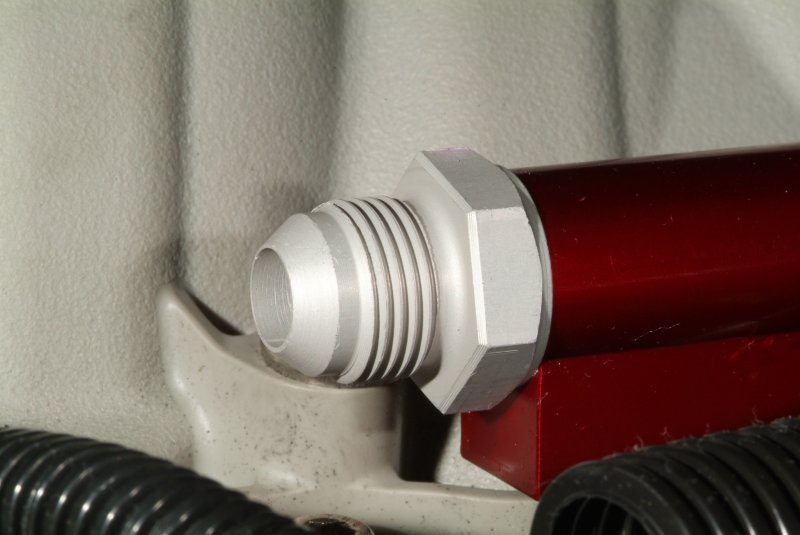
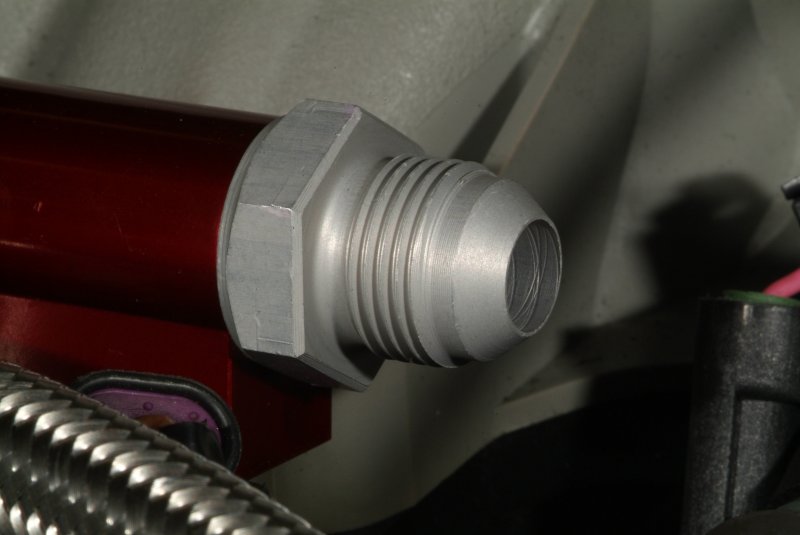
The new hose I put on the front of the fuel rails looks a LOT better now.
And thankfully that banjo fitting he sent me for the back of the driver side fuel rail fits fine and clears the firewall.
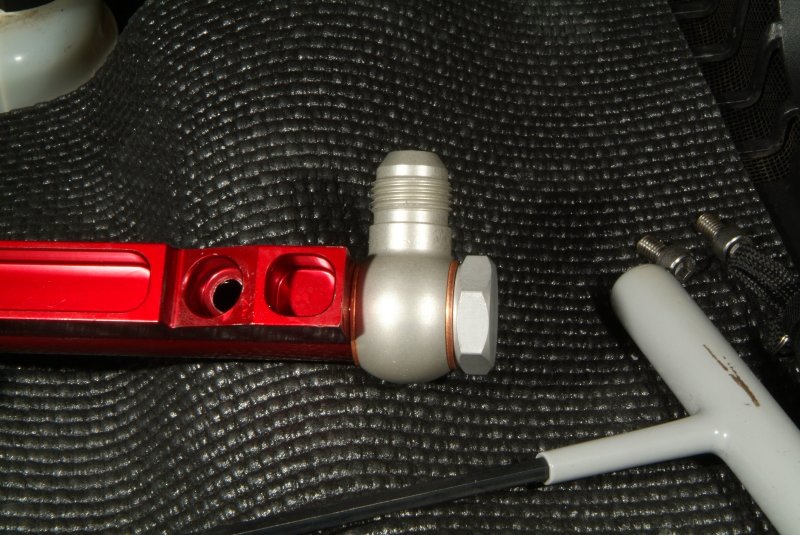
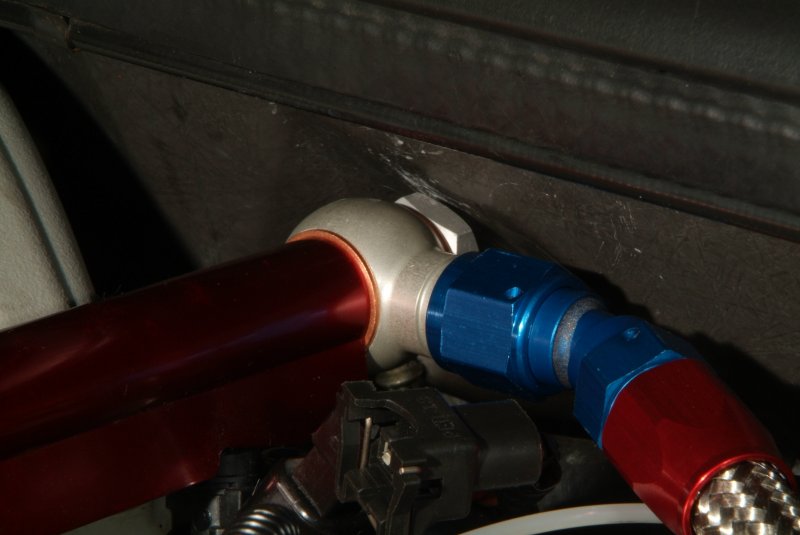
That banjo fitting seals with copper crush washers, so hopefully I tightened them down enough to seal them.
So if all goes well tomorrow and there are no fuel leaks, I'll run the car for a bit and double check for any leaks. If that also goes well, I'll be pulling off the fuel injectors to send off to have then inspected. It still worries me they were run without the fuel being filtered before getting to them. So I'd feel better if I knew they weren't choked with crud.
Then I'm back to figuring out how to drain the fuel tank on the driver's side to get that pump out so I can send it to Lonnie for his dual pump mod.
Now if I can just get the stubborn brake bleeder screw out, then things will be looking pretty rosy. Been spraying it with PB Blaster and tapping it with a hammer to remind it I'm thinking about it.... 
__________________
|
|
|
|
|
03-12-2012, 02:12 PM
|
#1417
|
|
Internet Sanitation Engineer
Join Date: Mar 2006
Location: Crawfordville, FL
Posts: 15,139
Name : Rich Zuchowski
|
Well, I did the "pre-smoke test" today. The actual "smoke test" would have been starting up the engine. Hooked up the laptop and then when the 2 second time out shut off the fuel pump, I switched the pump on via HPtuners. Then while fuel pressure built up slowly, I ran around and got under the car looking for any fuel leaks. And things were looking pretty darn good till pressure got over 50psi when fuel started jetting out of the banjo fitting between the copper crush washers and the fuel rail.
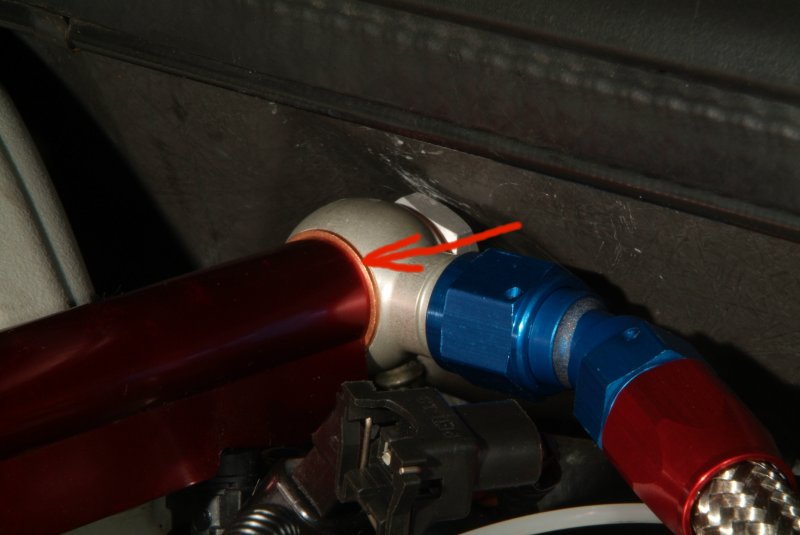
Rats.... I thought I cranked down on that banjo bolt pretty good, but I didn't want to run the risk of stripping out the threads in the end of that aluminum fuel rail. Ed Hutchings told me I could use aluminum washers to seal it but I wouldn't think aluminum would be any softer and seal better than the copper washers. But he's the expert, so I'll give that a try. Darn shame I can't get back there with a wrench and just try another 1/8th turn on that banjo bolt. Maybe I need to get some -8AN rubber o-rings, just in case. Hopefully SummitRacing has both the o-rings and the aluminum washers. Whatever I use can't be TOO thick or I'll then run into clearance problems with the firewall.
Oh well, got to wait for the pressure to bleed off a bit and the leaked gasoline to evaporate and dissipate before I do anything else anyway. But at least I didn't try this late yesterday so I would have been laying away all night fretting about it.
Sure wish there was some sort of schrader valve I could put into that fuel line to bleed off the pressure when I need to for situations like this. I hate the idea of just loosening a fitting somewhere and having gasoline spraying at wild abandon till pressure dissipates. Now that the fuel line has that check valve back in place, pressure won't drop off rapidly like it used to.
__________________
|
|
|
|
|
03-12-2012, 02:53 PM
|
#1418
|
|
Sinister C4
Join Date: Jan 2007
Location: Largo, FL
Posts: 1,223
Name : Eric G
|
Still fantastic progress Rich! Ever thought about building a kit car? You'll have all the tools and skills needed after this build!
|
|
|
|
|
03-12-2012, 08:04 PM
|
#1419
|
|
Internet Sanitation Engineer
Join Date: Mar 2006
Location: Crawfordville, FL
Posts: 15,139
Name : Rich Zuchowski
|
Quote:
Originally Posted by shakedown067

Still fantastic progress Rich! Ever thought about building a kit car? You'll have all the tools and skills needed after this build!
|
Yeah, pretty much seems like I already AM working on a kit car...
__________________
|
|
|
|
|
03-12-2012, 08:06 PM
|
#1420
|
|
Internet Sanitation Engineer
Join Date: Mar 2006
Location: Crawfordville, FL
Posts: 15,139
Name : Rich Zuchowski
|
BTW, I found what I think I need for that banjo fitting.
http://www.summitracing.com/parts/RUS-683910/
__________________
|
|
|
|
|
Currently Active Users Viewing This Thread: 8 (0 members and 8 guests)
|
|
|
 Posting Rules
|
You may not post new threads
You may not post replies
You may not post attachments
You may not edit your posts
HTML code is Off
|
|
|
All times are GMT -4. The time now is 07:56 PM.
|


 Linear Mode

