• Got the Contributing Memberships stuff finally worked out and made up a thread as a sort of "How-To" to help people figure out how to participate. So if you need help figuring it out, here's the thread you need to take a look at -> http://www.corvetteflorida.com/forums/showthread.php?t=3581 Thank you, everyone! Rich Z.

427 engine (part 2) - RHS block

Rich, perhaps a threaded rod might be able to catch the nut. If you can catch it with a
threaded rod, you can wind it onto the nut, then put a nut on the top end to draw
it tight. Then cut the threaded rod off flush with the top of the nut. It might look
better than a long bolt with washers. :shrug01: That is........IF you can catch the nut
in the first place. Good luck with the trial and error, sure hope you don't have to
pull the manifold to get it. THAT would suck!
Andy Anderson :wavey:

Thanks Andy, but the intake is going to have to come off. I can't figure out why I couldn't get that nut to catch on the bolt again, but believe me I gave it everything I had trying. Looking at the pictures I can't see any way the nut could have moved, so I'm just at a loss about what is going on. Just going to have to be REAL careful removing that manifold to make sure that darn nut doesn't go squirrely on me and jump down an intake port into the head. You guys will be coming over to Wakulla County to try to catch me with a butterfly net as I go running off screaming into the forest.
 
Man, I've been going over this over and over again in my mind trying to figure out why I couldn't catch that nut on the bolt by just threading into it. The only thing I can figure is that when that nut dropped down the second time, it got itself cocked at an angle in that hex shaped hole. When I tried looking at it with the flexible inspection thingie and by eyeball, I could see a bright piece of metal only on the 5 o'clock position but not anywhere else. So I'm thinking that what I was seeing was just that one facet of the hex nut closest to the top and the rest of the nut was shadowed. I've looked at the install pics till I'm blue in the face and there shouldn't be ANY way that nut could slide out of that hole to the side, so this is the only thing that makes sense to me. Just dag gum frickin' bad luck that it would land that way...... That first attempt I made to thread the bolt was SO easy that the failed later attempts just knocked me for a loop.

Tomorrow I'm going to see if I can find something to try to hook into that nut and lift it upwards to try to free it so it will fall down straight and flat in that hole. Then I'll be able to get a bolt attached to it. But honestly, I'll probably be pulling the intake anyway, just would feel better if I knew that nut was secured out of harm's way.
 
A trick I use to catch somthing like that nut is to take a long thin metal rod or screw driver and put a strong earth magnet on it. That willl make the rod magnetic and usually it is strong enough to pick up the nut or bolt or whatever. I have used the magnet on my parts dishes or I have some welders holding magnets. You may even be able to magnetise the rod I have done that with screwdrivers to hold small screws so I could reach into tight places to start them. You might also be able to use a small piece of wire or dental pick to reach in the hole and snag the nut and lift it back up so you can capture it with the bolt. Another trick is to use a small wooded dowel and putting a dab of hot glue on the end and quickly reaching into the hole and let it rest on the flat of the nut until it fastens to it. Hope one of these tricks helps you to recapture that nut.
 
A trick I use to catch somthing like that nut is to take a long thin metal rod or screw driver and put a strong earth magnet on it. That willl make the rod magnetic and usually it is strong enough to pick up the nut or bolt or whatever. I have used the magnet on my parts dishes or I have some welders holding magnets. You may even be able to magnetise the rod I have done that with screwdrivers to hold small screws so I could reach into tight places to start them. You might also be able to use a small piece of wire or dental pick to reach in the hole and snag the nut and lift it back up so you can capture it with the bolt. Another trick is to use a small wooded dowel and putting a dab of hot glue on the end and quickly reaching into the hole and let it rest on the flat of the nut until it fastens to it. Hope one of these tricks helps you to recapture that nut.
Magnetizing the screwdriver (or rod) might do the trick seeing as to how the heads and
manifold are aluminum. Then when you are done, jam the screwdriver into the dirt
3 or 4 times to get rid of the magnetism. just push it all the way into the dirt!

Andy :wavey:
 
One other thought.......before you pull the manifold, pull the valve cover on the "problem side",
and completely unload the valve springs for the cylinders around the problem area.
That way, the valves will be closed, and if the nut DOES go down one of the intake/exhaust
ports, it WON'T go into the cylinder. After the problem is put to bed, readjust the valves.
Might be a little more work but at least you shouldnt have to pull the head on that side,,,,,,,,,
Just a thought
Andy :wavey:
 
I tried using a sharply hooked dental pick to see if I could lift that nut and get it unwedged, but no go. Wouldn't budge a bit. Even bent the hook on the dental pick so it's jammed in there pretty good. Guess that is kind of the bad news/good news sort of thing. Bad news because I won't be able to straighten it out to get it threaded on a bolt, but good news in that it likely will stay put there when I lift the intake manifold off.

Started pulling the fuel rails off getting ready for this chore.

Yeah, I know I COULD pull off the valve cover and do a number of things to try to make sure the valves are closed near that area, but screw it. Murphy's Law is going to call the shot on this one. If that nut DOES drop out and DOES drop into an intake port and the valve IS open and it DOES drop into the cylinder, I will just have to take that as the final omen about this entire project and call it quits. I guess I have just been bucking and fighting fate all along with this and just too damned stupid to take the hints. So it's all in Murphy's hands now. I will NOT ignore this omen.

So if later today you see a 2002 blue Z06 being parted out in the classifieds here, you'll know why.
 
Well, Murphy must have taken the day off, as it went pretty well today. Honestly I was really sweating it, though. I felt behind the intake and it felt like you couldn't slide a piece of paper between the top of the manifold and the firewall. I was worried to death that it was jammed in there such that once I loosened up those bolts holding the manifold to the heads that the darn thing would push forward a half inch and then be a real bugger to get back on there. So I was envisioning having to drop the engine cradle to get it back on. And having first to take off the STS plumbing that runs under the cradle first. Which would have been a REAL headache. But surprisingly, that was not the case at all. Matter of fact, when Connie and I placed the manifold back in place, there was about a quarter inch of wiggle room left as we pushed the manifold a bit too far back to get the mounting bolts in place. So I feel a WHOLE lot better about ever having to do that again. At least now I know it CAN be done without a whole lot of headache involved.

But I'm getting ahead of myself.

Connie was a real trooper and helped me with this. I think she was scared to death of letting me down and causing that nut to drop more than anything else. But I pulled the bolts out of the manifold holding it to the heads, and was surprised that the ones in the far back didn't have to have anything special done to them to extract them. I've read accounts where people had to tie those bolts up because they wouldn't clear the firewall and needed to be lifted up so the bolts wouldn't drag across the heads and catch in the head intake ports. But that wasn't the case in my situation at all. They came right out with no fuss. Anyway, when the intake was free, Connie took over and lifted the manifold enough so that I could slide a thin piece of cardboard between the manifold and the head to seal off those head intake ports in case that nut was rattling around there somewhere. I think she was very surprised at how light that intake manifold was. She expected it to be much heavier, and it caught her a bit off balance. Once that was done, we switched places and she held down the cardboard while I continued lifted and pulling the intake out so I could get behind it to the vacuum fittings back there. I disconnected the brake booster hose at the "T" I recently put in, so that was able to slide around and come out with the manifold, rather than trying to mess with that clamp at the back of the manifold. There was also a small hose fitting on a 90 degree elbow, and another small rigid vacuum hose that I believe runs back to the wastegates. It was a tight fit getting my hands back there, but I was able to disconnect them enough to pull the manifold completely out.

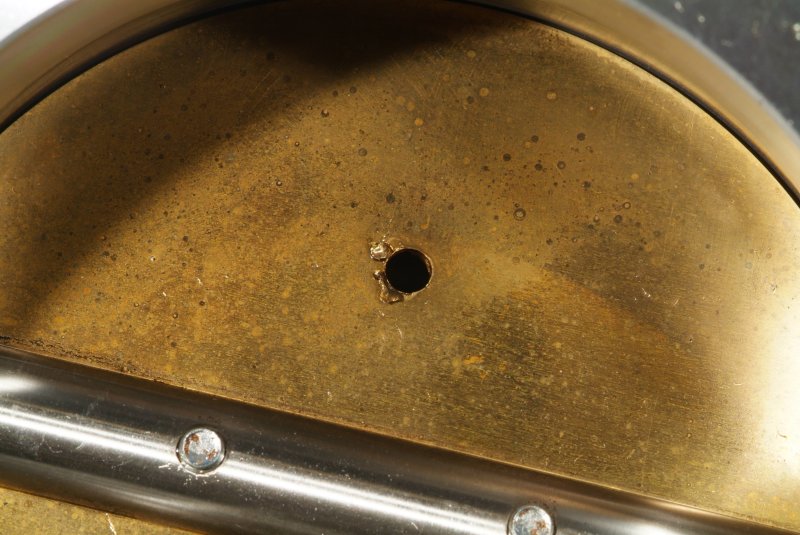
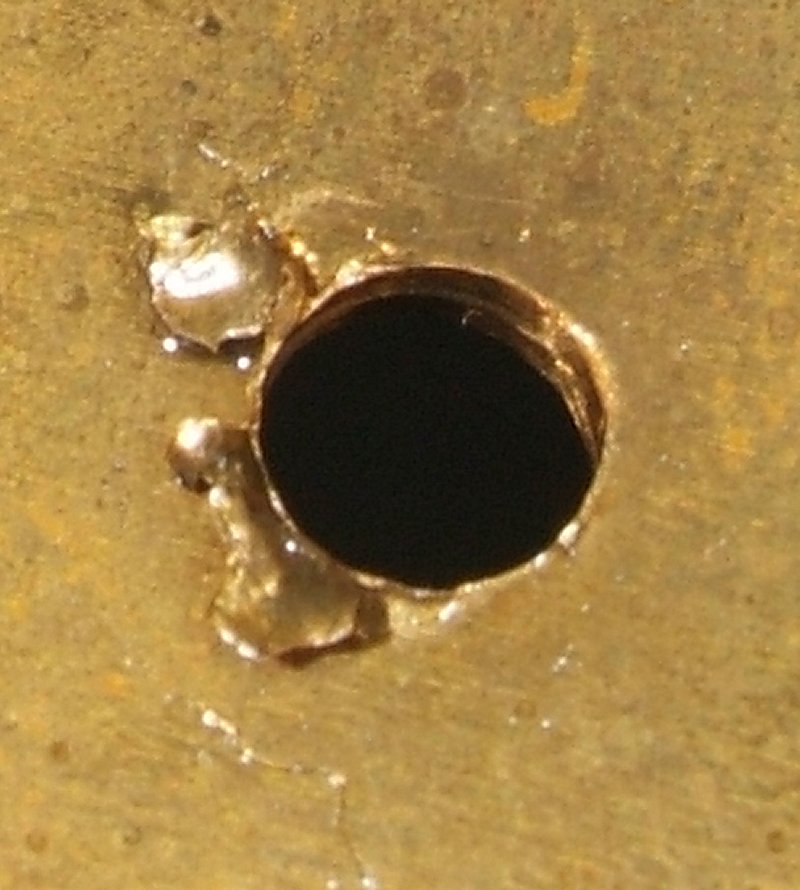
Well, that nut was jammed in there but good. You can see below how HARD I tried to get a bolt to thread into that SOB, as it got buggered up but good.

fast_nut_01.jpg


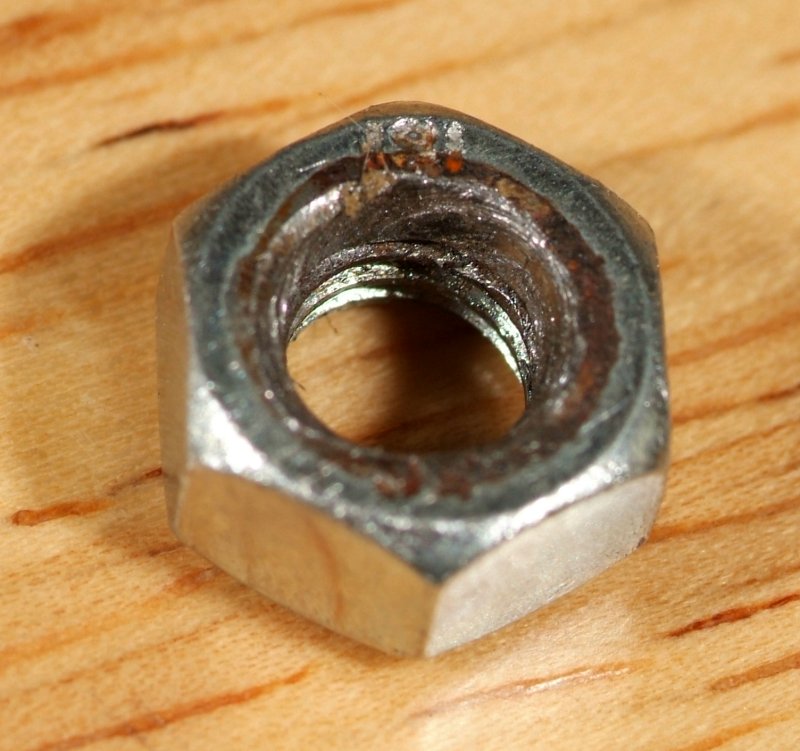
Interesting to note that the nut WAS laying flush against the head in the manifold but that didn't help a darn bit trying to get a bolt to thread into it. The surface of the head, and consequently that nut, is not perpendicular to the hole the bolt needs to run through to thread onto that nut. So it appears to me that it actually was a miracle that I was able to thread that bolt onto it the first time I tried, and not really a case of the nut becoming cocked vertically in the hole. The angle was such that it would have been pretty darn tough to get a bolt to thread into that nut once it drops off at all. Actually, it wasn't all that easy to get a new nut to drop down into that hole from the bottom to screw the bolt into it WITHOUT it getting cocked. I had to put a punch into the hole on the nut to guide it in straight to the bottom of the mounting hole so the bolt would thread into it. So, yeah, if this happens to you, in my opinion, you might as well just pull off the manifold, as there is nothing else you can realistically do about it. Personally, this is a piss poor design, in my opinion. Not that you can rubber baby bumper the world, but if F.A.S.T. could have used brass inserts or even studs protruding up to mount the manifold on, and it would have gone a LONG way to idiot proofing that design. For a $1,000 plastic manifold, I guess I would expect a little more thought put into the design, if you ask me. Taking off a fuel rail on one of these manifolds is just downright scary with just that little slip of attention or concentration being enough to putting you in a position like I just put myself into. Trust me, it's EASY to do. From many angles, those washers on the bolts you SHOULDN'T touch look just like the tabs of the mounts that hold the fuel rails down. More than once over the last 24 hours or so I was fervently wishing I had gone with a stock LS7 intake instead of this F.A.S.T. model.

Speaking of those headache causing bolts above, I found a place that sells chrome insert caps that plug right into those cap head bolts on the manifold. So I ordered a batch of them, and will cap those bitches off so this doesn't happen again to me. I was going to paint those bolt heads RED, but this will suffice, I think. It will not be easy at all then to mistakenly put an allen wrench into them without removing those caps.

So, all in all this went a lot better than I thought it would, and I didn't get slapped around by Mr. Murphy. But I did discover some things that were, well, not exactly what I would call "kosher", in my opinion, along the way. First off, two of the ten bolts holding the manifold to the heads were 1/2 inch shorter than the other eight. I dropped one into one of the mounting holes and it just barely caught a few threads in the head when I tightened it down. Darn miracle they didn't strip the aluminum threading out of those holes. I don't know if this is the way Harwood installed the manifold, or something got screwed up when the engine was taken apart while at Aaron's shop. But regardless, those shorter bolts certainly should NOT have been put back in there, in my opinion. The fact that there was one on each side of the manifold leads me to the opinion that someone likely noticed they were shorter and just decided to run with them anyway.

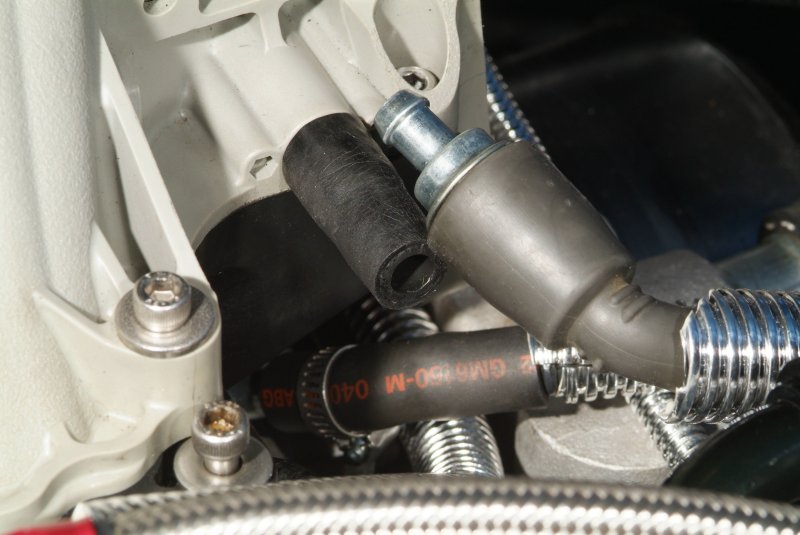
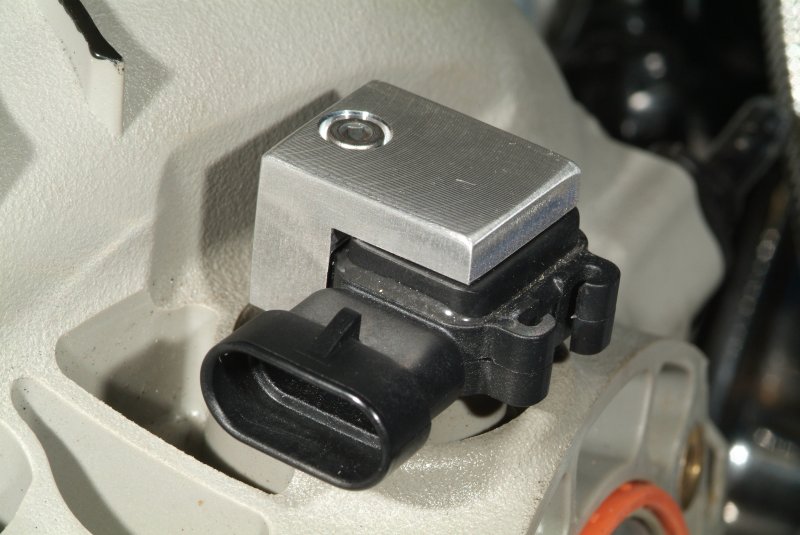
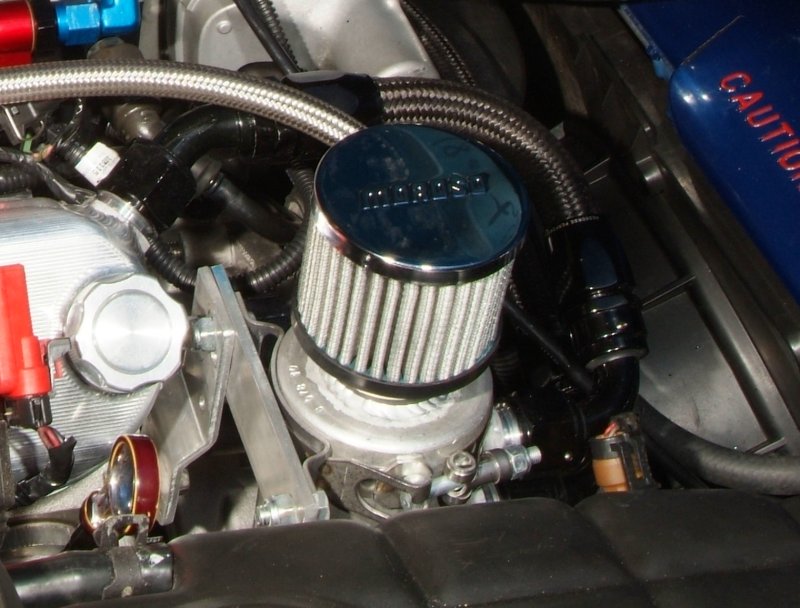
When I was removing everything that could possibly get in the way of removing the intake manifold, I grabbed the other end of that PCV hose attached to the nipple on the plate underneath the front of the manifold near the throttle body. Just as was the case with the other end of that hose that attached to the intake, the hose came off distressingly easy. I mean it was as easy as pulling the cap off of a pen. I put a hose clamp on that end of it, and then snapped a pic to show what I am talking about.

pcv_01.jpg


Again, that hose clamp was NOT there before I put the hose back on that nipple.

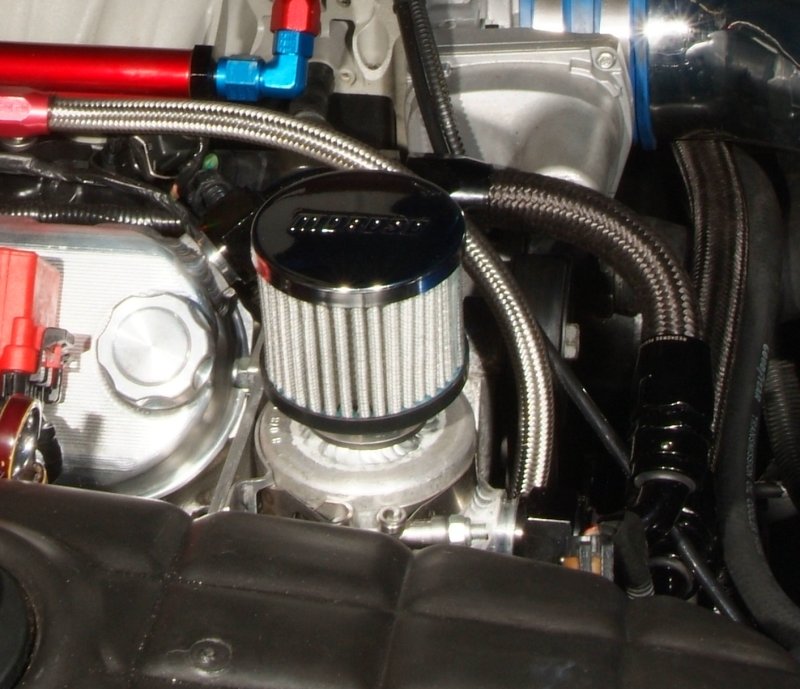
I'm going to put two clamps on that hose attaching the PCV itself to the intake manifold, one on either end of that rubber hose shown attached to the nipple on the manifold. Maybe I just don't understand things, but it seems to me that there would be no way in hell that that hose at either end would have stayed in place when that engine was under boost. So the question that pops into my mind is how in the world did Aaron run this car on the dyno under boost, and/or take it out on test drives under boost without it popping off and there then being a substantial air leak from that loose hose? Maybe I just don't understand how boost works in these manifolds, but pressure is pressure, isn't it?

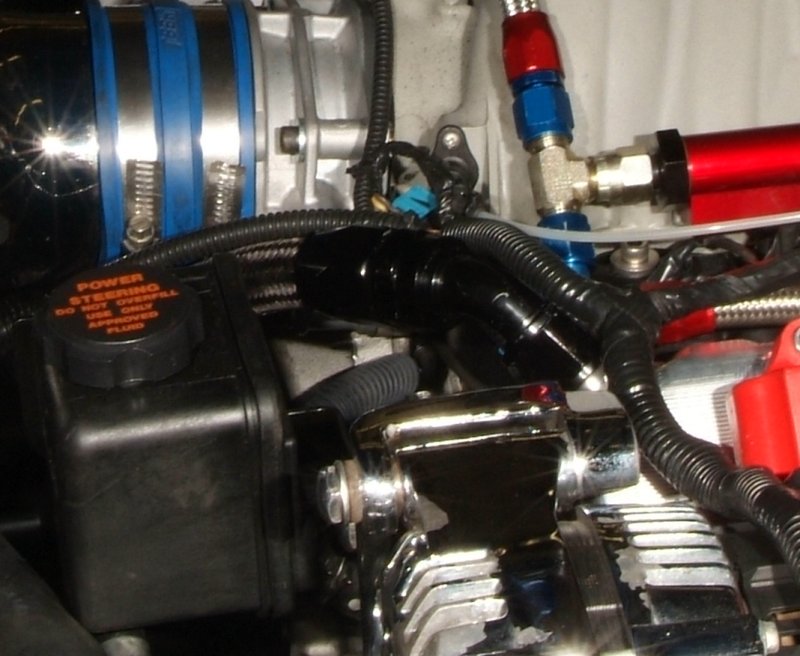
Also, there is a small vacuum line behind the manifold that attaches to the nipple indicated by the red arrow in the below pic.

fast_vac_01.jpg


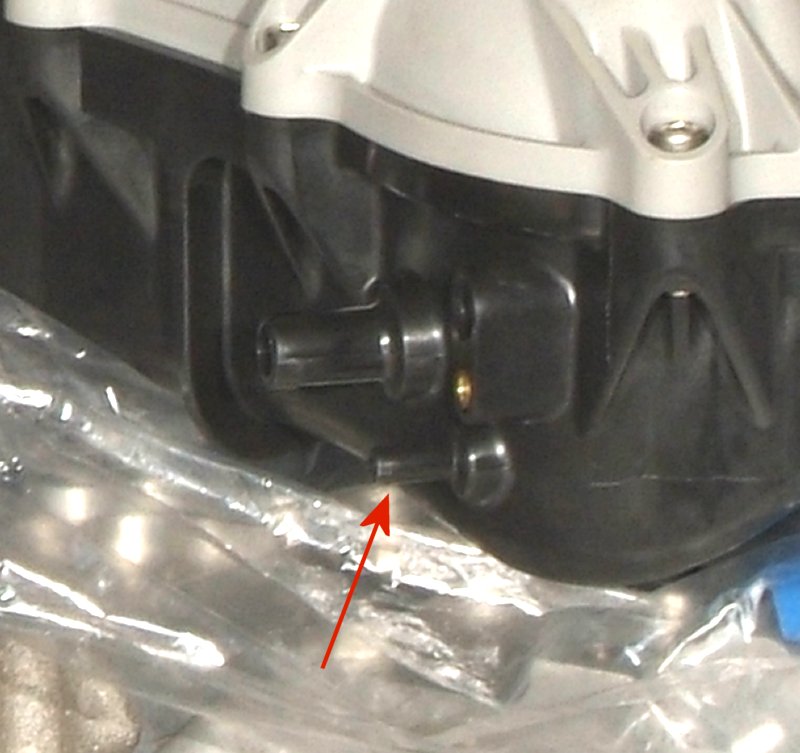
This is where that 90 degree elbow I mentioned above just slips onto that nipple, and although it didn't come off or go on especially easy, I'm wondering if it too might come off when boost puts about 10 psi of pressure into that intake manifold. So I'm thinking I really need to put a wire wrap onto that guy to make sure this doesn't happen the first time I put the engine into boost, and then HAVE to pull that intake manifold off again to fix it. I just have the intake laying on the heads right now with 8 of the bolts just lightly threaded in, so it's no big deal to take them out and move the intake forward enough to put that wire wrap on that hose. The reason I only have 8 bolts in place is because I ordered additional 80 mm bolts to replace those two undersized bolts I found installed there. No, I am NOT reusing those short bolts again! I'm not in THAT much of a hurry to get this thing back together again to do something that is just wrong, in my opinion. So obviously the engine is going to stay like it is till I get those needed bolts in.

Anyway, so that was today's saga. I definitely am in a better mood today than I was in yesterday, but honestly finding that loose PCV hose really has me questioning about how Aaron was able to run this can under boost conditions. He told me that the reason he put those huge black fittings in the valve covers going to a catch can with a filter on top was because crankcase pressure was such that under boost it was needed to keep oil from blowing out of the rear main crank seal. So if there is boost in the intake manifold and pressure in the crankcase, how in the world would that PCV hose EVER have remained attached without blowing off? What am I missing here?

And no, I'm not real happy about finding those short bolts holding the intake to the heads, neither. But this has been pretty much par for the course with nearly everything I've taken a look at on this car since bringing it home, now hasn't it?
 
I sent the throttle body core back to Jantzer Performance last week to get a refund for that core charge I paid, and I was concerned that the hole Aaron drilled in the throttle plate might be an issue with me recovering that money.

tb_blade_hole_01.jpg


tb_blade_hole_02.jpg


And yeah, apparently it is...

The problem is the drilled blade. I'm trying to find a replacement. I thought I had one somewhere. Otherwise, I can't use it as a core for a customer, the car won't run right.

Scott

- jantzerperformance

:banghead:
 
BTW, here's a closeup of that hole Aaron drilled into the throttle body blade.

tb_hole_01.jpg


It appears, in my opinion, that he didn't even bother taking the throttle body off of the intake to drill that hole, with no apparent concern for metal particles that may fall off of the back while drilled and into my intake manifold to be likely ingested by the engine. As can be seen from this photograph, there are still metal burrs left on the backside of that plate, which had the throttle body been removed for the drilling, would have most likely been removed prior to putting the throttle body back into place on the manifold.
 
While waiting on those longer intake manifold bolts, I just puttered around with some minor stuff on the car today. The painted radiator upper support was cracked, so I JB Welded it at the crack to see if that will hold up.

The M4 cap headed bolts I ordered came in so I pulled off the MAP bracket I had machined, and put it under the milling machine and countersunk the hole on top so that bolt would fit flush with the top surface.

map_bracket_05.jpg


I shouldn't need to mess with that any longer.

While the throttle body was off of the intake manifold (again!) I rechecked the flatness of that mounting surface again, since the throttle body wasn't fitting as flush as I liked against the intake. I bought a flat edge last time I was out at Home Depot and was able to better check the flatness of the surface. Three of the four threaded brass inserts was sticking ever so slightly above the plastic, so I filed them down completely flush. Also put in the new throttle body gasket that had come in a few days ago. I know they say you can reuse those rubber gaskets, but I can see that the new one sticks out noticeably further than the old one did. So just as well I got a new one and changed it out.

On CorvetteForum one of the guys there suggested that I try to find some specialty plastic ties that are made to give a better seal on round surfaces. Supposedly Evinrude dealers carry them, so I looked up a local dealer in Tallahassee and Connie and I ran out there to see if I could pick up a few. Well, the address where the place was supposed to be located is now an abandoned building. Should have known better, as finding stuff locally I need is usually a worthless effort. Unfortunately the only place I could find them even online is located in Washington state, so I had to second day air them in so I would have them no later than Friday. I want to get the engine back together by the weekend. That little nut snafu set me back a week and I'm getting antsy to get started on the tuning. I think Ed is out of town this week anyway, so I guess it worked out. Assuming nothing else pops up, of course.....

Oh, here's what those wire wrap ties look like that I mentioned above.
 

Attachments

  • fuel_line_tie_01.jpg
    fuel_line_tie_01.jpg
    72 KB · Views: 76
Today I cut out 6.5 ft. out of that Racetronix wiring harness for the fuel pumps, as I had the excess just tucked up around the fuel filter, and looked like a rat's nest up there. So I pulled it down, cut out the excess, soldered and heat shrink covered the joints, double wrapped it all with convoluted tubing to protect it, and wire tied it all in place. Looks a LOT better now. Plus no chance that excess harness could somehow come undone and wind up wrapped around the driver's side half shaft or something else embarrassing.

I'm thinking I should make up another MAP sensor bracket for the back of the intake manifold where the stock one is located. But a simpler more utilitarian version, as this will be non visible. Something like a straight sided "Z". Bottom horizontal leg where the bolt screws in, and the top horizontal leg holding down on the top of the sensor to keep in in place. The vertical section just needs to go between the "mickey mouse ears" on the side. The stock one is just held in there with a single screw and washer, and I'm thinking I should try to do a preemptive strike on anything that COULD possibly go wrong while the time and opportunity is right to do it.
 
The other day when Connie and I pulled the intake manifold off of the engine, I noted that there was quite a bit of oil around the intake ports of the heads and apparently in the runners of the manifold itself. Come to think of it, there was a substantial amount of oil at the entranceway into the intake manifold when I took off the throttle body to replace it with the LS2 model, even some oil on the throttle body plate itself. I didn't think too much about it at the time, as I recalled that Aaron had had three instances that I could recall while he had the car that had caused oil to be ingested into the air intake system because of a problem with the STS scavenge pump. The first time he claimed there was a wire pinched in the bell housing, the second time because when he put braided SS lines on the oil lines he used too small of a diameter return hose, and the third time when he forgot to hook the power back up to the scavenge pump after doing something else. So I just figured the oil in the intake came from one or more of those three incidents.

But I dunno, seemed to be a LOT of oil, and when I saw the oil literally dripping out of the intake at the head ports, well, it just stuck in the back of my mind as something I needed to think about.

Well, I wasn't too sure about what Aaron had done with the PCV system, as Harwood had installed a catch can and for some reason Aaron removed that and put in something else that also looks like a catch can, but has a filtered breather sitting on top of it.

pcv_breather_01.jpg


pcv_breather_02.jpg


pcv_breather_03.jpg


This thing has a large hose running to it from the front of both valve covers. There is supposed to be a drain at the bottom, but there is no way to get to it while it is mounted , apparently. If I recall correctly, Aaron's suggestion was for me to pull off that filter and try to siphon out the oil that way.

Anyway, I noted that the oil was rather dark colored, so based on how dark the oil was when I changed it, it is a pretty safe bet that this oil in the intake all happened before I brought the car back home. I'm using Brad Penn Oil when I changed the oil myself, which is green colored, so what I am seeing is definitely NOT green colored.

So, with some questions in my mind about the PCV system in general, I found a thread that appeared to delve into this topic at length, and started looking into it last night. Might be worthwhile reading for anyone else interested in this topic. -> http://ls1tech.com/forums/generation-iii-external-engine/1054089-my-catch-can-routing-ok.html

So, with all that in mind, today (Thursday) I decided to take a look at putting that oil catch can that Aaron removed back into the car. Now this wasn't a small object to have to find a spot for...

dualcatchcan01.jpg


Just the cans themselves are something like 8 inches tall and around 3 inches in diameter EACH. Heck, I had a tough time trying to find a place for that vacuum manifold block a little while back that was not nearly as big as this dual catch can. The only place that even came close was inside the driver side fender at the front up where that EGR pump used to be that I removed. But it was only close, not a fit. The only way that looked even possible to do was to have a single catch can and mount it on the EGR pump bracket. And even then, it had to be on an angle, not straight up and down. So I hated to do it, but I took that dual catch can into the work room, and separated the two by sawing through the welds. Working with a single can makes it much easier, but still, I only have the can sitting there as I really need to check to make certain that the headlight on that side doesn't hit the hoses nor the can when it opens. The can clears the headlight OK in the closed position, but I have no idea if the back section drops down much when the headlight is opened. So I need to check that out when I've got the battery hooked back up. I think there is supposed to be some sort of manual method to open up the headlight, but darn if I know what it might be.

Anyway, today the (correct) longer bolts for the intake manifold came in, as did those caps I wanted for the danged bolts that hold the upper and lower pieces of the intake together. I'm going to cap those darn things so there will be NO chance I will have another incident of my loosening those wrong bolts again accidentally.

I'm still waiting on the power brake booster vacuum cable to come in, and I guess it's fortunate I had ordered one. I really ordered it just so I could put that formed end back on that goes to the check valve, but when poking around in back of the intake manifold, I noticed a curious thing about the other end of that hose...

brake_booster_hose_01.jpg


Hmm, does that look like a smaller hose shoved into a larger hose back there? I guess I need to replace the entire hose and just put the "T" for the vacuum manifold block into that new hose.... Hopefully it will be in on Friday and I can start putting this all back together again.

When I was telling Connie about what I felt I needed to do with the catch can stuff, she got kind of a sad look on her face and said "You are never going to be done working on that car, are you?" :( Sure does seem that way......
 
Wow, those are some large cans for the room you have (or don't have). No sense in trying to rush things now. Keep going over the small details, and you'll KNOW your car is good when you get behind the wheel and MASH that go pedal. I can't even imagine how much you must want this project to just be over with, but it's going to be a show stopper when YOU are done with it. You'll be able to say it was BUILT by CorvetteFlorida.com! I think that'll be pretty darn cool! :thumbsup:
 
Rich, after you're done with this project, there M-I-G-H-T be a second career as
a Vette Mech/mod installer on your horizon :D
Andy :wavey:
 
Rich, after you're done with this project, there M-I-G-H-T be a second career as
a Vette Mech/mod installer on your horizon :D
Andy :wavey:

No man, not a chance. I'm only doing this kind of stuff because I HAVE to now. Becoming a tech/mechanic is just not my idea of how to spend retirement.

But thanks for the compliments.
 
Hi Rich,
At the back of the pop up lights is a small motor. It has an adjustment screw to raise the lights manually. Hope this helps you.
 
Back
Top