• Got the Contributing Memberships stuff finally worked out and made up a thread as a sort of "How-To" to help people figure out how to participate. So if you need help figuring it out, here's the thread you need to take a look at -> http://www.corvetteflorida.com/forums/showthread.php?t=3581 Thank you, everyone! Rich Z.

427 engine (part 2) - RHS block

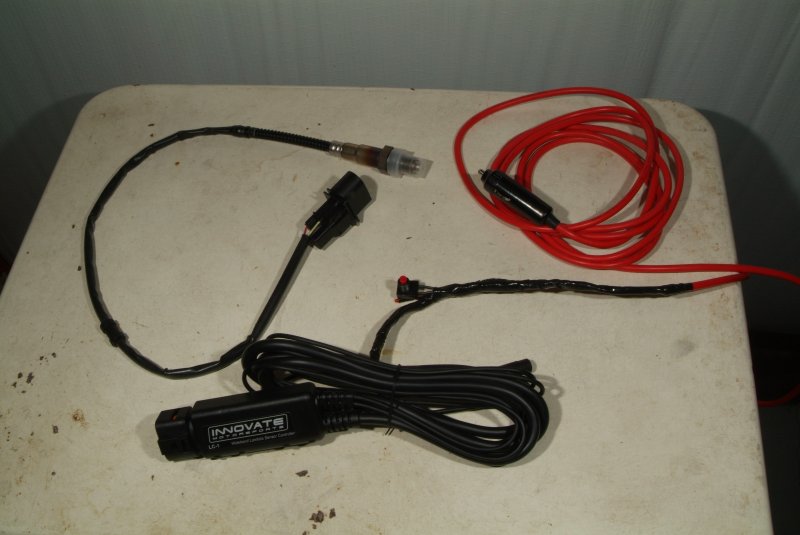
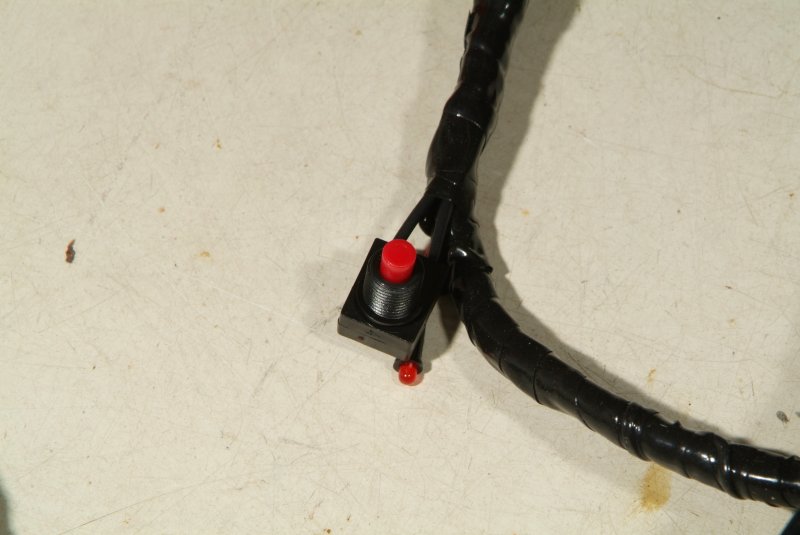
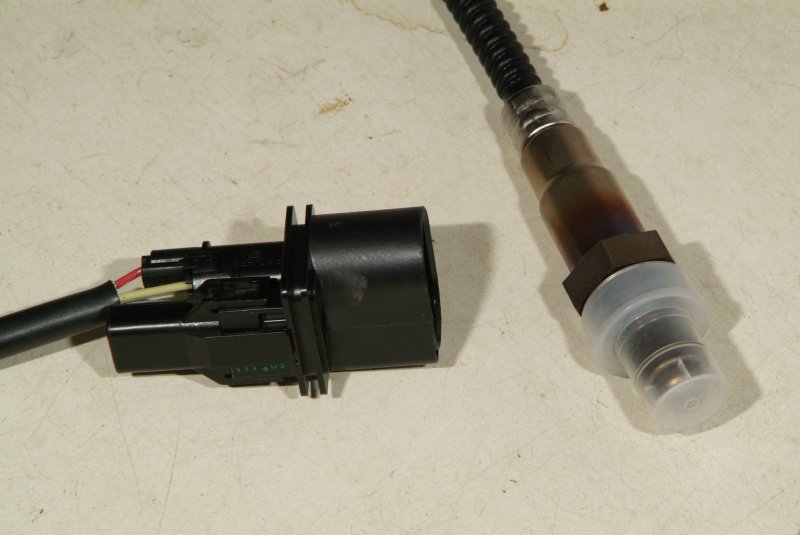
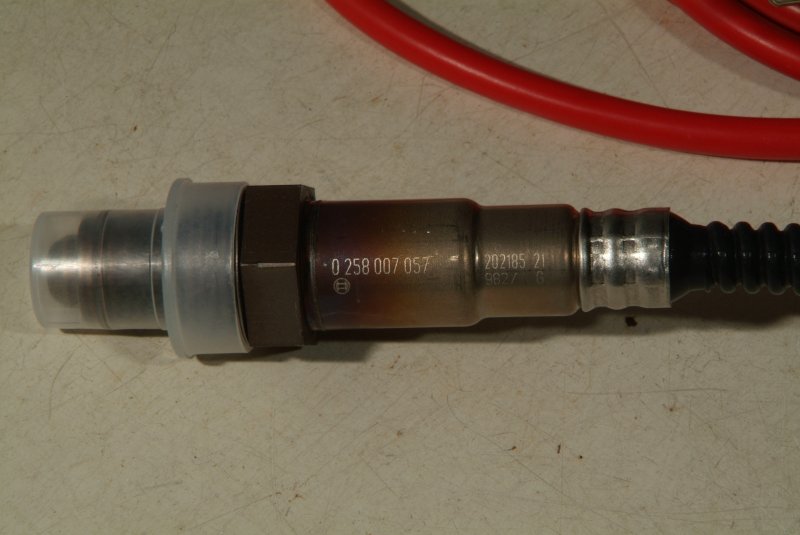
Yesterday I put together the wiring for the LC-1 wideband controller. Soldered a power plug to go into the cigarette lighter socket and attached the calibration button and LED. Then I went through the calibration procedures for the controller and the sensor. Everything went OK, so apparently I soldered the wires together correctly. I found a guy selling a single cable that runs from the LC-1 to the EFILive FlashScan V2 module. With the stock parts it would take two cables and a null modem adapter plugged between them, and that's just too many connections for my tastes. A single cable just makes a whole lot more sense to me. But it's not here yet so I may hold off mounting the wideband sensor into the exhaust until it shows up.

Got the stuff in from SummitRacing to replace the long runs of fuel lines going from the engine compartment to the fuel pump area. Minus one fitting that is on backorder until the end of the month, however. So I'm not pulling anything apart till I have everything I need in my hands.

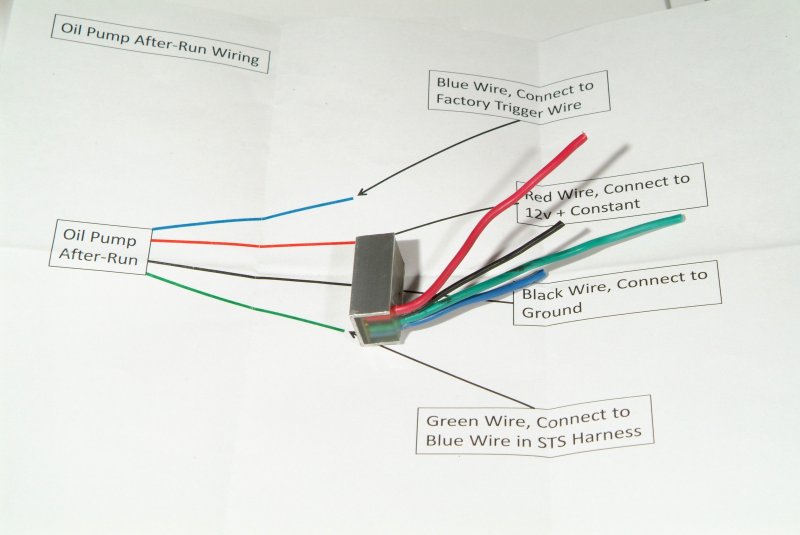
And today I got a package from STS which I presume has the turbo timer inside.

Still spending a lot of time over on the EFILive forum and reading over their tutorials. I need to figure out an make up some sort of glossary of acronyms they all use there. I already know some of them, but man it really slows down the comprehension of what they are talking about when you don't know what that acronym they are referring to means.

Mike Carnahan sent me a new tune, but I haven't flashed it into the PCM yet. I've been using his tune to look at to apply these practical examples to what the EFILive tutorials and threads are talking about. To be honest, there are some things in the tune that I just don't understand yet. But I'm still chipping away at it.

Not sure if I'm just not feeling all that ambitious because of the holiday season or if I'm being smart and just waiting till EVERYTHING shows up and I can dive in and get it all done at one swell foop. Yeah, I'm being smart. THAT's the ticket........... :hehehe: Now, where are those Christmas cookies?
 
I pulled the turbo timer (they also call this an "after-run timer) out of the envelope it came in from STS, and it's a lot smaller than I thought it would be. Not a whole lot of length on the wires, but beggars can't be choosers. Maybe I better look around in that battery compartment again to see if mine is still tucked up underneath some wires or something and I just overlooked it thinking it was something larger and more obvious.

turbo_timer_01.jpg


I think the reason I was expecting something larger is because I was envisioning putting this timer AFTER the relay and having it carry the current needed to the oil scavenge pump. Higher current would mean a larger unit. But after reading over the wiring instructions, obviously STS used a much better method. This timer simply provides an extended runtime via the trigger wire from the fuel pump line that activates the relay. So it doesn't have to carry much current at all. Which makes a whole lot more sense then the way I was looking at it. Duh....

I'm just double checking with STS to make sure that this is the correct way to hook it up, as the color coding in their instructions for those wires no longer applies to my system. Since this part is not something I can easily find again, I sure as heck don't want to burn it up if I hook it up wrong.

I'll have to pull the relay out to wire this timer up to it, and I guess I had better solder those leads onto the relay lugs. I only used slip on connectors originally, but I think soldering would be much better and more permanent. If one were to vibrate off, then the scavenge pump would stop working and those turbos will be spitting out oil through the exhaust and intake pipes until the oil pan goes dry. :ack2:
 
I took some pics of the Innovate LC-1 wideband controller along with the sensor. I should have made better use of heat shrink tubing, but I used silicone wrap tape instead, which will work OK. I'm not trying to win any prizes with my wiring skills. :)

It's a tool, seems to work, so that is all that matters. The button works, the LED works, and the sensor heats up. That's all the soldering I did needed to accomplish. And the wrap keeps loose wires from getting snagged on something.

lc1_wideband_01.jpg


lc1_wideband_02.jpg


lc1_wideband_03.jpg


lc1_wideband_04.jpg


lc1_wideband_05.jpg


I guess the cable I'm waiting on from the LC-1 to the FlashScan V2 will get here this upcoming week sometime.
 
I pulled out the battery today and wired up the after-run timer I got from STS to the scavenge pump relay. I had to basically retrace those wires, since the color coding now had nothing at all to do with what was in the original wiring harness from STS.

I soldered all the splice connections I made and also soldered all the slip on connectors I originally had on the relay lugs. Wouldn't want any of those connectors to loosen up and vibrate off over time.

timer_relay_01.jpg


Then put shrink wrap on all the connections to insulate them.

timer_relay_02.jpg


Finally, mounted the relay back on the stud it was originally located on, and put the timer into it's own clamp on the firewall to hold it securely.

timer_relay_03.jpg


Done.

Haven't hooked the battery up yet to test it, since I've got something else I want to do while power is disconnected. So I just put the batter back into the battery compartment but left all the cables disconnected.

So I'll have to do the smoke test another day.

Oh yeah. I looked HARD while in the battery compartment, and my original timer is nowhere to be found. So apparently it just walked away either in Blountstown or Thomasville.
 
I can't win......

So I ordered a special interface cable mentioned in a thread on the EFILive forum to hook up the Innovate LC-1 wideband controller directly to the FastScan V2. Just showed up today, so I wanted to hook this all up so I could do some data logging of the air/fuel ratio to see what I have. Only problem is that the end that plugs into the female serial OUT jack is just a tad TOO big to fit. The plug on the stock LC-1 harness measures 6.9mm, and the one I got on this TAQcables (http://taquickness.com/taqcables.htm) custom cable measures 8.1 mm.

lc1_connector_01.jpg


You can see the obvious difference in diameter.

Here's the jack it needs to fit into. The female jack accepts the male end, and that plastic collar extending from the jack grips the plastic on the plug end to hold it tight in place.

lc1_connector_02.jpg


That is not a soft rubber collar around that jack. I tried forcing it, but both ends are rather flat against each other, and I'm afraid of splitting that collar by doing a "damn the torpedoes" assault.

Here's how it looks with the terminator in the IN jack on the harness showing how it fits. Even with the correct diameter it was a pretty darn tight fit.

lc1_connector_03.jpg


Am I being too picky thinking that this should just be RIGHT for the application? Or is this another case of a part having "minor fitment" issues, some machining required? :banghead:
 
I contacted the seller. Of course I am the only one in the universe who has noted this issue and contacted him about it........ :rolleyes:

Does no one on this planet give a crap about attention to detail and quality of their workmanship?
 
BTW, I smoke tested that wiring I did yesterday installing that timer, and everything seemed OK. The oil scavenge pump now runs for about 10 seconds after the engine is shut down, so that will help to clear the oil out of the return lines.
 
take a knife and cut what is extended over the socket off. that's the only easy way to make it work.

Yeah, that is certainly one option if I want to damage the LC-1 cable. But I'm tempted to take a file to the male plug end instead and try to remove enough plastic around the front circumference to make it fit. Plus I would rather damage a $20 cable than that LC-1 interface cable. Who knows? I may want to sell it one day, and it would be better to have it "good as new", I think.

Or I could try to find a stereo plug with a smaller body and just cut off that old one and splice a new one that works in place. It's not like I'm rusty on my wiring and soldering skills lately...... :rolleyes:

The seller has offered to take it back and refund my money, so that is certainly one option. But yeah, apparently I am the only person in the world to notice that his plug just doesn't fit that LC-1 connector.

I dunno, maybe this has all just driven me nuts. None of the details concerning quality of workmanship seems to matter to most other people, it seems. At least as far as this car stuff is concerned. Maybe I just expect too much. :shrug01:
 
I took a file and some sand paper to that male plug end mentioned earlier and got it to fit the female connection properly. So with that out of the way, I pulled one of the rear O2 sensor hole plugs out of the exhaust and installed the wideband sensor in it's place. Got everything hooked up, and amazingly enough it didn't take much trouble at all to get EFILive detecting that serial wideband signal. This is a whole lot better (I think) then using an analog signal where you have to apply a scaling factor to convert the analog signal to digital. In that case, you basically have to tell the program what digital AFR value to place on the analog input coming in from the sensor. The serial interface bypasses that complication.

Anyway, with the wideband hooked up, I too the car out yesterday and did some data logging to see what the AFR looked like. And it actually looked pretty darn good, in my limited knowledge of this tuning stuff. I could compare the commanded AFR (14.63) with the actual AFR and for the most part it was pretty darn close. I actually put the car into boost a little bit, and I can see where that likely needs some fine tuning, because it looks like the AFR just goes rich (11.70) no matter what the other parameters are, instead of being scaled for RPM and MAP values.

It also looks like my O2 sensors are actually working, which surprised me as I thought the harness on the passenger side had been butchered on the PCM side of the connectors. But I can see them toggling from high to low like they are supposed to when in CLOSED LOOP.

I did notice some fluctuations in the timing and fuel that didn't look right, but then I noticed that something is wrong with my IAT (incoming air temperature) signal. It was averaging 72 degrees or so, but would intermittently climb gradually to an unrealistic number, or suddenly just pin the needle at 284 degrees, and then just as suddenly drop down to 72 degrees. It never went BELOW the normal temperature. So it appears that I've got a problem either with the IAT sensor or the wiring harness.

When I got back home, I pulled off the connector on the MAF housing (for those of you who don't know, the MAF housing not only houses the MAF sensor, but also has the IAT sensor incorporated into it as well) and sprayed the male and female connector pins with electronic contact cleaner and then reseated it a couple of times to clean the contacts with friction. I looked at the female connector plug itself, and all the wires were nice and snug in the pins and did not pull out with a tug. I looked at the scan log and the MAF sensor readings itself seemed legit, so the problem seems to be solely with the IAT alone.

I have read that engine backfires can destroy an IAT sensor, so no telling what happened before I got the car back home. I don't know when exactly this IAT problem showed up, because it is pretty nearly impossible to tell you have a problem like this unless you actually monitor the signals via some sort of scanner. Evidently it's not at all unusual for one or more wires in the MAF/IAT connector to break eventually, so it's probably something everyone needs to keep in mind to check on with these C5s getting some age on them.

Anyway, this morning I hooked up EFILive again, and just turned on the ignition to put power to the sensors. The IAT was registering 72 degrees. Yeah, I know, I thought that was too much of a coincidence, too, but I broke out my IR temperature gun and sure enough, that was the temperature of the MAF housing. So that was an accurate reading. Anyway, while power was applied, I tugged, pushed, pulled, and shook the wiring harness going to the MAF/IAT and banged around on the MAF housing itself, and the reading didn't waver at all. Shook the car itself while it was off the ground on the lift. Nothing. Signal stayed rock solid. I guess when the weather clears up again I'll have to take the car out and monitor that signal to see if it goes crazy again. If it does, then I guess I need to try to diagnose the cause to fix it. I'm probably going to check around for a used or reman MAF just to use for diagnostics purposes. Start from that end and work my way back to the PCM looking for a problem with one of the wires. Should only be a ground and a single signal wire if I'm reading the description of the wiring harness correctly, so it shouldn't be too difficult to figure out.
 
I've been out of the loop--how's the car going overall now? Enjoying it or still having to do more work on it than fun?

Well, let's see what I still have facing me.
  1. The IAT sensor readings are bonkers.
  2. An odd intermittent noise coming from the drivetrain when the clutch engages.
  3. Need to replace the two fuel lines going from the engine compartment back to the fuel pump and fuel filter from rubber lined to PTFE lined.
  4. Insulating the exhaust some to keep the heat off as many other parts of the car as I can.
  5. Some minor tuning tweaks to smooth out some rough edges.

That's what I know about so far, so it's not too bad, I think. The worst one on the list is the drivetrain noise, but that might just be that Centerforce clutch. Some people have commented on other forums about that clutch making some squealing noise when engaging.

The car actually runs REALLY strong. When I took it out for the data logging the other day, I kicked it a bit and I could REALLY feel the turbos kicking into boost. The car wasn't any slouch BEFORE boost kicked in, either! And I don't believe I had the throttle any more than 50 percent. And that was with the IAT signal telling the PCM that incoming air temperature was around 284 degrees, so timing got pulled and the fuel went a bit rich to compensate. So I would imagine when the above mentioned issues get straightened out, the car could be quite a handful if I'm not careful with it.

So it's just minor stuff that is most certainly fixable. Just all in due time, I suppose. I'm treating this like a hobby and trying to put all the bad crap done by the other shops behind me and move on. Those guys have their own consciences that they have to live with and look themselves in the mirror. I am just glad that I am not like them and would REALLY prefer to never have to come in contact with people of that nature again. Well, enough of that.

Anyway, it's definitely a learning experience, which I think any interesting hobby really should be. And yeah, it does border on being fun when I think about it. Not so much finding and fixing all the things I have found done wrong on the car, but wrenching in general. Just something satisfying about using tools and making things right with them. Heck I was looking at a DIY thread just the other day of someone pulling apart a C5 differential, and I caught myself thinking "That doesn't look too tough to do". :lmao: Like Shane at the local dealership recently said to me, it's all just nuts and bolts.

I think anything on these cars can be fixed if you just don't give up.
 
I found a MAF/IAT extension cable that I'm going to convert into a signal breakout box thingie. I can take the two wires of the IAT sensor cable coming from the PCM and just put a resistor across it and then see if that fixes the problem when I take the car out for a drive. If it does, then the MAF/IAT is bad. If it doesn't, then the problem is in the wiring harness. The IAT sensor is really nothing more than a thermistor, which provides a resistance value based on the temperature it is exposed to.
 
I took the car out Thursday for another data logging run, especially watching for the IAT to go bonkers. Drove up to Tallahassee and got gasoline at the Sunoco that carries ethanol free 93 octane and then drove back home. Drove around for about an hour and a half, all total, and I didn't see the needle on the IAT display move off of where it was supposed to be. So when I got back home, I watched the logs looking for anomalies that I might have missed while driving and spending more time watching the road than the laptop display. And at 42 minutes into the drive for only 6 seconds, the IAT glitched about a half dozen times, pinning the needle at the highest reading, and then dropped back to normal. As best I can tell, this happened right after I pulled out of the Sunoco and seemed to be related to me pushing a little bit of acceleration then getting off of the gas pedal. But I did the same exact thing all throughout the drive from any dead stop, as this was nothing heavy footed at all. Just something like 20 percent throttle and barely getting to 3,000 rpm.

So it's not fixed completely, but it is definitely better than last time. I'm thinking I should clean the MAF/IAT connector contacts again, maybe after I get some more electronic contact cleaner. This stuff I have been using is so old it should be in the Smithsonian. So maybe it's lost much of it's potency.

Oh yeah, I heard that drivetrain noise again right after pulling out of the garage and starting out forward down the driveway. Pretty noticeable and loud. I thought, "Oh boy, hope the cell phone is charged up in case I need to call for a tow truck!" But the entire rest of the drive it didn't make a single peep again. Beats the heck out of me what is going on.

I may pull out the exhaust and tunnel plate sometime in the next few days and get the last two fuel lines replaced with the PTFE stuff. I also want to line the tunnel plate with reflective insulation and maybe wrap more of the exhaust when putting it back together. When it's all put back together, if that doesn't invoke a Murphy's Law to make whatever is making that noise BREAK in the drivetrain, so I have to pull it all apart again, then nothing will.

BTW, looking over the data logs I've been doing, I'm pretty amazed at what the wideband output is telling me. The AFR is pretty much dead on based on what the commanded AFR is, and what is actually being delivered. The wideband signal is like a low amplitude sine wave with the commanded AFR being the center line of that sine wave. It would be pretty darn tough to improve on that. Pretty impressive when you consider that Mike Carnahan only spent a few hours on this tune. :thumbsup:

Oh yeah, since Mike sent me the new tune engaging the stock O2 sensors and running in Closed Loop, gas mileage has increased quite a bit. I was surprised to see 30 mpg during some stretches. It was hovering around 25 mpg before this. So definitely an improvement in that department.
 
Aw dang it. I got in the parts I ordered to do that IAT sensor problem troubleshooting, but apparently I ordered the wrong parts. What I got were parts for an LS3/LS7 MAF/IAT harness. Rats. They are not interchangeable with the C5 connector. Well, I'll just have to figure out what the correct part numbers are for extension harness and replacement ends and get them on order.

Probably a good thing that I decided to tackle the rear fuel lines first anyway. So I got the exhaust off, at least. I was planning on pulling down the tailpipes that go over the differential, but heck, I'd have to pull off the rear sway bar, the lower braces on the transmission, and I think the blow off valves to do that. I was just planning on cleaning up those pipes and putting a coat of heat paint on them and then wrap them with insulation, but heck with it. I think I can get the insulation wrap on them without pulling them down. It will be more tedious, but maybe less so than pulling off all those other parts and putting them back on again.

But good thing I did take a hard look at the tail pipes. I found that the vacuum line running to the passenger side blow off valve was only hanging in there by a thread. I just barely turned it and it came right out in my hand. Doesn't look like the threads are damaged, just hadn't been tightened down, or just came loose over time.

BOV_vacuum_line_01.jpg


But certainly it was a vacuum and boost leak for a while. Not to mention that the blow off valve on that side wasn't working at all. So I'll have to put sealant on both of those vacuum lines when I put this all back together again.

I got a late start working on the car today, so I only got the exhaust from the headers to the tail pipes off. I tend to do more looking than doing when I am working on the car, to see what I am in for and how best to do something. But it looks like that's all I need to do in order to get that tunnel plate out, I think. Fortunately the headers can stay in place.

I'll be taking off the tunnel plate tomorrow, and will hopefully be able to finish replacing those two fuel lines. Hopefully I won't hit any snags along the way. I'll be doing some more cleanup of areas I haven't been able to access before, and planning on putting insulation on the tunnel plate and maybe up on the bottom of the passenger compartment area as well. You can bake cookies in that console sometimes. And I'll be insulating the new fuel lines, too. So I doubt I'll get everything done tomorrow.
 
Ah well, today didn't go quite as well as planned. :nonod:

I got started rather early, for a retired guy anyway, and got the tunnel plate off. Clipped off all the wire ties holding the fuel lines in place, and checked out what I will have to do to pull those old lines out and put the new ones in.

I'm pretty sure now that the gasoline odor is just coming from those SS braided rubber lined hoses on the car. The smell of gasoline was pretty potent when I pulled off the tunnel plate and had my head up close and personal with those lines. I had insulating convoluted tubing around some sections of the fuel lines, and the gasoline smell had permeated them to where I'm going to have to discard them. I broke out the UV light to take a look at those fuel lines, and it was very obvious that they were weeping gasoline through them. Matter of fact, maybe even weeping enough to be dripping gasoline on some lines below the fuel lines. Jeesus, this was a catastrophe just waiting to happen. I didn't realize what thin ice I had been driving on. So I'm glad I didn't delay getting to replacing those fuel lines any longer.

In case this point has not be driven sufficiently home yet, do NOT use plain rubber lined stainless steel fuel lines for GASOLINE! It's just not made to hold up to the modern ethanol laced gasoline of today, and I would go so far as to even say the stuff is just downright dangerous to have on a car. Your mileage may vary, but I can see with my own two eyes and UV light what has been going on with my fuel lines. So a word to the wise....

But anyway I did hit a snag in my plans for today. Like a dummy, I filled the car up with gasoline the last time I took it out for a drive. I didn't stop to think that in order to pull off the fuel line that runs the return from the fuel pressure regulator to the fuel pump, that the connector for this line is below the midline of the gas tank where it connects into the fuel pump plumbing. That didn't even hit me till I was loosening up the fuel line connector. I loosened it slowly as I expected some gasoline to come out, but when it soaked the rag I had at the ready, and no sign of stopping, that's when it dawned on me that I'm going to be having a LOT of gasoline come out. So I tightened it back up and cussed a little bit. Oh well, not going to put the exhaust and tunnel plate back on again now, so I grabbed the 5 gallon gas cans I had laying around here from the last time I ran into the gas tank draining problem. Mounted a funnel underneath the fuel line fitting and positioned the gas tank under the funnel and loosened up the fitting just enough to get a slow stream of gasoline coming out. And that's about all that I've been doing all day. Watching that slow stream of gasoline. I am on the second 5 gallon tank right now, and it does seem that the stream is tapering off ever so slowly. So maybe it will be done tonight, and I can cap off the fuel pump end and that fuel line end. Luckily that fitting on the fuel pump is at the top of the pump, so I won't have to drain ALL the gasoline out of the driver's side tank as I did when I was pulling out the fuel pump itself.

Oh yeah, I did get something else accomplished. While standing guard over the fuel drip, I measured and cut the insulation for the tunnel plate. So at least I don't have to take the time to do that after the fuel lines are in and I'm anxious to get the car back together again.

Anyway, hope that darn gas tank stops dripping before I want to go to bed tonight. But at least it IS draining, and just a matter of time before it stops.
 
Well, the gasoline finally stopped dripping out of the tank, so I was able to put a cap on the fuel pump line, and a plug on the end of the fuel line hose. Maybe I'll be able to get the fuel lines built tomorrow.

Anyway, here's some pics I took while I was messing with the tunnel plate waiting for the gasoline to drain.

This pic is of the tunnel plate still in, but after the exhaust after the headers was taken out.
tunnel_plate_in_01.jpg


Then a few after I removed the tunnel plate, showing the torque tube and the snake's nest of hoses and harnesses.
tunnel_plate_out_01.jpg


tunnel_plate_out_02.jpg


tunnel_plate_out_03.jpg


This is the tunnel plate itself, looking kind of weary from being pulled out of the car so many times over the past three years, it seems.
tunnel_plate_10.jpg


I cleaned up up real good, then applied some adhesive backed insulation on what will be the top of the tunnel plate facing towards the torque tube.
tunnel_plate_11.jpg


Than I will have another layer of insulation underneath the tunnel plate facing the exhaust pipes, and held in place by the bolts holding the tunnel plate mounted to the car.
tunnel_plate_12.jpg


That should help to cool down the temps in the tunnel area, and subsequently in the passenger area above that as well.
 
Back
Top