• Got the Contributing Memberships stuff finally worked out and made up a thread as a sort of "How-To" to help people figure out how to participate. So if you need help figuring it out, here's the thread you need to take a look at -> http://www.corvetteflorida.com/forums/showthread.php?t=3581 Thank you, everyone! Rich Z.

427 engine (part 2) - RHS block

Does no one on this planet give a crap about attention to detail and quality of their workmanship?
Not since about the late 70's!~!!:thumbsup:
Very few "Real Craftsmen" anymore,Most ALL the younger generations are now professional Texters,I wish them luck with that!~!! :D
 
Not since about the late 70's!~!!:thumbsup:
Very few "Real Craftsmen" anymore,Most ALL the younger generations are now professional Texters,I wish them luck with that!~!! :D

Yeah, well, it's not always the younger generation being the problem. One of the guys who had my car for 14 months wasn't of the younger generation, and his "craftmanship", in my opinion and my experience, leaves a LOT to be desired.

Seriously, what would you think of the craftsmanship of someone putting O2 sensors in this condition in YOUR car?

old_o2sensors_01.jpg
 
Well, I was feeling a bit puny today, maybe fighting off some sort of bug or something, so I only got the return fuel line replaced running from the fuel pressure regulator to the fuel pump. I did get the other fuel line out that runs from the fuel filter to the back of the passenger side fuel rail, but I'll finish that up tomorrow. Supposed to rain off an on for the next several days, so I'm not planning on driving the car anyway. And hopefully I'll feel better then as well.

Man I don't like working around gasoline. Stinks to high heaven, and certainly didn't help my headache much breathing it in the garage. And you've always got to be worried about some errant spark somewhere lighting you up like a torch. Makes me especially nervous when I've got it running down my arms.
 
Yeah, well, it's not always the younger generation being the problem. One of the guys who had my car for 14 months wasn't of the younger generation, and his "craftmanship", in my opinion and my experience, leaves a LOT to be desired.

Seriously, what would you think of the craftsmanship of someone putting O2 sensors in this condition in YOUR car?
Hey,I didn't say there weren't any "Butchers" back in the old days,I'm just saying there are allot more of them today!~!!:thumbsup:

Of course I'd be p*ssed!~!!:thumbsup::thumbsup:

I've see guys hack harnesses,run jumper wire's trying to circumvent something,bypass wiring plugs rather than repair them right,I've even seen a so called technician use zip ties to hold a worn out tie rod end to the steering knuckle so the customer could drive it till a part came in from out of town,Just so the shop owner could make a extra $20.00 over getting it locally!:banghead::banghead::banghead:
I :dancer01: the second I seen them let the guy hit the road with it!~!!
(Their no longer in business!):thumbsup:

The nice thing is,"KARMA" always seems to come back on people that do that kind of butchery for the big bucks!:thumbsup:


PS.I think you'll notice a difference in the heat and noise in the console area,I did something similar when I rebuilt my Transmission,Replaced the Clutch.:thumbsup:
 
Last edited:
Well, if the karma thing is true, I know of a couple of guys in for a rough time sometime in the future. I guess it was stupid of me not to interpret that their shops getting hit by lightning while my car was there was God trying to tell me something. Maybe it actually was a form of pre-karma warning that they ignored as well. :shrug01:

Yeah, NO doubt that this saga with my car taught me quite a bit about quite a few people. Including myself.
 
Well, guess there is no rush to get this done. The weather forecast is calling for crappy weather through the entire week. Just like it's been here this past week. Plus I have been fighting off some sort of flu bug or something the last several days anyway, and just not had a whole lot of initiative to wrestle with things underneath the car. But that's about over with now, it seems.

So I started putting some insulating wrap on the exhaust pipes that go over the differential. I decided to just loosen them up from the turbos, since I wanted to replace the gaskets there anyway (not trusting them to NOT be leaking at this point), and not remove the pipes completely. Too much other stuff would have to be removed to get them out of there. So I'm not going to do that until I REALLY have to.

I only got one done pipe today, and it's kind of a pain in the ass and rather tedious. The insulation I am using is in sheets, with an aluminum face with fiberglass backing. So I have to cut it into small sections to wrap the pipe adequately. Not sure if it would have been a bigger pain in the ass to remove them completely to do this, as I would have still had to cut the insulation anyway. Probably trying to put them back IN without ripping the insulation would have been a real challenge, anyway, so I think the way I am doing it is probably best. But it is tough to try to get both hands up around those pipes, especially to affix and tighten the stainless steel wire wraps I am using to secure the insulation. Hopefully it won't look TOO funky when I get done.

Anyway, I was waiting for a one piece insulating sleeve for the fuel line running from the fuel filter to the rear of the passenger side fuel rail. Running that fuel line is going to be a challenge, so I want something more flexible hanging off the end so I can more easily maneuver the hose around the torque tube. That PTFE is not quite as flexible as the rubber lined braided hose. Had I planned this all out from the beginning, I probably would have done the fuel rail plumbing differently than I did. But I guess that's the breaks when just trying to FIX a screwy design someone else started, just to get it to work, rather than trying to design it properly from the beginning. I'm sure you have all seen what I have had to deal with concerning this fuel system. :crazy03:

Luckily it's a bit on the cool side with temperatures so I can wear a long sleeve shirt without sweating to death. Otherwise my arms would be itching like crazy from the fiberglass insulation. And wearing a breathing mask and eye protection is a WHOLE lot more problematical when the temps are higher. Can't get much done when you can't see and have to wipe the condensation out of the goggles every two minutes.

Hah, thinking about it, I think the C5Z has more mileage on the lift going up and down that it has street miles driving it since bringing it home. :hehehe:
 
Next Saturday is the cruise-in at Hardee's Rich. Think you'll have it ready by then? If you're going(weather permitting of course) let me know, I'll meet you there if nothing comes up this week. I went to the one at Sonic in north Tallahassee last night. The turnout was a bit low(so I actually got to park in the parking lot) because of the rain coming in from the west, but we left around 7 and avoided it all. One guy had a newer GTO with STS turbo's on it, saw a red C5 Z06. Several 60's and 70's Camaros and Mustangs and a Pro Street or two. Met some folks who couldn't believe my Cadillac had an LS6 factory installed! Next time we go I need to remember to bring chairs....
 
Well, it might be done by Saturday. Really not that much needing to be done, when I think about it. Probably will run that fuel line today. Connie is going to help me feed the line from the top while I guide it from underneath. I don't know what length I'm going to need, since I'm not sure what route will be best to run it, so I'm going to have to mount the fitting on the top end, and then cut the hose once it is run and mount the fitting while the line is in place. Theoretically, anyway.

Then I have to dress up all the hoses and secure them with clamps. I'm also going to be marking the fuel and STS oil lines so I will know which is which if i need to down the road sometime.

Then put the tunnel plate back on. Hook up the exhaust, getting those tailpipes straight, then insulate the remaining exhaust pipes.

Hook up the battery and put some fuel pressure in the system and check for any leaks before doing the actual smoke test. Literally, as the new insulation is going to smoke a bit when it burns in.

But like I said, I'm in no rush. It's not like I am working on a customer's car or anything. This is more like a hobby, even though one that I got forced into doing.

I'll just have to see how things go during the week. But I'll let you know.

Yeah, been quite a while since Connie and I have been to the Sonic up by Lake Jackson. Maybe one of these days we'll get out there again.

Oh yeah, I still don't have in everything I need to troubleshoot that flaky IAT signal.
 
Got the last fuel line in today with Connie's help. Wasn't too bad of a struggle. Then I dressed up all the fuel and oil lines nice and neatly alongside the driver's side of the torque tube tunnel.

fuel_lines_20.jpg


fuel_lines_21.jpg


fuel_lines_22.jpg


Connie also labeled the hoses for me so I will know which is which. Green for "gas", and orange for "oil". With arrows showing the direction of flow.

I have some new bolts on order for the tunnel plate, as the stock ones might be a bit short with that thicker tunnel plate and the insulation I just put on. Should be in the early part of this week. In the meantime I can wrap that other exhaust pipe on the passenger side going to the turbo there.

BTW, over on EFILive's forum, there was some discussion about the oxygen sensors. I have rear sensors relocated in the front bungs with adaptors to convert the square 4 pin connectors of the rear sensors to the flat 4 pin connectors that the front sensors hook up to the PCM with. The reason for this is that with long tube headers, you need to extend the cables from the front oxygen sensors. You can either use the regular front sensors with extension cables, or you can use rear sensors that already have longer cables, but need adaptors to mate up to the front connectors. In any event, NO ONE recommends splicing those cables just to put longer wires in the harnesses. And GM specifically warns against doing so in the service manual.

Some say that you can't use the rears in place of the fronts, and others say that they are BETTER than using the original front ones. So I was curious to see if there was any physical difference in them.

Here's what the rear sensors look like:
o2_sensor_rear_01.jpg


And here's what the front sensor looks like:
o2_sensor_front_01.jpg


It appears that the rear sensors have more openings to allow gases to reach the actual sensor. Not sure if that is better of worst, to be honest. Some of the problems you can have with oxygen sensors is that they might not heat up quickly enough, or get hot enough when relocated on long tube headers. Being further away from the actual exhaust ports of the heads can affect the temperatures reaching the sensors, making them cooler and therefore slower to react to AFR changes. This can trigger error codes on the DIC. Supposedly wrapping the headers can help by increasing the temps of the exhaust gases then reaching the sensors. Also reducing back pressure (via removing the catalytic converters) can also affect the working temperature of those sensors. And lord only knows what rear mounted turbos and a complete change of engine can do to what the PCM is expecting out of the sensor outputs. :crazy9:

The more I learn about this stuff the more complicated it all seems to be. Which is why I think learning this tuning stuff is really going to be in my best interests. I need to REALLY know and understand this car from every angle if I expect to get it running perfectly. Well, close to perfectly, anyway. Not sure that will be an attainable goal, as it may just be a moving target. But with nearly everything modified, all the tuning is going to need to be custom as well. And it will probably take a while to get everything dialed in properly.

Oh well, didn't cut up and scrape my hands and arms too badly today. But I'm DEFINITELY getting better at wrapping up hoses and wires with wire ties using only one hand.
 
Got the tunnel plate in the car today. Wasn't anywhere near as easy as I thought it would be. Connie helped me by helping to guide the front end and hold the cardboard in place so the ends of the headers wouldn't rip the insulation. I was beginning to think it just wasn't going to go in. I remember it was a tight fit coming out, but it didn't seem too tough to do at the time. But I guess that additional thickness of insulation made a bit of a difference. I wondered why the manufacturers of these aftermarket tunnel plates don't offer insulation on the thicker model like I have. Now I guess I know. Honestly, I really don't know exactly how it went back in. It just DID.

But it's in without any damage to the insulation. Also had some trouble with the bolts in that the four I needed for the clamp to hold the oxygen sensors up at the top of the tunnel area wouldn't work. The integral washer on them was too wide to fit into the clamps, yet the stock bolts were too short to catch on the threads in the holes. Fortunately I have all kinds of automotive bolts, clips, nuts, etc. that I bought when I was finding a lot of that stuff missing on my car when I got it back home. I found the perfect bolts I needed in one of those assortments, so that saved the day.

Got all the bolts torqued down to 89 in/lbs and it's good to go now. But I do hope I don't have to pull that sucker out anytime again soon. It's in there but TIGHT.

tunnel_plate_13.jpg


tunnel_plate_14.jpg


tunnel_plate_15.jpg


Might hook up the battery tomorrow and just run up the pressure in the fuel system to check for leaks. Might be best to do that before going any further. But just have the exhaust to put back on, so not too much left in this part of the program.
 
That looks stellar! :thumbsup:

Thanks! That stuff was pretty easy to work with. Adhesive backing and the aluminum shielding was thick enough to not deform easily, yet thin enough to cut easily with metal shears. And it looks like it will be easy enough to keep clean.

The stuff I am wrapping around the exhaust pipes is real similar, but does not have the adhesive backing. It's wrapped around the pipes and held in place with stainless steel ties. I'm getting some sort of tape that should help me seal up the inevitable seams on the pipes. This stuff works real well on straight sections of pipe, but you need to use small sections on sharp bends, which leaves seams that need to be covered. This stuff is made by Heatshield Products (http://www.heatshieldproducts.com/home). What I am using for the exhaust pipes is called Heatshield Armor Exhaust Heat Shield (http://www.heatshieldproducts.com/p...ap/heatshield-armor-exhaust-heat-shield/47/19), which has a quarter inch of ceramic liner on the same shiny aluminum facing. They also make it with a half inch of the ceramic liner, if needed.

Anyway, all this should really help to keep the heat in the exhaust system and away from everything else on the car.

heatshield_01.jpg


heatshield_02.jpg


Today (Thursday) Connie and I had to run some errands in town, so I didn't get to do much on the car. I figured I have been taking the ground cables off and on the battery so much while working on it, that I decided that maybe I should make things easier on myself. So I got a couple of switch disconnects for both of the negative terminals. That way I simply turn the dials to break the battery connection. Hopefully these won't introduce their own problems, as I'm not sure how well they will hold up with vibration from driving. So if they vibrate loose over time, then this just might wind up being one of those ideas that didn't work out as well as I had planned. So I'll just have to see how it goes.

Anyway, I got the battery hooked up again, so I just turned the ignition switch on a couple of times to get pressure into the fuel system and check for any leaks. So far everything looks good, with no leaks. I didn't start the car, of course, since I don't have any exhaust plumbing in place after the headers. Hopefully I'll work on that tomorrow. Looks like I might have to work on some of the exhaust pipe ends a bit, as there are some minor signs of possible exhaust leaks. So it's not going to just be a simple matter of slapping them back onto the headers and be done with it.

And I have to align those tailpipe ends again. I think if they give me fits, I may just put some exhaust hangers back there to help keep them aligned.
 
Well, didn't get to spend much time today working on the car. Connie and I ran out to a local nursery and picked up a few more tangerine trees to plant. Oh well. Gotta do what I've got to do. And that had priority.

Anyway, I did get the turbos hooked up to the exhaust pipes. Put on fresh new gaskets and used sealant on them so they will hopefully be nice and airtight under boost.

heatshield_03.jpg


heatshield_04.jpg


I put the vacuum lines back onto the wastegates and used teflon tape on them to seal them up. Got them nice and snug.

Then I checked the ends on all of the exhaust pipe slip fittings and banged out some spots that looked like they wouldn't seal properly. Had to use an expansion tool on one of them to widen it up a bit. So I have them all in place on the car, but haven't bolted them up yet. I need to position all the pipes where they need to be to get the tail pipe ends aligned and then double check to make sure the slip fits are still sealing the pipes properly. Once that is done, then I can tighten everything down and hopefully the tailpipes will stay aligned. If not, well, I have some tailpipe hangers that I will have to use to run from the back of the frame on the car directly to the tailpipes to keep them where they need to be.

I'm still waiting on some new insulation for the pipes I just put on, so I'm not sure I'll get the car on the road tomorrow (Saturday). I'll probably start it up to burn in the insulation on the back pipes that I installed, though, and make sure the fuel system is running OK.

BTW, anyone working with those stainless steel wire ties, I figured out how to keep those suckers from slicing your hands to ribbons after you cut the excess ends off. Take a robust needle nose pliers and BEND the sharp end down and against the band of the tie. Maybe even fold it under completely if you can do it...

heatshield_05.jpg


I'll have to go back and see how many of those ties on the header wraps I can do that way. Those things are sharp as razors when you cut them...
 
Had a friend stop over today to do some tractor work on our property, so I didn't get as much time as I had thought I would to work on the car.

But I did get the exhaust installed. Tail pipes looked pretty good in the alignment department. And I inspected the pipe joints closely looking for any gaps. Everything LOOKED real tight. So I clamped it all down and made sure it was solid and the pipes didn't rattle against anything. Then went from one end of the car to the other using wireties where I had had to cut out the older ones, and made sure all the harnesses and hoses were held away from anything hot, moving, or could knock against while driving.

It was after dark before I could smoke test the car, and it started right up. I put it up on the lift and inspected underneath to look for exhaust leaks. Everything looked pretty good. Ran it for quite a while, letting it get good and hot. Condensation was blowing out of the tailpipes, but no moisture was coming from any of the joints at all. The Heatshield insulation on the rear pipes seems to make a heck of a difference. The pipes in front of those section were really hot to the touch, yet I could lay my hand on the insulation. They were moderately hot, but nothing like the uninsulated pipes.

Anyway, after a while, I noticed a couple of spots with faint smoke coming from two of the joints. These slip joint pipe connections have slots cut into the slip over section, and there are two places where real faint streams of smoke are coming from. I think it's the anti-seize burning off (I used it to help slip the pipe ends together as a lubricant), so I probably wouldn't have noticed anything at all otherwise. I mean, it's REAL faint, and I actually had to hold a flashlight at an angle to even see it. But still, those leaks are there, so I'm going to just remove those clamps and put some sort of high temperature sealant in those slip over joint slots, underneath the clamp, and see if that closes them off.

Heck, they might not even be a problem at all, and probably wouldn't affect boost spool up very much, but I want to get this as good as I can possibly get it.

Didn't notice any fuel leaks, and everything seemed OK, otherwise. The car sounded really good just sitting there idling, getting some more lift mileage under it's belt. One thing I have been noticing the last few days is that the smell of gasoline that used to be real noticeable when walking into the garage is completely gone since putting in those PTFE fuel lines. So I guess the old lines seeping gasoline through the rubber inside the ss braiding was causing the gasoline odor entirely. So at least that is behind me now.
 
you should see an decrease in spoolup time, creating a faster spoolup since you have helped keep the heat in the exhaust. most people don't realize that thermal energy helps turbo's a lot. that is why most turbo vehicles have a thick cast iron manifold and not a thin wall header.

are you going to insulate the long sections of pipe connecting the headers and the turbo's? I didn't see them in the pictures and figured those were the ones you were referencing to when you said uninsulated....

Yes. I'm just waiting on some more insulation from Heatshield. I had a slight problem with the stuff I bought and am getting replacements. I'm going to wrap each individual section separately so it won't be a major pain in the butt to take the exhaust out in the future.

As for the exhaust leaks I saw yesterday, I loosened the clamps at the joints where I saw exhaust leakage, and used the SPA turbo exhaust gasket maker putty I had laying around here to fill in the joints I had seen leaking fumes yesterday. I then let it set for a while, and then started the car and put it up on the lift to check the exhaust.

The joints I fixed seemed OK, but at another joint there was a piece of lint or fuzz or something and I noticed that it was moving like there was air flow coming out of THAT joint. Great..... So I used a small piece of paper towel and checked all the other joints for air flow, and sure enough, exhaust was leaking from most of them. Ah well. So I let the exhaust cool down, and then went and applied the exhaust goop to all of them to close off those slits on the female pipe ends. Hopefully that will put an end to that problem, but I won't know till tomorrow when I start the car again to check.

I guess I should have just applied that SPA putty from the start, but I had hoped for the best. Should have known better. :rolleyes:
 
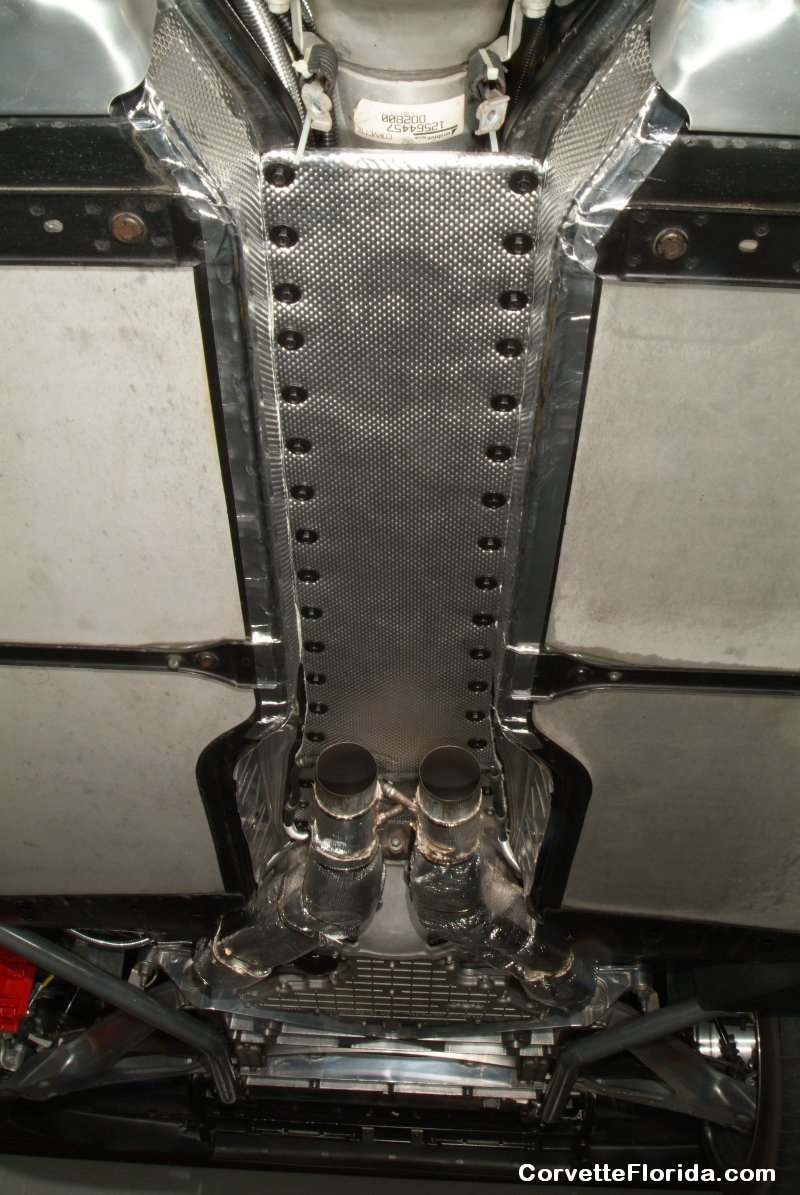
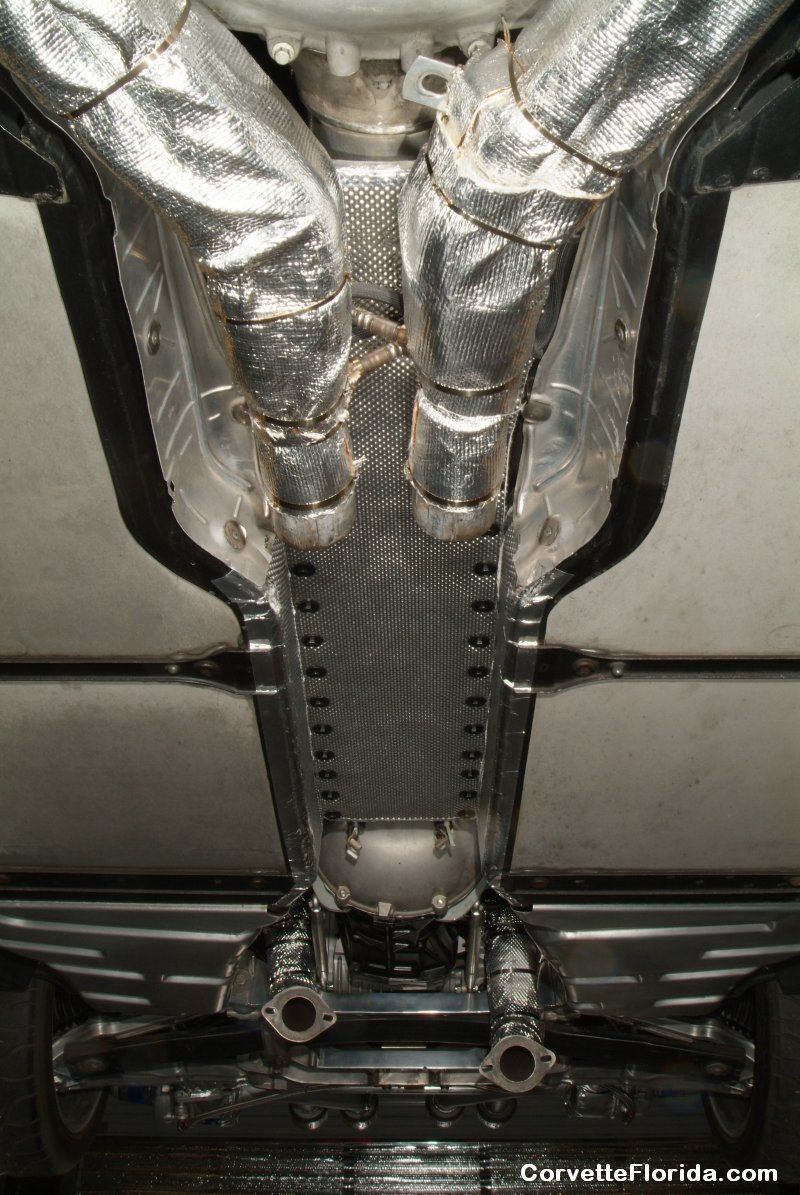
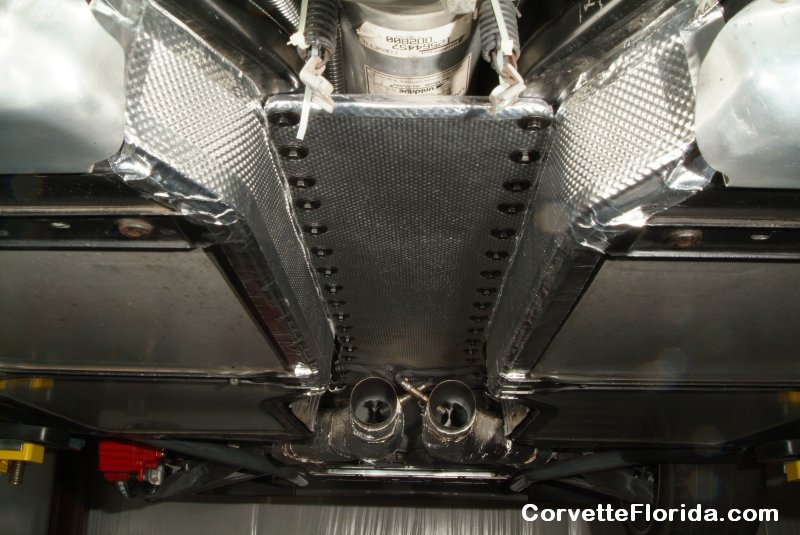
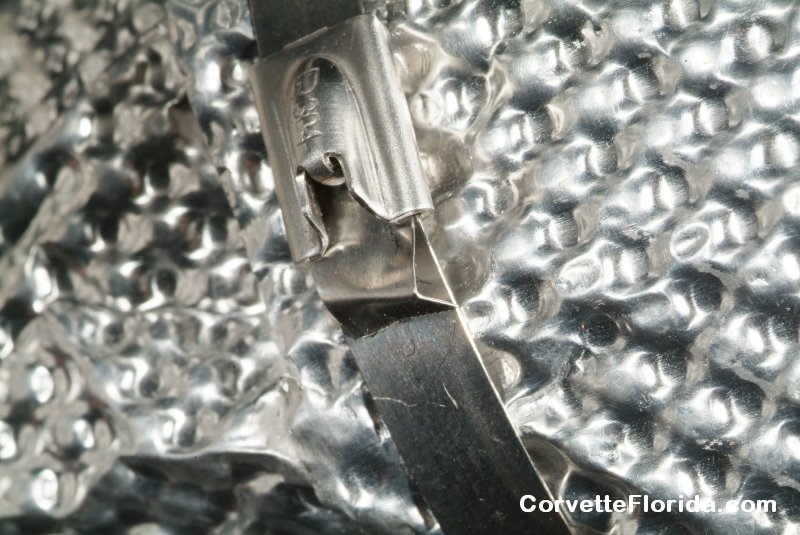
Looks like the exhaust leaks are licked. I checked all the joints and not a hint of air flow coming out of them anywhere.

I was planning on taking the car out for a drive, and I had the laptop on, running EFILive, and was logging the warm up cycle to note how it goes from open loop to closed loop. I noticed immediately that the IAT signal was pegged at 284 degrees and staying there. So I apparently had a SOLID failure to track down. The main reason I was going to take the car out today was to do some logging specifically for this IAT problem. I had cleaned the contacts on the connector thoroughly, so I wanted to see if maybe that corrected the problem. Apparently not. Turns out I was barking up the wrong tree anyway.

So I shut off the car and set up the laptop where I could watch it while I was poking around under the hood with that harness. Connie was actually monitoring the screen for me, and she called out when the signal dropped from 284 to 90 degrees or so while I was jiggling a particular section of the IAT/MAF cable harness. So it looked like we had zeroed in to the problem. Hard failures are SO much easier to find than intermittent crap.

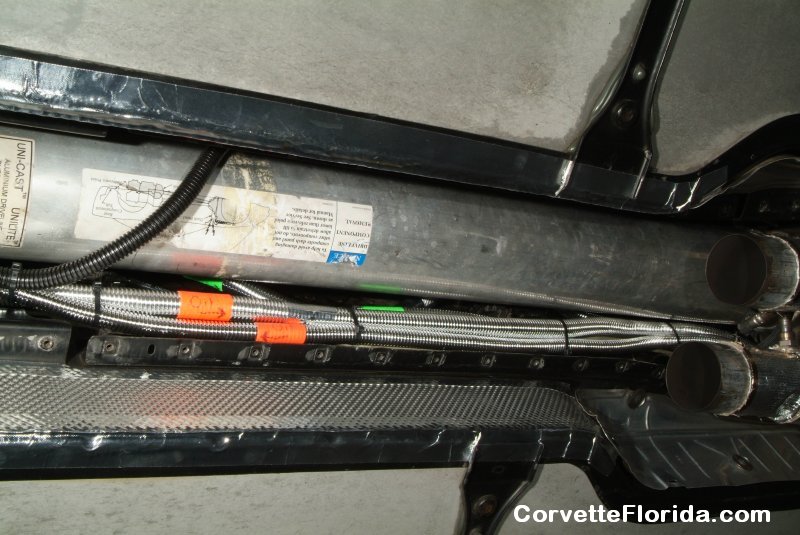
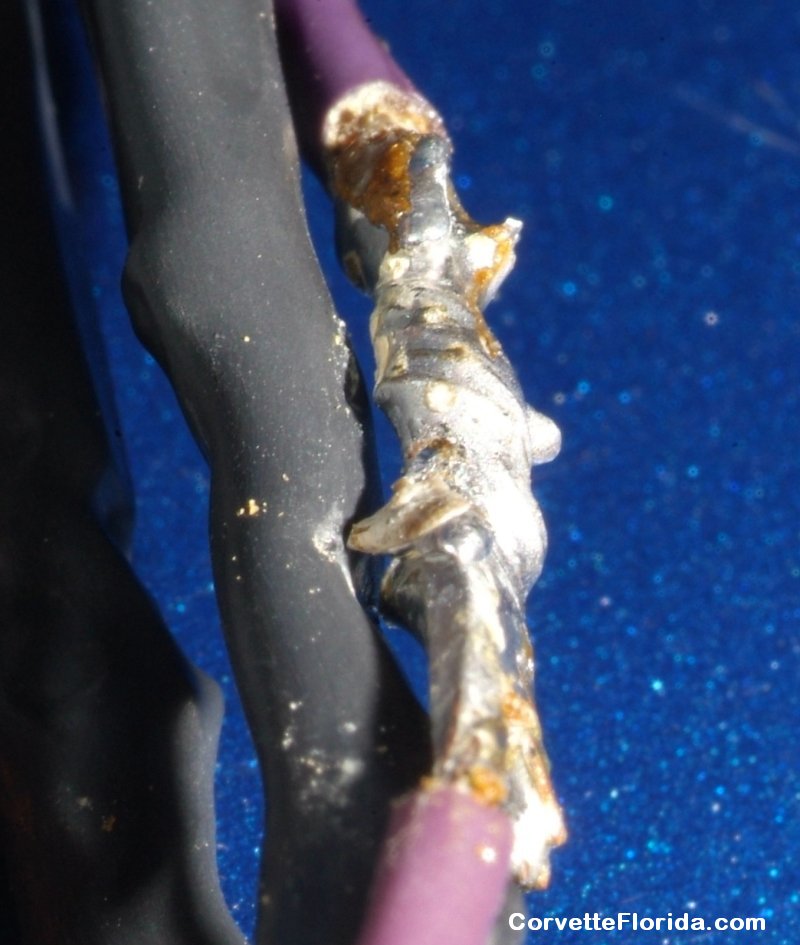
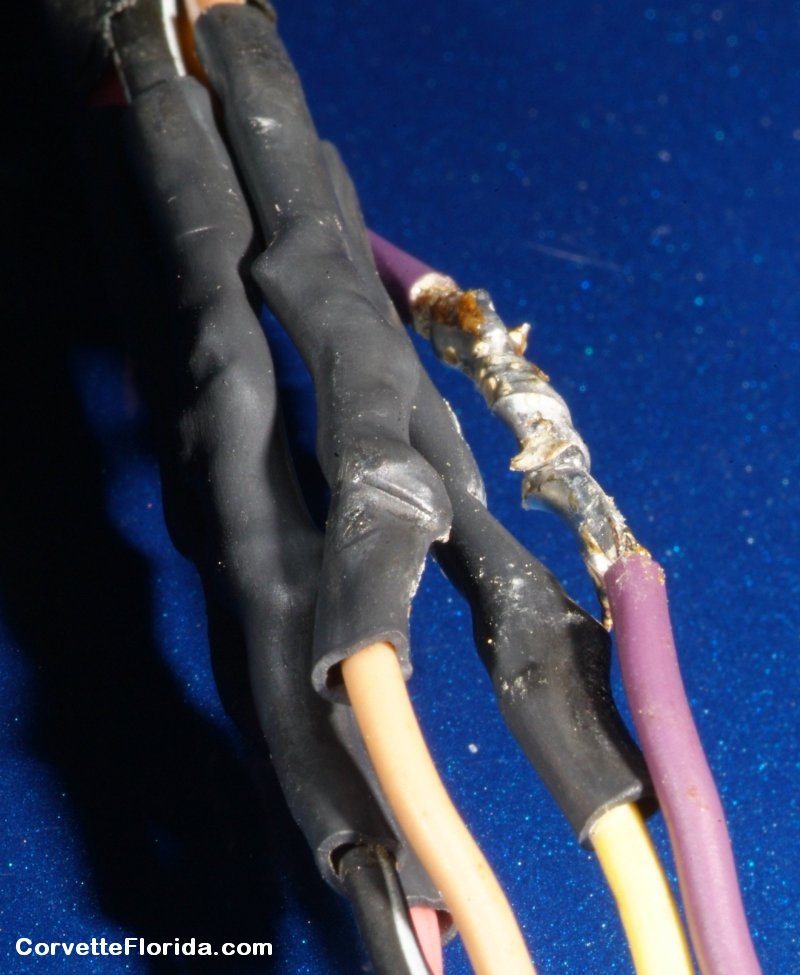
So I pulled the insulation sleeve off of the harness to take a look. And here we go:

IAT_wire_01.jpg


IAT_wire_02.jpg


IAT_wire_03.jpg


IAT_wire_04.jpg


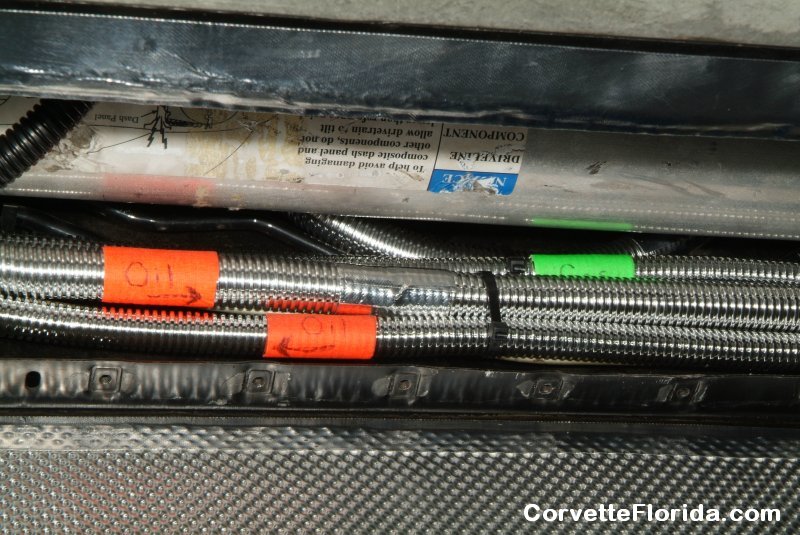
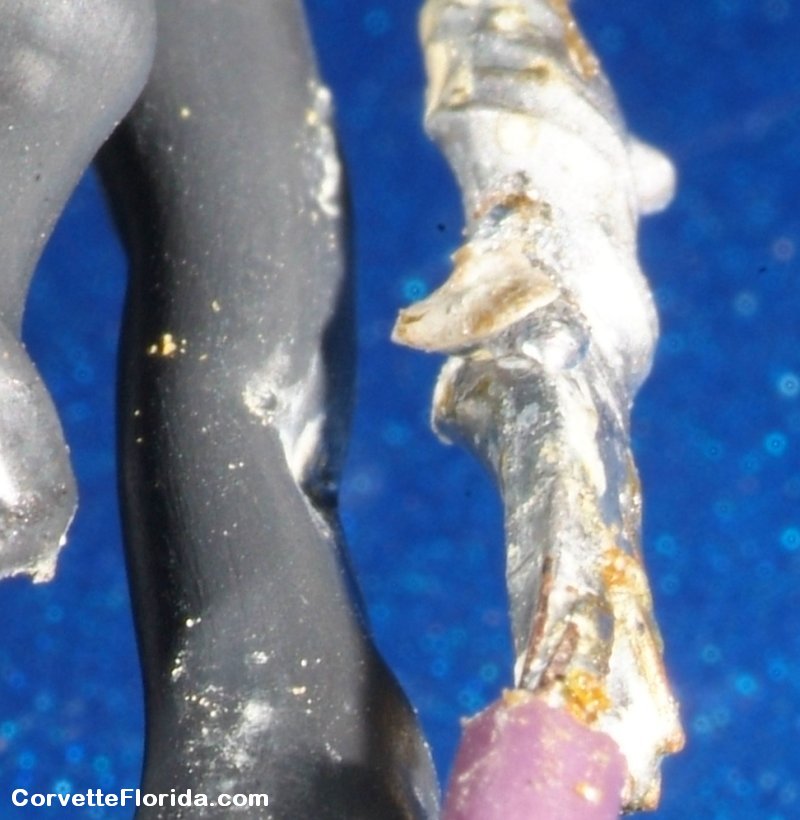
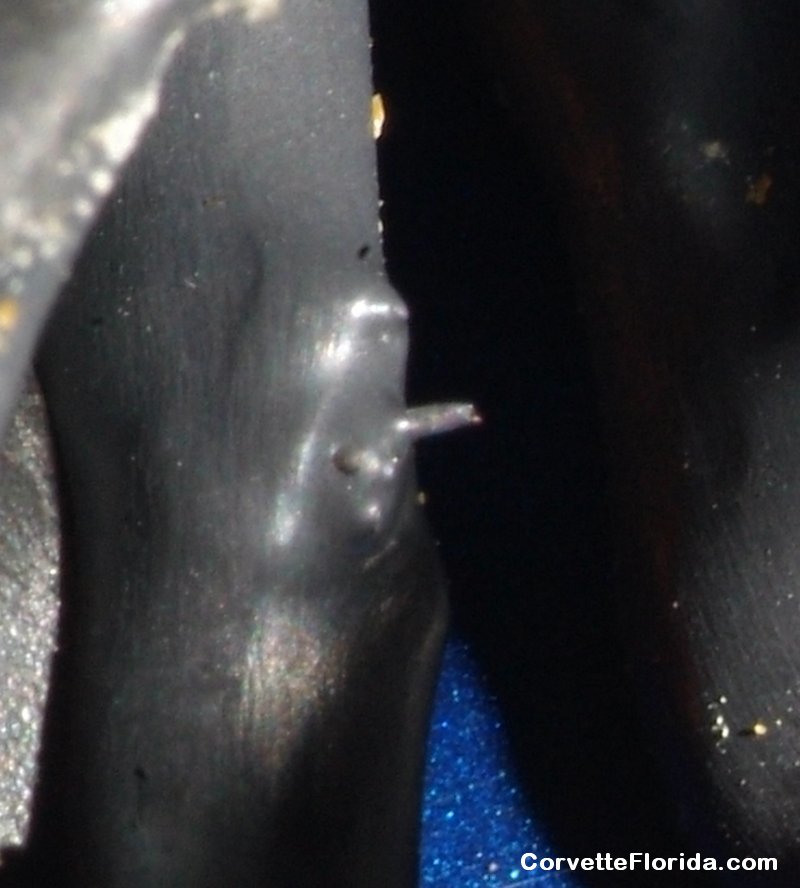
Whoever did this piss poor soldering job left jagged ends sticking out from the soldered joints, and didn't bother to even cover the purple wire individually. Just plain laziness. So what happened was that a sharp point on the purple wire's joint had cut right through the insulation on the yellow wire and was shorting the two of them together. There were a couple of other sharp points on the other wires, so they may have been poking through the insulation as well. If not now, certainly sometime in the future.

Two things really wrong with this solder job. (1) Before putting the shrink wrap on the solder joints, smooth the sharp solder points down. This can easily be done with no more than needle nose pliers by crimping them down flat against the wire. Actually wrap the two wire ends together properly, and you rarely have sharp points sticking out every which way. (2) With multiple wires being soldered in a harness, stagger the cuts on the wires so the joints aren't right next to a neighboring joint. This not only helps to prevent this kind of problem with shorts, but also keeps you from having a big LUMP in a harness when you try to put a cover over the entire wiring. You know, looks like a snake that ate a big rat or something.

So I crimped the sharp ends in the solder joints, then rewrapped them all with silicon tape. Double checked the signal to make sure the short was gone, then rewrapped the entire harness with insulation and wire wrapped it back in place along the air bridge.

So I believe the intermittent IAT problem has been solved now as well.

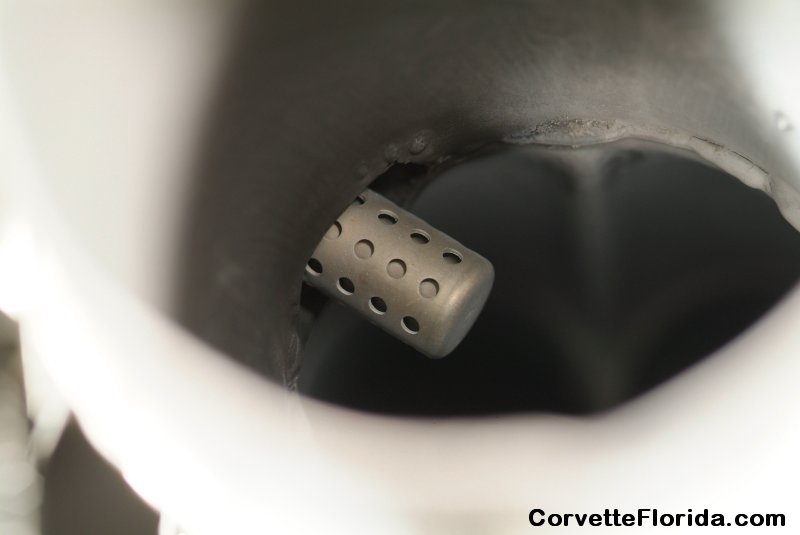
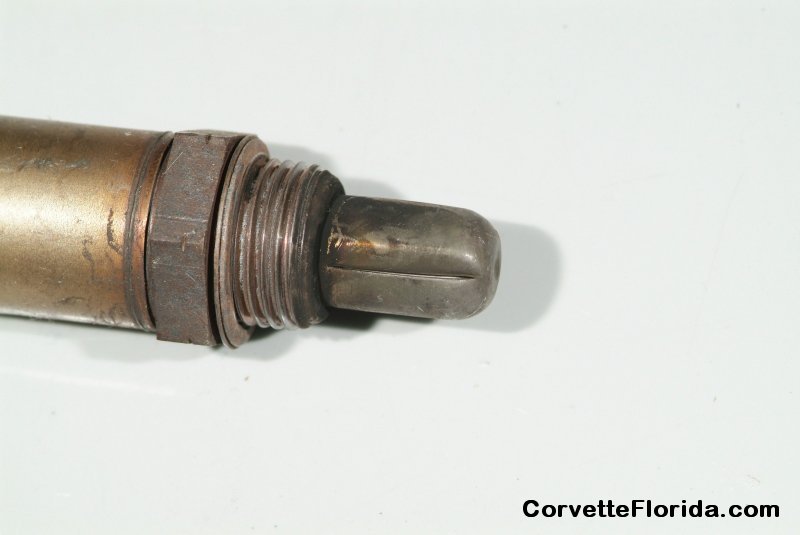
Maybe tomorrow I can take the car out for a spin. I didn't hook the wideband controller up again, as I want to burn off any anti-seize compound that might be in the exhaust pipes above the sensor first.

Well, (knock on wood), I think I'm running out of things I need to fix. :thumbsup:
 
After seeing this I think I will go back over the solder joints I have had to make to be sure I did not do the same thing as you found. I have had to splice in new connectors and replace a lot of broken wires in the harness on my C4. Thanks for showing use what you found it may save me down time on the road.:thumbsup:
 
Glad the pics helped. Soldering properly takes practice. I cut my teeth on soldering by repairing computer circuit boards at the component level. So I would have to extract those soldered in components and put new ones in without damaging the traces on the boards. MANY problems were fixed simply by correcting cold solder joints, particularly when someone else had worked on the board previously. So I had LOTS of practice way back then.

For soldering wires together, wrap them together firmly and neatly, first positioning shrink wrap tubing above or below the joint. Strip enough insulation off of the wires to give you plenty of working material. The shorter the uninsulated ends, the harder it is to mate them together prior to soldering. Melt solder onto the tip of the soldering iron and then apply that glob of melted solder to the joined wires. The PURPOSE of that glob is NOT to be the solder joint. It's to allow a real good heat transfer from the soldering iron tip to the wires joined together. Then hold new solder to the wires themselves until the solder melts and flows evenly across and through the wire strands to coat them completely. If the wires are hot enough, the solder will just flow across the wires like water. When the wire joint is completely covered with solder, carefully remove the soldering iron tip and solder from the wire joint, and do NOT move the joint until the solder solidifies completely. Movement of the joint can cause a bad solder joint. Just heating the solder and dropping it onto the joined wires can give you a cold solder joint. It's called a "cold" joint because the wires did not get hot enough to melt the solder and all the solder is doing is just physically surrounding the wires without actually melting onto them. Once you know what they look like, you can tell a cold solder joint just by the sheen of the solder itself at the joint.

If you do think you have a cold solder joint, you can fix it by reapply heat and using new solder so that the rosin helps the new solder to flow better into the old solder.

Actually I didn't even realize that the MAF/IAT harness had soldered wires from a new connector being put in, otherwise that would have been my first choice candidate as being the likely cause of that intermittent problem. I have no idea who replaced that connector in the past. Maybe there is a note somewhere back in the history of this fiasco of someone tackling a MAF/IAT problem, but darn if I can remember. I guess I could take a look at those front oxygen sensor harnesses that Aaron Scott soldered in trailer hitch and radio shack wire into to see the soldering job done there, and that might give me a hint. On the other hand, Chris Harwood was notorious for cutting out connectors from one customer's car because he needed it for the current car he was working on. But I guess it would just be academic, anyway, even if I could positively say who did it. Not a chance that either Aaron Scott nor Chris Harwood will ever work on my vehicles ever again, so I guess I really don't need to know the answer to that question anyway.

Well, dumped the gasoline I extracted from the driver's side tank before replacing the fuel lines, back into the gas tank, so I'm ready to take it for a spin tomorrow.
 
Last edited:
Back
Top