• Got the Contributing Memberships stuff finally worked out and made up a thread as a sort of "How-To" to help people figure out how to participate. So if you need help figuring it out, here's the thread you need to take a look at -> http://www.corvetteflorida.com/forums/showthread.php?t=3581 Thank you, everyone! Rich Z.

The garage build.

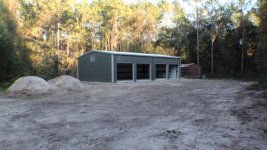
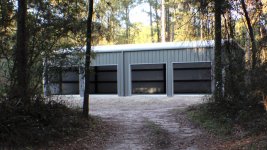
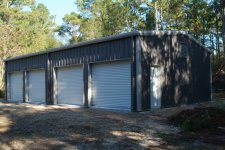
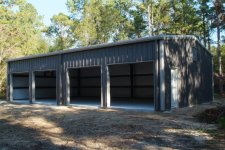
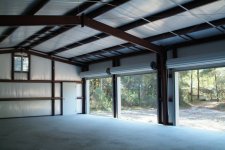
Well, I was surprised to learn that the crew is planning on working right through the weekend to get my garage finished. On Saturday they should be putting in the insulation and mounting the sheet metal. Perhaps installing the rollup doors and the louvers as well. Looks like all the frame work is done now, and they put in the walk-in door today (Friday).

Weather has been just perfect for this, even though it started off on the wrong foot earlier in the week.

Good thing is that I may very well be able to get back to Xtreme on Monday to catch the rest of the drivetrain build through the week. :thumbsup:
 
Well, the crew is out here again today bright and early. Yesterday all that pile of steel finally began to look like something. I let Connie pick the color scheme, and she chose a charcoal gray with ash gray trim. At first I was apprehensive that it might be too dark, but I think it turned out quite well. Even the main guy doing the building erection (Mike Nichols - Integrity Contractors and Erectors) commented on how the color looked.

All that is left to be done now is the siding on the right side of the building, the roof, two of the four rollup doors, and finish up the trim. Then it will be done. Not sure how long the crew will be out here today and how much they plan on doing, but I think it will be no later than Monday before it is completely finished.

That will just leave the apron needing to be poured, then get the electrical done, and that will be that.

Well, almost. Guess I should be thinking about a coating or sealant for the concrete..... This is optional, I guess, but I think it would be a good idea.
 
Rich,

I know some people would think sealing or coating the floor is optional, but to be honest, I am not one of them. When I lived in Maryland I did not seal my three car garage. That was a mistake. It always looked like hell, no matter what I tried to do. If you spilled anything on it it just got sucked into the raw concrete. So, when I built our new house in Ft. Myers, I did a lot of research and decided to go with a product called UCoat It. They do a lot of advertising in various automobile magazines. Here is a link to there website.

http://ucoatit.com/pgs/main.htm

They have a pretty decent site and they also have a material estimator so that you can get an idea on what it costs. Make sure you select the automotive application. I will tell you that it is not cheap, but it works great. You will see tire marks from driving in and out of the garage, but the tire marks wipe up with a little water. It's pretty easy to keep clean. I do keep some old carpet samples under the tires so that I have to clean it as little as possible. Here are a couple of older pictures of my garage. I hope this helps.

Rich

Floor4.jpg


VettesArriveinFlorida-20.jpg
 
Man, I like the looks of that floor! :thumbsup:

They are still working on the garage today. Putting up the rain spouts and aligning the doors. They still have some minor touch up and clean up. Oh yeah, the door sill for the walk in door needs to be installed. Mostly just odds and ends at this point. I'm hoping they will be done by this afternoon.

Got the concrete guy scheduled to come in on Monday to do the apron. I'm guessing that will be two days involved. Then once the apron hardens off I can talk to an electrician.

Only snags so far that I can see is the louvers I got. My plan had been to put the louvers on now during the building construction and then have the electricians mount exhaust fans. But when I looked at those louvers, I see hand cranks on them and no way for them to be air operated by exiting air moved by the fans. And those cranks aren't going to do me much good, as they are 10 to 12 foot up the side of the building, so I would need a ladder just to reach them. I've got a message in for Darren at SteelMax about this as this isn't what I had in mind for those louvers at all.

But all in all the building looks REALLY good. Everyone who has seen it compliments the looks and quality of the materials.

Oh, and the whole time I've been expecting the building inspector to stop by. But you know what? He was fired not that long ago, so I'm sure that whole department is in turmoil right now.
 
:pics: :peelout 1:

I've got LOTS of video, but no sense posting anything until I have everything. Plus it will take a while to actually generate a suitable video clip.

Unfortunately they have to come back tomorrow.

A couple of the rollup doors are binding a little bit, and the walk-in door needs a minor adjustment. Then they need to clean up all the accumulated garbage. I'll probably be finding sheet metal screws in the driveway forever. I'm thinking hard about getting a metal detector so I can find them before the tires on the vehicles do.

Been talking with Darren about the louvers and he is going to see what options we may have, since these are really unsuitable for what I had intended. I'm thinking it could get right hot in that building during the summer months, and not having some way to move some air in from the outside would make it real uncomfortable in that building. It is insulated, but insulation only slows down a temperature differential, it doesn't stop it completely.
 
Just get a big old subwoofer speaker and attach it to nylon string so you can scrape the ground with it. It's magnet will pick up all those screws...unless they are aluminum screws....then your tires are screwed. Hope you've got run flats.
 
I actually used a small magnet to pick up steel bits and pieces that were left over from when they were drilling out the side and roof panels. They were all quarter moon shaped and sharp on both edges, so certainly wouldn't get along with tires very well.

Actually I'm thinking harder about getting a metal detector, because after using it for this, maybe it would be fun and interesting to go scour the beaches and other areas looking for stuff to dig up. Probably will wear off pretty quickly after my 100th aluminum pull tab or crushed beer can is dug up.

But what the heck. I'm retiring and I guess I should do things that retirees tend to do. Next thing I need to think about doing is to find some store or shop that I can sit out in front of all day long. That seems to be a popular pastime as well. :hehehe: Too bad XtremeMotorsports isn't just down the street...
 
Got lots of video to play with, but it's going to take me a while to get them all into something presentable.

In the meantime, here's a few photos of the completed building...
 

Attachments

  • garage01.jpg
    garage01.jpg
    95.8 KB · Views: 61
  • garage02.jpg
    garage02.jpg
    112.9 KB · Views: 60
Lookin' good, and almost done :thumbsup: ! No wait...I forgot.....in THIS hobby,
you're NEVER done spending money on a project, and the project is NEVER completely done. :lmao:
Andy :wavey:
 
Thanks guys!

The color scheme is what Connie picked out. At first I thought it may be too dark, but when they had this mostly put together, I thought it looked REALLY sharp. It think this turned out VERY well and Connie hit the color scheme dead on. :thumbsup:

My concrete guy can't get back here till after Thanksgiving, so the apron will be delayed an extra week. Probably just as well as I want to be over at Xtreme as much as possible this week to watch the drivetrain get put together and maybe even mate the drivetrain and frame together once again with all new components installed. So I can't complain too much about this minor wrinkle.
 
Got lots of video to play with, but it's going to take me a while to get them all into something presentable.

In the meantime, here's a few photos of the completed building...
:thumbsup: Awesome RichZ now you need more cars:rofl1:
 
I took some new photos with my REAL camera. Camcorders are great for video, but just don't cut the mustard for still photos....
 

Attachments

  • garage01.jpg
    garage01.jpg
    118.4 KB · Views: 45
  • garage02.jpg
    garage02.jpg
    121.6 KB · Views: 45
  • garage03.jpg
    garage03.jpg
    83.2 KB · Views: 44
Back
Top