• Got the Contributing Memberships stuff finally worked out and made up a thread as a sort of "How-To" to help people figure out how to participate. So if you need help figuring it out, here's the thread you need to take a look at -> http://www.corvetteflorida.com/forums/showthread.php?t=3581 Thank you, everyone! Rich Z.

427 engine (part 2) - RHS block

Rich,

Why not just get a cheap hand siphon pump and pump the gas out from the filler opening?

Back in the days when I was still in Maryland, and before I decided to heat my garage, I used to use a kerosene heater to take the chill off in the garage. I used a battery operated hand held siphon pump to pump the kerosene out of the can and into the heater. They were not terribly expensive and moved the kerosene pretty quickly. Here is a link to one I found that was like the one I used. Pretty cheap to eliminate the aggravation that you are going through.

http://www.heartlandamerica.com/browse/item.asp?PIN=48043&DL=GAW1&SC=WIG20001&

I am sure if you went to a Northern Tool or Harbor Freight store in your area, you could find something to siphon the gas out from the filler opening.

Good luck.

Rich

Actually I read somewhere that someone said that you can't get a siphon tube down the neck of the gas filler tube because of some sort of obstruction that may be there specifically to block this. At least that's what I remember trying to research this problem online. I actually have a siphon pump that I bought a while back and was going to try it but the bulb that you are supposed to squeeze to get the siphon action working is hard as a darn rock. I don't know if it's from the rubber bulb hardening with age or I've just become much more feeble in my old age than I realize. I believe I bought that and the pump thing I tried yesterday both from Harbor Freight. I bought them a few years ago to keep in my "emergency rations" kit.

I did a scan on Google for some sort of siphon pump, but all I could find were things that were either no better than what I already have, or else big commercial units for shops that were way too expensive for this single job.

I did read an account where someone actually punched holes into the bottom of his gas tank to drain it, then sealed it back up with JB Weld or something. I don't think I'm at the point to do something as drastic as that, but obviously the guy wasn't having much luck coming up with a more elegant solution neither.

I really thought the fuel pumps on the car would do the job, but apparently not. So far no one has come up with anything that I have overlooked trying it that way, so I guess I'm the first one in the world to run into this kind of problem. Lucky me.....
 
Oh, btw, thanks for finding that link for me for that battery operated pump. But to be honest, I've bought from HeartlandAmerica before, and absolutely everything I ever bought from them wound up in the trashcan. So Connie just throws the catalogs directly into the trash any more before I even get to see them.
 
Over on CorvetteForum some people were discussing my fuel system and brought to mind that there are TWO fuel lines coming out of that pump over on the passenger side gas tank. That got me to thinking that I really didn't recall seeing enough fuel lines on the driver's side..... :shrug01:

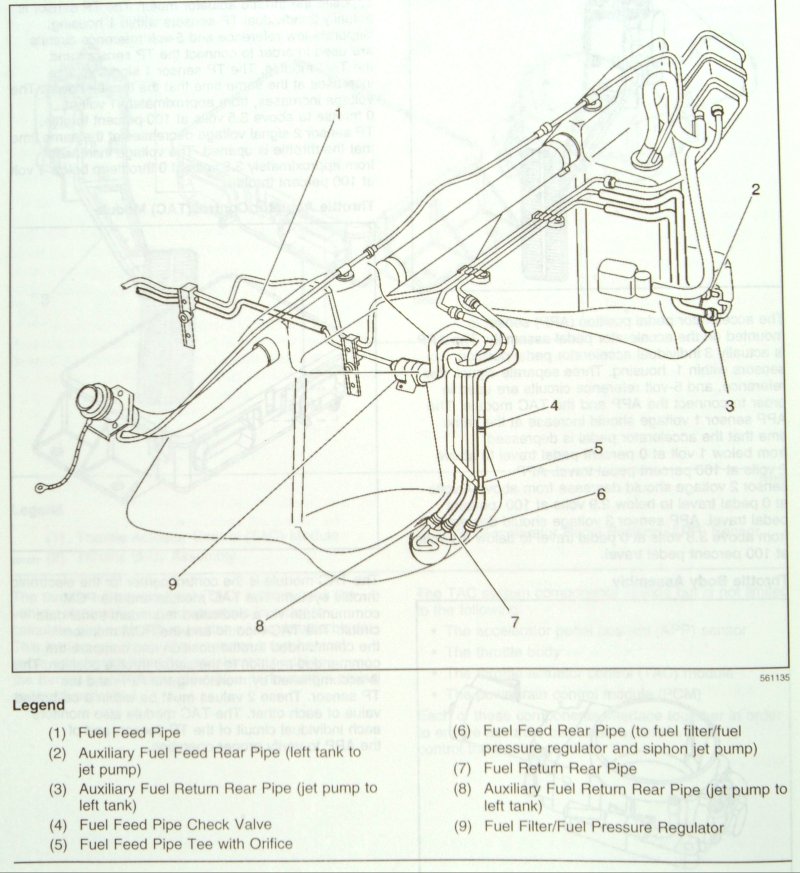
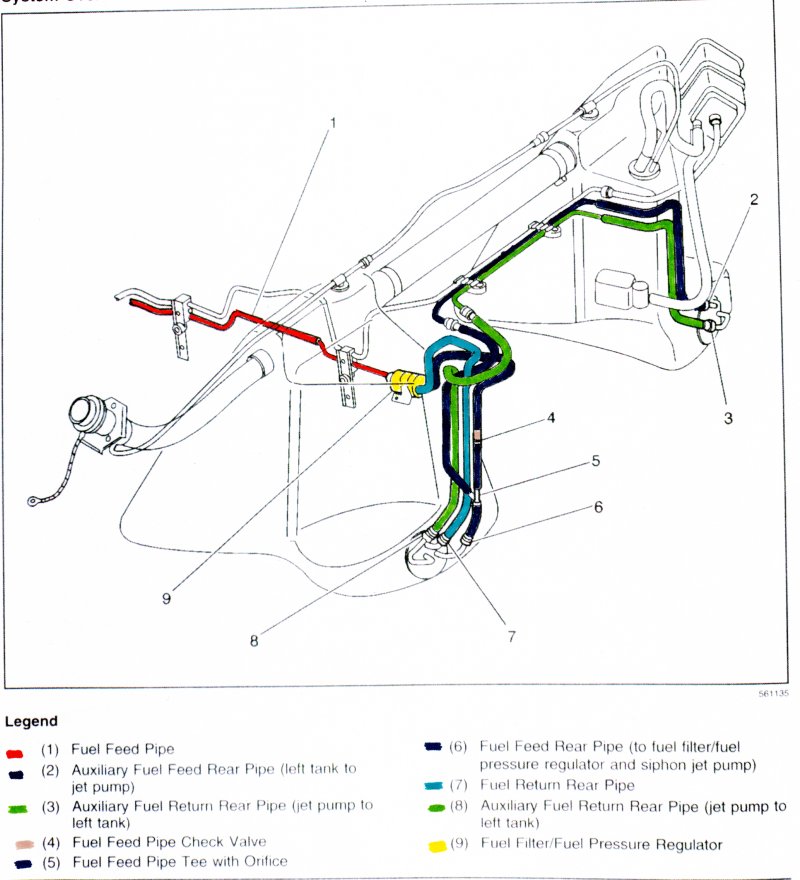
One of the members on that site sent me a page number in the service manual showing a plumbing diagram of the stock fuel system. Page 6-1054 for those of you who might be interested. This helps a LOT!

I was over in the garage earlier trying to figure out that mess, and I'm still not sure what is going on. I was wiggling and tugging on the lines trying to figure out where they go when something fell into my left eye. I got it flushed out (something that felt and looked like puddy), but the eye is still smarting some, so that's enough of that for today.

Anyway, I couldn't figure out why there were four lines coming down from the top of the driver side tank through an opening, but there were only three connections at that pump. According to that diagram in the manual, it looks like one of the lines from the passenger side tank joins with the main output line (black label on the stock system) of the driver side pump. Honestly that doesn't make any sense to me since that is a pressure OUT line and I just don't understand why the design would want the pump sending fuel under pressure TO that passenger side tank.

In what I have with the car now, it doesn't appear that either of those two lines coming from the pump in the PS tank are connected to my fuel system in any way. I found one just hanging down disconnected completely, and I can't find any loose end of the other hose that shows to be connected to a "Y" fitting into the output line of the DS pump. Perhaps that "Y" fitting is up out of sight somewhere. But since that stock line is disconnected as well, then no, there is nothing connecting that PS tank and pump to my fuel system as well.

I need to go over there again and just jot down my own notes and make a diagram of what is actually there to get my mind straight on this. Because just sitting here thinking about it, it just doesn't make any sense to me at all why it is plumbed the way it is. Best I can make out, I am running solely off of that driver side gas tank and the passenger side isn't plumbed into the fuel system at all EXCEPT to get fuel put into it when the tank if filled through the filler tube. Which certainly would explain why I used a half tank of fuel just driving the car 55 miles home. I can't remember how much fuel the gas gauge was showing when I filled it up in Thomasville GA, but the gas receipt shows I got 10.4 gallons to fill it up.
 
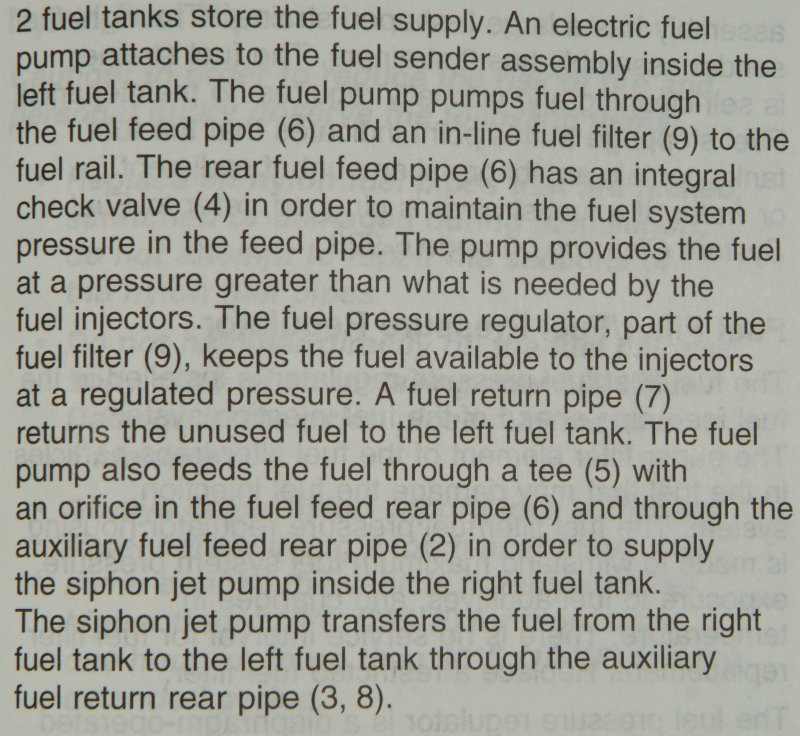
Here's some info from the service manuals that explain pretty well how the plumbing is SUPPOSED to be.

fuel_line_plumbing_01.jpg


fuel_line_plumbing_desc_01.jpg


Of course, from what I saw today, Chris Harwood didn't seem to worry too much about how it SHOULD be done. I'll trace the lines tomorrow and document how they ARE now, and then will have to figure out how to get from how they ARE to how they SHOULD BE.
 
Well, that section of the service manual is proving to be a wealth of information about the fuel system. I'm finally getting answers to questions that puzzled me about how all this stuff is supposed to work. For instance, the reason why my car is so hard to start after it sits for a period of time is because the stock fuel line has a check valve on the pressure side that prevents the pressure from bleeding off when the fuel pump stops running. That is also the reason for having the schrader valve on the stock fuel rail so you can bleed off the fuel pressure when you need to BECAUSE of that check valve. The fuel rails SHOULD always be holding pressure, which makes the car much easier to start, and WHY the fuel pump only has to run for two seconds when you first turn the ignition key before actually activating the starter, to just top off any small amount of pressure that might have bled off.

So do I have either a check valve or a schrader valve on my fuel system right now? Nope.

I guess I have my work really cut out for me to fix this butchering that Harwood did to my entire fuel system. If you are reading this, Chris, thanks bunches.....

Plan A is to try to find out if the stock fuel filter/regulator can handle the fuel flow that my engine needs. That would probably be the easiest way out of this mess, but I just don't know if it can handle the fuel flow that a 700 horsepower engine needs without leaning out from fuel starvation. If it will work, I just hook up the original stock lines to the fuel filter/regulator, then run the fuel line going to the fuel rails from the output of the filter/regulator. Since the fuel return is on the input of the filter/regulator and just turns around and goes back to the fuel pump, all of the fuel stuff on the fuel rail for that return line will just go away. So will the Aeromotive fuel pressure regulator in the driver's side wheel well. I will probably have to replumb the fuel rails anyway, to make the fuel delivery to each injector more balanced. Probably putting a Y connection at the back to take the fuel feed to the back of both fuel rails and keep the crossover in front in place (but using a -08 line instead of the -06 there) would be the best way of going about it. I probably could do away with the crossover completely, though, if I need to simplify it.

Plan B would be to pull everything off of the driver's side fuel pump and replumb everything the right way, incorporating the new fuel filter, fuel pressure regulator, check valve and schrader valve in line somewhere. I would also have to put a "T" or "Y" fitting in so that the fuel pump output on the driver's side could feed back fuel to the passenger side tank like it's supposed to. And just hope that there isn't something critical about the actual size of the orifice for that fuel feed that regulates the volume of fuel passed.

The check valve would likely need to be as close to the pump as I could get it, and probably the best place for the schrader valve would be under the hood where I could get to it easily. No telling how easy those parts will be to come by for my application. I would also have to plumb the passenger side pump into all of this, of course. I'm just hoping that the jet pump in the passenger side fuel tank hasn't gotten damaged from the open lines going to it. The darn thing isn't cheap, plus I really don't want to have to open up that other fuel tank too.

Obviously Plan B will be a lot more complicated to do. But even Plan A isn't going to be a picnic trying to find the stuff to make it work.

Quite honestly, this latest roadblock really knocked the wind out of me. Every time I feel like I am really making headway I find something else that just smack the crap right out of me. I just can't believe the crap I am finding that was done completely wrong or in a slipshod and unprofessional fashion.

Oh, about the only positive thing I did today was to put a heat shrink tubing cover around the electrical connection that Kenny and I opened up to check the wiring on the fuel pump a little while ago. Heat shrink tubing is pretty cool stuff, and almost akin to magic. If you have never used it, it's worth playing with if you want to cover electrical connections and make it look close to professional. Maybe I'll take a pic of it tomorrow if I think of it. Might get too distracted by my screaming obscenities trying to track down and document those screwed up fuel lines, though.

I REALLY need to be careful, however. I'm still VERY afraid that this is all working up to the grand finale of my car going up in a huge ball of flames, and I AM working around gasoline. This is just like watching a Ben Stiller movie where you KNOW what is going to happen next....
 
If I were you I would try to see if I could get a look at a ZR1 Manual and see how GM handled the fuel delivery problem for that set up. I would have to believe they would have solved all your questions with how much fuel is needed for a 700 HP engine and how to get it from the tank to the injectors.
 
If I were you I would try to see if I could get a look at a ZR1 Manual and see how GM handled the fuel delivery problem for that set up. I would have to believe they would have solved all your questions with how much fuel is needed for a 700 HP engine and how to get it from the tank to the injectors.

That's not a bad idea at all. Thanks! :thumbsup:

I'm checking with the guy who modifies stock fuel pumps to dual pumps supposed to handle over 1,000 horsepower engines. -> http://www.lonniesperformance.com/doublepumpers.htm

Then there is also the "Boost-A-Pump" -> http://www.kennebell.net/accessories/boostapump/boostapump.htm, which might be an option I have to consider.

Thirdly, there is an option from Lingenfelter -> http://www.lingenfelter.com/mm5/mer...=L710650197&Category_Code=C232&Store_Code=LPE that replaces the actual pump in the stock fuel pump assembly with a higher flow Walbro unit. For my car I probably would have to use the Boost-A-Pump with this unit, so my guess is that a Boost-A-Pump alone with my stock fuel pump just may not be enough.

As far as I can tell, the stock fuel lines are retained in all of those cases, but I am checking with them to verify that.

If I can just use the stock plumbing up to the fuel filter/regulator, it will make this a WHOLE lot easier to fix, I think.
 
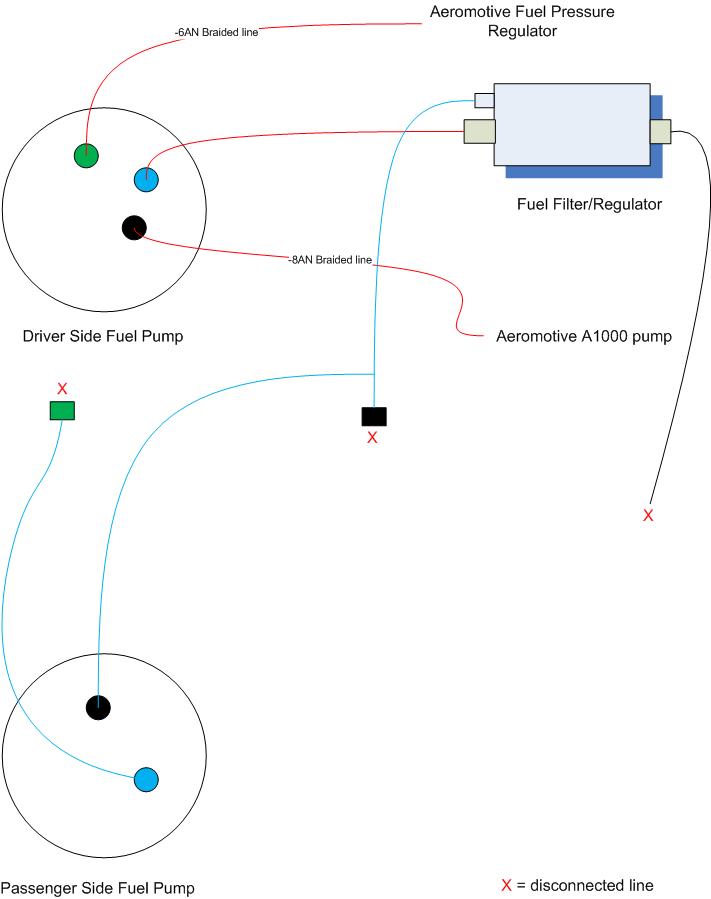
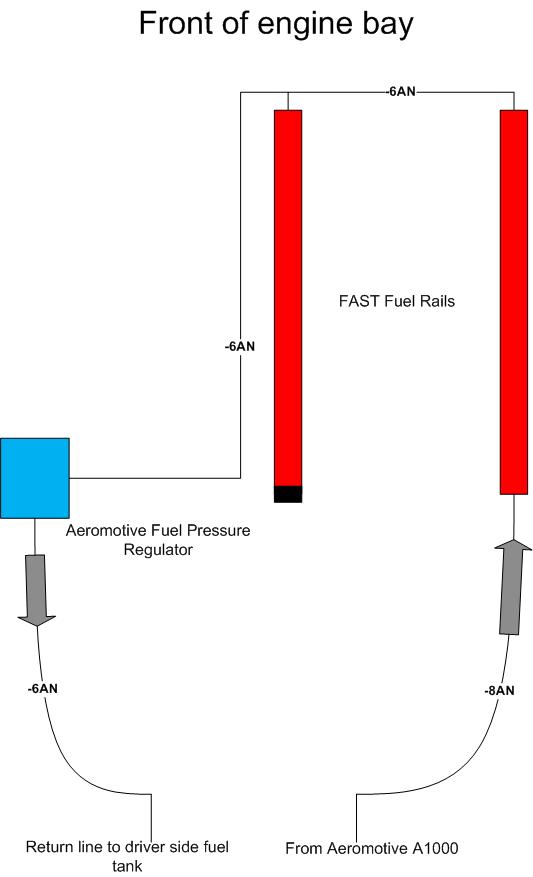
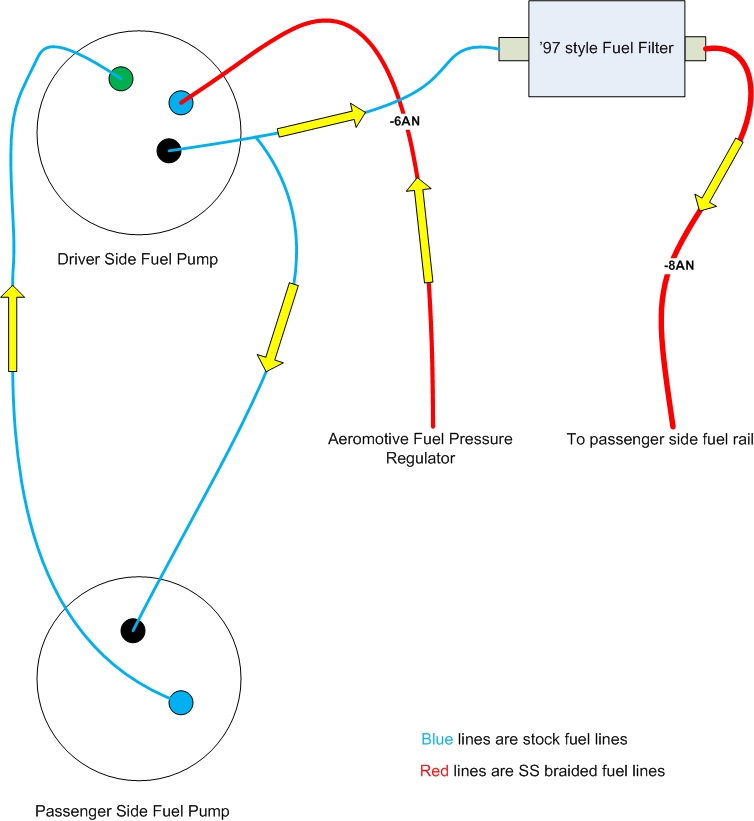
I traced all the lines in the fuel system, and here's what I have now that was installed by Harwood.

fuel_system_diagram_01.jpg


fuel_rail_diagram_01.jpg


So far I have been unable to find out yea or nay whether that stock fuel filter/regulator can handle the fuel flow my engine would need WOT. So I'm pretty much spinning my wheels waiting on this before I do anything further with that fuel system.

In the meantime I started replacing the brake pads, rotors and hubs on the front wheels.
 
Connie wanted to help with this fuel system stuff, so she took a copied page of that stock fuel system and marked the various fuel lines with color codes. This sure helps a lot to see where they are going.

fuel_system_stock_color_01.jpg


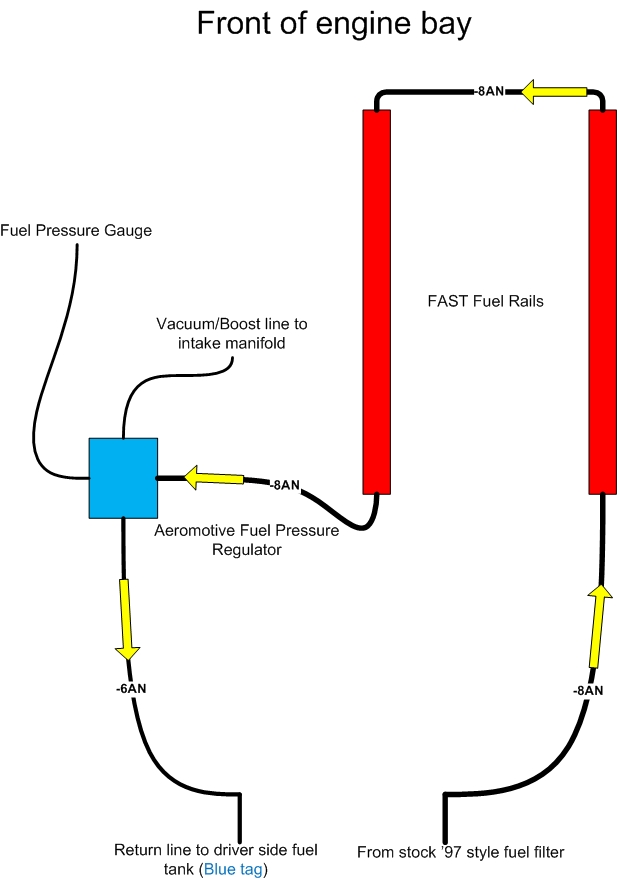
Been raining all day today, so I've been working on the diagrams of the fuel system to match up with what Lonnie at Lonnie's Performance has recommended that I do with this mess. So this is what I have come up with.


fuel_system_diagram_new_01.jpg


fuel_rail_diagram_new_01.jpg


This won't have any easy fuel pressure relief mechanism, however, via the schrader valve in the stock fuel system. I'm also considering that maybe I should use an aftermarket fuel filter using AN fittings instead of those stock fittings. At this point, I'm still not certain if the fuel input and output fittings of that stock '97 filter will match the fuel line ends of my 2002 system.

I will also need several fittings to make this work, but just need to get all my ducks in a row so I know exactly what I need to do this.

Honestly, the details are making my head hurt.
 
I've got nearly all the parts here to get this fuel system done, hopefully. I think I'm just waiting for the fuel filter. Since this one was only made for two model years (97 & 98), I decided to get a few for backup, just in case. The guy where the fuel injectors came from has been made aware of this, how they have been running for a while without any fuel filter in place while at Aaron's shop, and has offered to have me return the injectors and he will inspect them for free to make sure they don't have a any garbage in their internal filters.

I decided to go with the '97 style fuel filter, which will allow me to keep the Aeromotive fuel pressure regulator and use that return line back to the fuel pump. I will hook up the other two stock lines to the driver side pump (going to the fuel filter/passenger side fuel tank, and the other from the passenger side tank) which should then plumb in the passenger side fuel tank. The Aeromotive pump gets taken out of the loop, and I just route -08 the line coming from the output of the Aeromotive pump to the output of the fuel filter and that is all done. At least up to the fuel rails.

As for the fuel rails themselves, I just need to replace that -06 crossover fuel line with a -08, removing the "T" fitting there at the front of the driver side fuel rail, and replacing the -06 return line from that "T" with an -08 coming from the back of the driver side fuel rail to the FPR. Hopefully that banjo fitting from Sweden will work without needing any cutting out of the firewall.

For now I'm not going to mess with the vacuum line coming from the FPR, although I do have the fitting for that purpose at hand. If I put in that vacuum line, then the pertinent table in the PCM needs to be modified, so I'm not at the point yet where I want to do that. Hopefully that open hole in the FPR didn't cause any damage to it being open to road dust while Aaron was test driving the car.

I'm just trying to figure out how to do all this without having to do too many things more than once. I would like to get everything running with just the plumbing straightened out to make sure it all WORKS, but I'm going to have to likely take off that driver side fuel rail to get to that rear fitting, so I don't see any way to not have to remove the fuel rail twice for this. Once to get to that fitting, and then again when I need to pull the fuel injectors out to send them off for testing. But shouldn't be any big deal. I hope. There are an awful lot of things that I am doing for the very first time here. So it's intimidating, to say the least.

Once I have that done, then I still have to get that driver side fuel tank drained to get the pump out of it to send off to Lonnie's Performance for his mod to make it into a high flowing dual pump. So I guess I don't want to send off those fuel injectors until I'm sure I won't need to run the engine again to burn off as much gasoline as I can if I can't empty the tank any other way.

Got the new front hubs and the brakes for the front. Just waiting for some paint to dry on some odds and ends and that should be going together pretty shortly. After that stuff, I will put the new braided brake lines on, then bleed the brakes and that's finished. All new brakes and bearing hubs on the car. I probably won't be able to break in the brake pads properly for a while as the tuning needs to be done first, otherwise doing the stop and go braking to bed the new pads will have the car stalling all over the road.

Seems like just minor stuff at this point, I guess. But it does seem to be coming together with all the hardware stuff I KNOW ABOUT, just about finished. Knock on wood...

With any luck I'll be able to get the tuning done remotely without having to ship the car up to Virginia. Ed Hutchings is supposed to be real good at this, so hopefully I won't need to find a dyno nearby to get some logging done. I don't know of anyone with a dyno within reasonable driving distance that I would be comfortable taking my car to. So if it does need dyno time, I may have to wind up shipping it up north anyway. I'm also hoping that the data logging and my own descriptions of what is happening will be enough to get the driveability issues straightened up.
 
Yesterday I just spent time cleaning up some hardware on the passenger's side front suspension. Cleaned up the bolts, and put a wire brush to a steel panel that goes between the hub and the knuckle that holds the connector for the wheel speed sensor. The panel looks like it had some sort of sealant or something on it, giving it a rough texture where the hub and knuckle meet, so I wanted to smooth it out so the hub would be flush against the knuckle. Since it was steel, I went ahead and put a light coat of paint on it as well. I painted the caliper bracket, so I'm pretty much in a state of waiting for paint to dry thoroughly on those parts before I put the passenger side together and get to the driver's side.

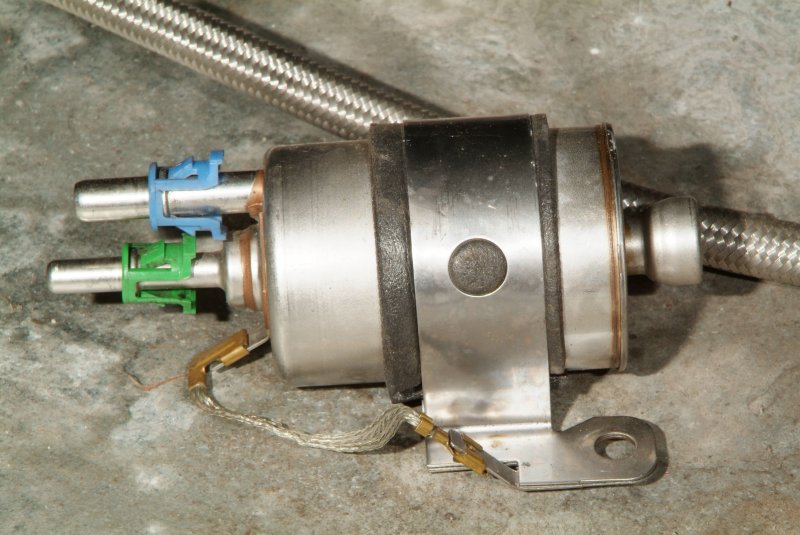
Today I decided to start working on the fuel system. Still waiting on at least one of the new fuel filters to show up, but I figured that in the meantime I could pull out the old one and start rerouting the plumbing back there. Lucky I did, because I found out that there are two sized fittings needed for those three tubes coming out of the fuel pump. Two of the lines are 3/8ths and the other (the blue line) is 5/16ths. Since the return hose from the fuel pressure regulator was on the green line of the pump (which is not correct) it had a 3/8ths to -6AN fitting on it, which, of course, would not work on that 5/16ths tube. So I had to scramble to find one to try to get it here by this weekend. Fortunately Summit Racing carries it (although it was pretty tough to find), so it should get here on Saturday. Lately I've been learning about 10 times as much about the Corvette fuel system than I EVER really wanted to know about. :ack2:

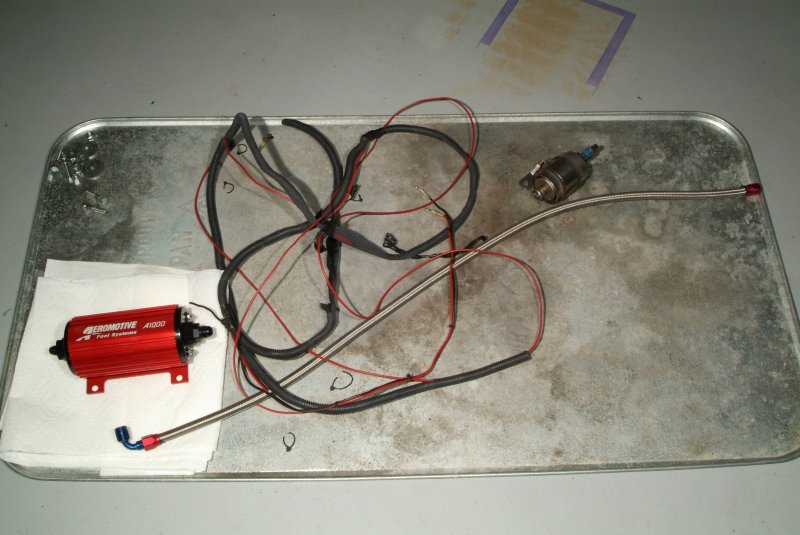
But in any event, I got the Aeromotive pump disconnected and pulled off of the car. Pulled that funky red hot wire off of the fuse block and pulled it out of the car. The darn plastic convoluted tubing that the power and ground wire ran through to the pump OVER the turbo wastegate on the driver's side was all melted and gaping open with the wires exposed. Wonder how long it would have taken for the hot wire itself to have the insulation start melting off of it exposing a live wire right near the fuel lines? :rolleyes:

Anyway, here's the stuff I pulled off of the car today:

aeromotive_gone_01.jpg


And here's a close-up of the fuel filter that came out:

fuel_filter_10.jpg


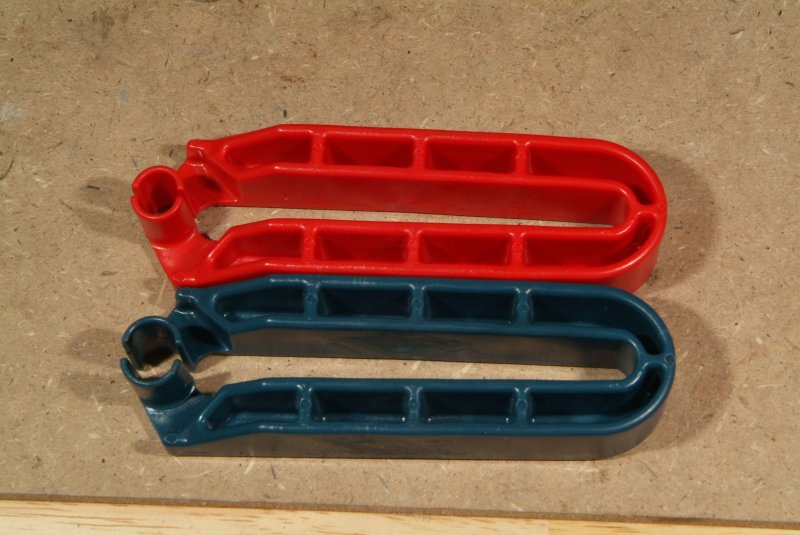
I had read all kinds of horror stories online about getting this filter and the front line from the output separated, so I went ahead and bought the GM tools made for disconnecting these types of fuel connections. This is what they look like:

fuel_line_tool_10.jpg


Actually it came apart very easily for me, so perhaps it was just a matter of having the right tool for the job.

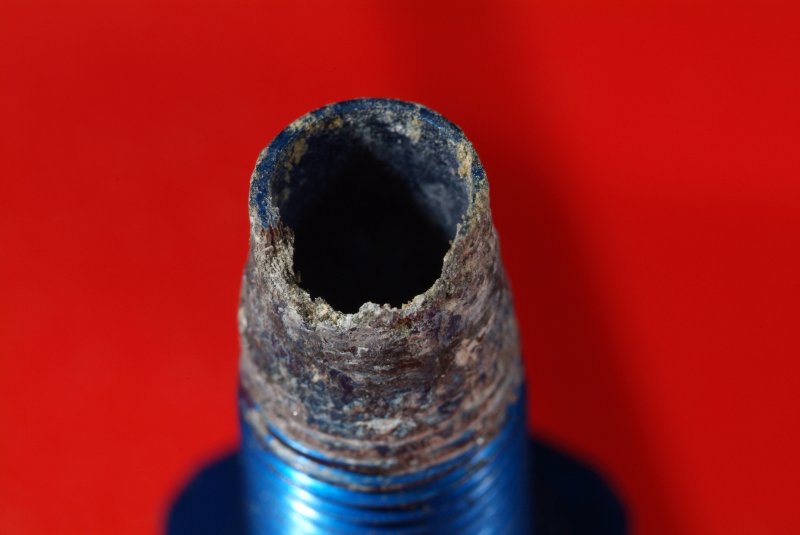
Now when I was trying to figure out exactly what kind of fitting it was that I would be needing for that 5/16ths fuel tube, I decided to take apart the one that came off of the 3/8ths tube that is the fuel OUT line (black tag) coming out of the pump and had been going to the input of the Aeromotive pump. You may recall that when I took a look at the AN fitting at the Aeromotive pump end of this same fuel line, the tip of the fitting was all corroded. Well, come to find out that the fitting on the stock fuel pump side of this same fuel line looked identical.

fitting_corroded_01.jpg


What in the world caused that to happen? I didn't see any corrosion like that on the output side of the Aeromotive pump. But when I take apart the fuel rails, I am certainly going to inspect all those fittings carefully to see what they look like. I sure am glad that I'll be getting those fuel injectors inspected and cleaned. If those fittings were shedding junk, then certainly some garbage got into the injectors since there wasn't ANY filter between those fittings and the injectors the entire time Aaron was running the engine.

Ah well... I've now got to plug those holes in my trunk where the bolts holding the Aeromotive pump were located.
 
Today, I finally got the tool I ordered for pushing the dual brake pistons in the front calipers back into position to mount the new brake pads and new rotors, so I figured I would work on that a bit. As an aside, I got the '97 style fuel filters I ordered, but am still waiting on that fitting to mate the -06 return hose to the 5/16ths steel tube on the fuel pump. I figured I might as well get SOMETHING done today.

Anyway, first thing I wanted to do was to loosen up the bleeder screw on that passenger side front caliper I have hanging loose. Figured I might as well do that before I mounted the hub and knuckle back into place while I had more elbow room in the wheel well. The two rear ones came loose pretty easily, but this one seems a tougher nut to crack. I pulled off the rubber boot around the base of the bleeder screw and it is substantially corroded looking where the screw meets the caliper. Just for chuckles, I tried the driver side front and that one came loose with just modest effort. Looks like I'm going to have to let this passenger side one soak in some PB Blaster for a while before having another go at it.

Now the puzzler is that Harwood had all of the brake plumbing off when he put the engine (twice!) into my car, and I specifically recall him saying one day that he and Justin had bled the brakes when all the brake plumbing was put back together. But that bleeder screw on the passenger side front looks (and sure acts) like it has not been moved anytime very recently. So either it was NOT bled a year and a half or so ago, or else it was and it got corroded up in a hurry since then. Based on everything else that has happened, I think you all know which one I think is the actual case here.

Anyway, hope this isn't going to be an issue. I'm guessing that snapping off a bleeder screw in a caliper is not going to make my best day working on this car. :nonod:

I did buy some stainless steel bodied bleeder screws with the intention of replacing them anyway, but still, I was hoping that this part wouldn't be a headache.
 
I got the fitting today that I needed to hook the return fuel line from the FPR to the correct tube on the fuel pump, so I got that done. Also hooked up the fuel filter and rerouted the -8AN fuel line to the output of the fuel filter. I couldn't get the hose exactly how I would have liked it, as it is draped over top of the transaxle and up the passenger side to the fuel rail and rather tough to get to. There was a mess of other lines that kept me from just tugging it forward as much as I would have liked to. As it was, I had to loosen up the driver side exhaust pipes to get my arm up there to move it around. I was afraid that if I actually pulled it completely out up to where it goes into the tunnel plate, I might not be able to get it back in place at all. I sure as heck didn't want to have to pull the transaxle out for this. But it doesn't have any sharp turns in the hose, so it should be OK where it is.

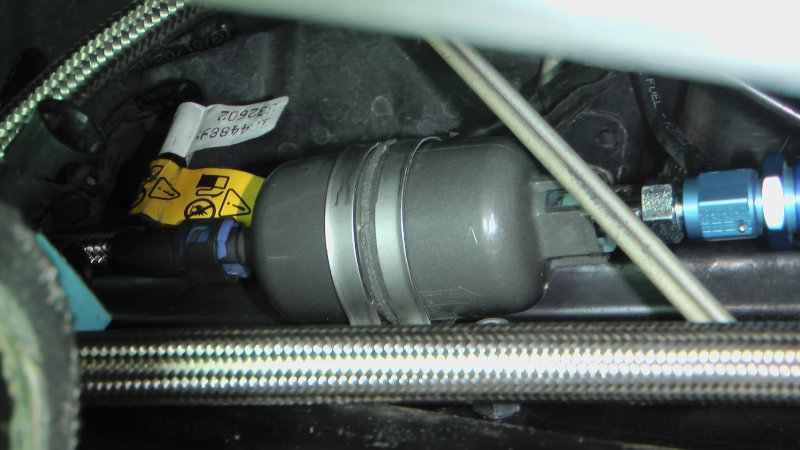
So here's that -97 fuel filter in place:
fuel_filter_20.jpg


The output side is kind of funky because I had to use a quick connect 3/8ths to -06AN adapter, which then goes to a -06AN to -08AN adapter to mate with the -08 fitting on the braided hose.
fuel_filter_21.jpg


I just could not find a quick connect 3/8ths to -08AN adapter. Found this -06AN and also found a -10AN but no -08AN for some odd reason. So I had to use one more fitting in line than I would have liked to.

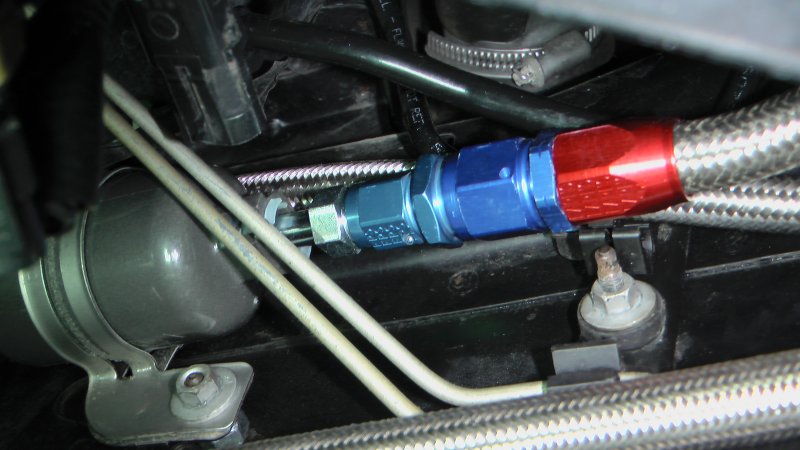
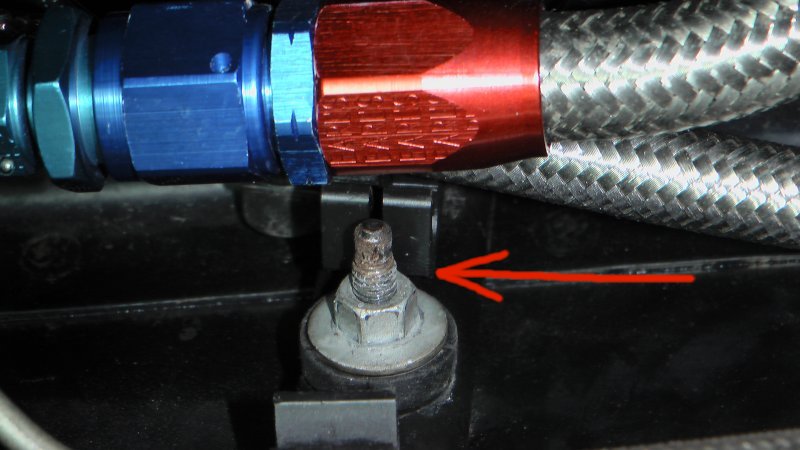
Just when I thought it was smooth sailing from here and I simply had to snap that hose into the output of the fuel filter, I noticed that there is a bracket sitting smack dab in the way of where that franken-fitting needs to go.
fuel_filter_22.jpg


This bracket is used to hold the stock fuel line and some brake lines in place, and since it fed directly into the filter, of course it is right in the way for what I want to do. Just removing the bracket itself wouldn't help, as that mounting bolt is going into the body or frame. I figured the best thing to do would be to just use some washers between the filter bracket and the frame and bring the filter itself out from the frame. That way I could bend the filter mounting bracket slightly so that the hose line would clear the obstructing bracket with enough clearance so it wouldn't bang against it while driving. Seems to be OK now, but I'll see if it gives me any noise related problems when driving the car. Luckily GM seems to use mounting bolts like this that are about 3 times longer than actually needed.

I didn't really like the fuel feed hose going directly over top of the transaxle, not only because of the hose maybe rubbing against the transaxle, but also heat would be transferred into the fuel from it. So I ran some insulating sleeving around the hose to help protect it from abrasion and heat.

So now the fuel system is done (I hope) up to the back of the fuel rail. I didn't cut as much hose as I thought I would be able to from that -08 line to reroute it, so I may have to buy some more to be able to run from the back of the driver side fuel rail to the fuel pressure regulator. I'll have to measure it to see what I need, but if it's more than about three feet, I won't have enough. Hopefully I can get some at the local Advance Auto parts store.

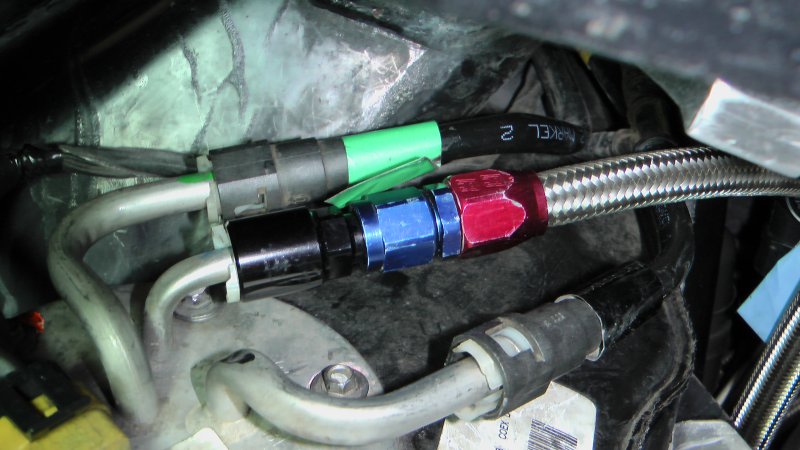
Anyway, I took pics of everything, and here's what the fuel pump looks like with the lines installed correctly.
fuel_filter_23.jpg


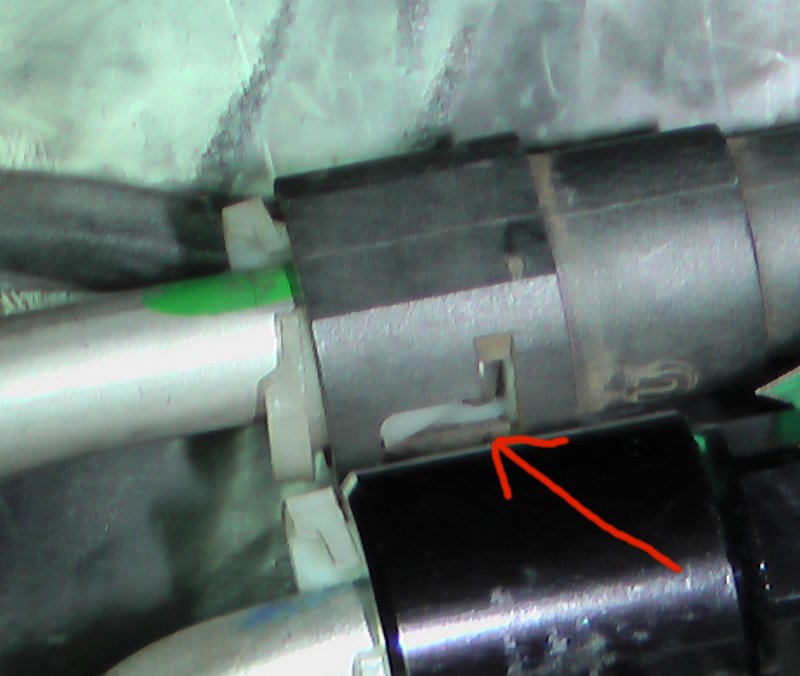
Well not COMPLETELY correct, as it's lucky I took these pics. I noticed that the green line is not seated correctly on that tube on the pump.
fuel_filter_24.jpg


That white tab needs to be clicked into place in the slots on that fitting, and the ends should be perpendicular to the ends. Which they are not in this case. So I'll need to fix that tomorrow.

Got the exhaust pipe put back together again, and that was enough "fun" until next time.
 
Nice progress Rich. Don't you just love it when something is done right knowing you did it yourself. You probably know more about your car now than CH.
 
I made an interesting observation while doing this stuff. There are some instances where you are presented with a choice.

  1. Use your left hand
  2. Use your right hand
  3. See what you are doing
Pick two.

:shrug01:

I'll be quite honest about it, I don't see how people can do this kind of stuff without a lift. Crawling in an out from under a car sitting on jack stands, needing this tool or that, would be absolute murder. It would have made doing this stuff 10 times harder. Heck, I don't know how I could have even relocated that fuel line hose that I did yesterday. As it was I had to position the car on the lift at just the right height and then still had to stretch to reach that hose with my fingers. Laying on my back on the floor trying to do it? Heck, I doubt it. At the very least I would be at the chiropractor's in emergency traction right now.

I bought that lift pretty much on a whim because I was able to save quite a bit of money by subcontracting out getting the garage built. I thought it was kind of frivolous because I was only intending to use it for oil changes and doing REAL clean up underneath the cars. Pretty much saved my bacon with this car, though. I would have gotten rid of it within a week of bringing it home from Aaron's after seeing the problems I faced. And even then, I wouldn't have known the half of them. So yeah, that frivolous decision saved my car. At least up to now, I guess, as I'm still not out of the woods yet.
 
Got the fuel system plumbing done today. I decided to wait till tomorrow to run up the fuel pressure to check for leaks. Didn't want to end today on a sour note if I found any. So I decided to quit while I was ahead and end the day feeling a little upbeat about it.

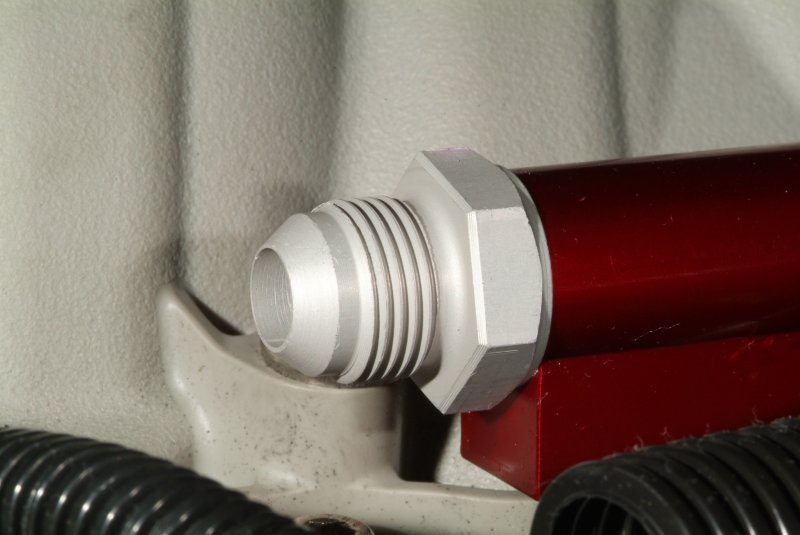
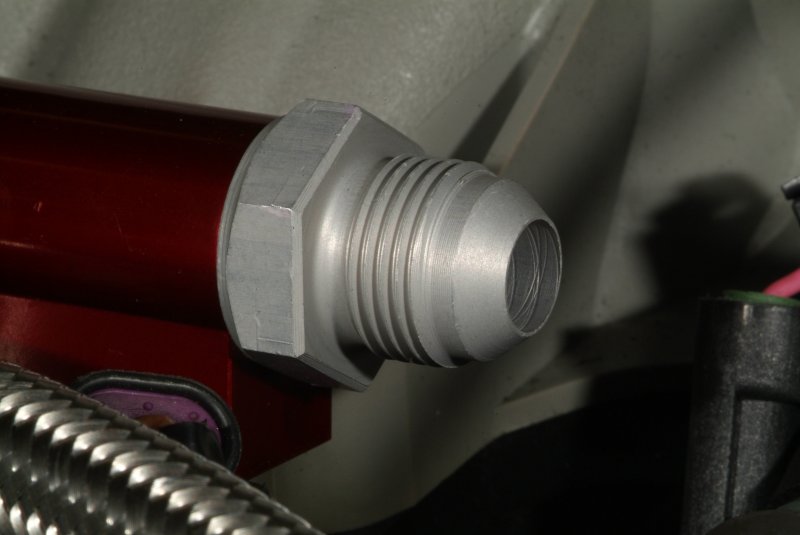
The fuel rail fittings I got from NukePerformance in Sweden worked great.

fuel_rail_fitting_front_d.jpg


fuel_rail_fitting_front_p.jpg


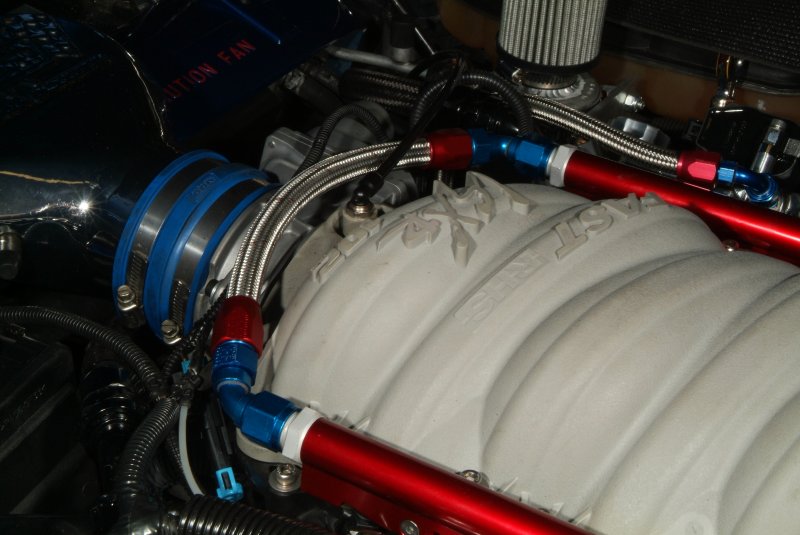
The new hose I put on the front of the fuel rails looks a LOT better now.

fuel_rail_front_01.jpg


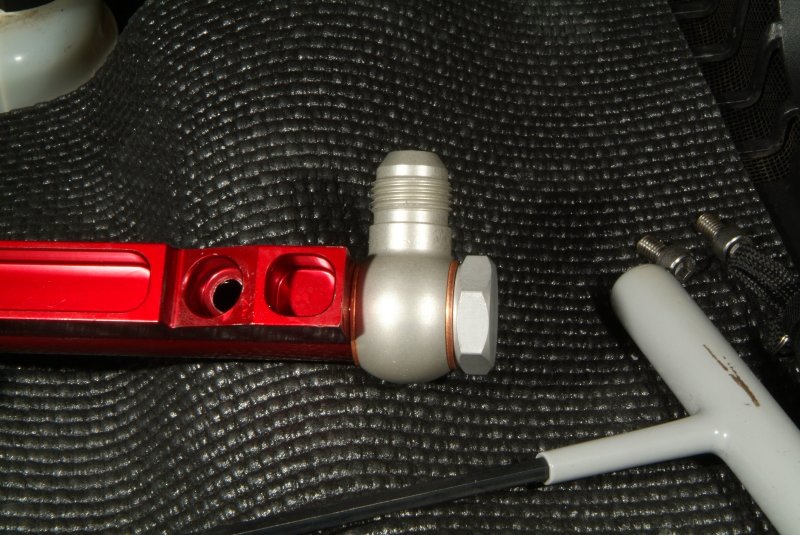
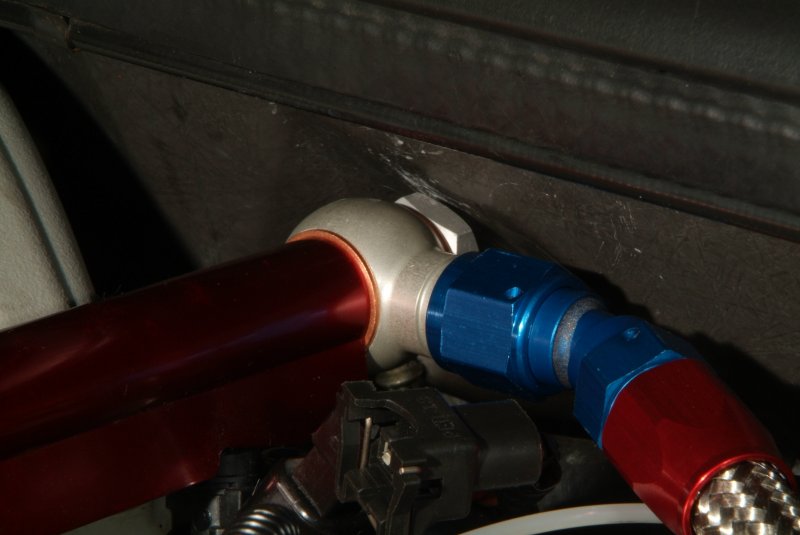
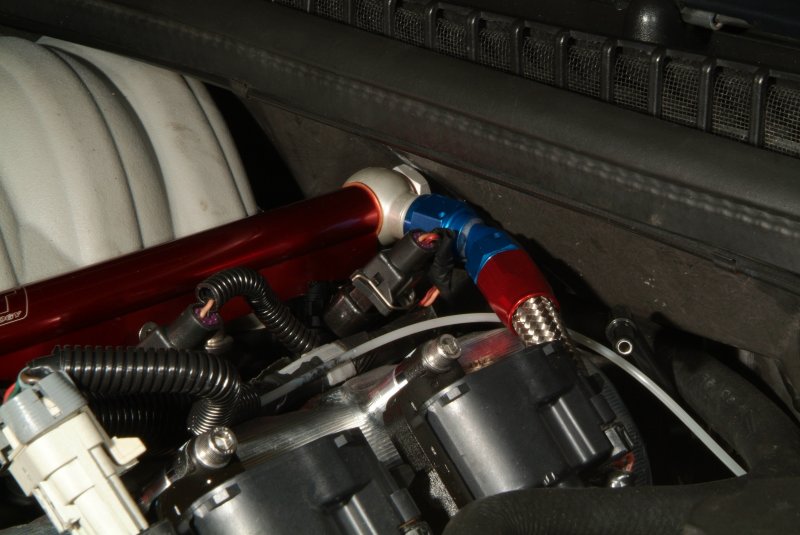
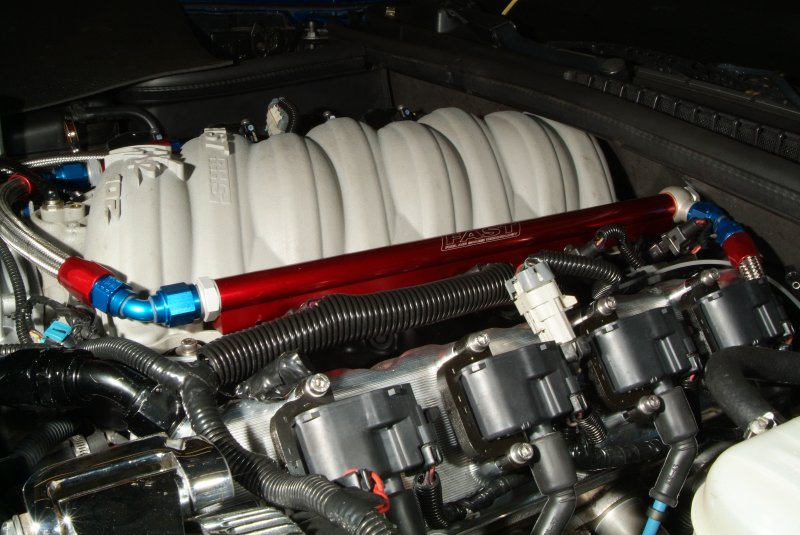
And thankfully that banjo fitting he sent me for the back of the driver side fuel rail fits fine and clears the firewall.

banjo_10.jpg


banjo_11.jpg


banjo_12.jpg


banjo_13.jpg


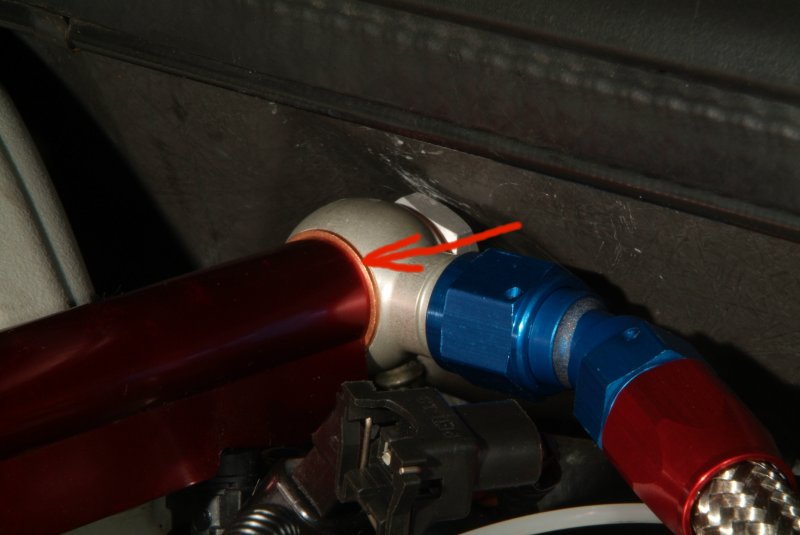
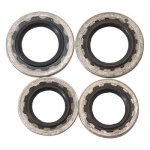
That banjo fitting seals with copper crush washers, so hopefully I tightened them down enough to seal them.

So if all goes well tomorrow and there are no fuel leaks, I'll run the car for a bit and double check for any leaks. If that also goes well, I'll be pulling off the fuel injectors to send off to have then inspected. It still worries me they were run without the fuel being filtered before getting to them. So I'd feel better if I knew they weren't choked with crud.

Then I'm back to figuring out how to drain the fuel tank on the driver's side to get that pump out so I can send it to Lonnie for his dual pump mod.

Now if I can just get the stubborn brake bleeder screw out, then things will be looking pretty rosy. Been spraying it with PB Blaster and tapping it with a hammer to remind it I'm thinking about it.... :hehehe:
 
Well, I did the "pre-smoke test" today. The actual "smoke test" would have been starting up the engine. Hooked up the laptop and then when the 2 second time out shut off the fuel pump, I switched the pump on via HPtuners. Then while fuel pressure built up slowly, I ran around and got under the car looking for any fuel leaks. And things were looking pretty darn good till pressure got over 50psi when fuel started jetting out of the banjo fitting between the copper crush washers and the fuel rail. :ack2:

banjo_leak_01.jpg


Rats.... I thought I cranked down on that banjo bolt pretty good, but I didn't want to run the risk of stripping out the threads in the end of that aluminum fuel rail. Ed Hutchings told me I could use aluminum washers to seal it but I wouldn't think aluminum would be any softer and seal better than the copper washers. But he's the expert, so I'll give that a try. Darn shame I can't get back there with a wrench and just try another 1/8th turn on that banjo bolt. Maybe I need to get some -8AN rubber o-rings, just in case. Hopefully SummitRacing has both the o-rings and the aluminum washers. Whatever I use can't be TOO thick or I'll then run into clearance problems with the firewall.

Oh well, got to wait for the pressure to bleed off a bit and the leaked gasoline to evaporate and dissipate before I do anything else anyway. But at least I didn't try this late yesterday so I would have been laying away all night fretting about it.

Sure wish there was some sort of schrader valve I could put into that fuel line to bleed off the pressure when I need to for situations like this. I hate the idea of just loosening a fitting somewhere and having gasoline spraying at wild abandon till pressure dissipates. Now that the fuel line has that check valve back in place, pressure won't drop off rapidly like it used to.
 
Back
Top