-
Got the Contributing Memberships stuff finally worked out and made up a thread as a sort of "How-To" to help people figure out how to participate. So if you need help figuring it out, here's the thread you need to take a look at -> http://www.corvetteflorida.com/forums/showthread.php?t=3581 Thank you, everyone! Rich Z.
You are using an out of date browser. It may not display this or other websites correctly.
You should upgrade or use an alternative browser.
You should upgrade or use an alternative browser.
427 engine (part 2) - RHS block
- Thread starter Rich Z
- Start date
are you now getting the correct O2 sensor readings?
Heck, haven't even looked. Maybe if I think of it I'll run the laptop out there and just do a quick scan to take a look.
Thanks for reminding me...
shakedown067
Sinister C4
Rich, the money you spent with these two guys, you could have had Kateck or LPE build a killer motor, and had money left?...Hang in there, you will get all of the Sh*t sorted out...
Don't tell Rich that...he's going to go postal on one of these guys and we'll lose our lovely site here! :ack2:
Actually, the motor I have is fine. At least I hope so after all this crap. Even if Katech or LPE had built the motor, that wouldn't have changed much. The whole idea behind getting someone local to do the install was so I could document the entire thing here via video and photos.
Yeah, THAT went well......... :nonod:
Yeah, THAT went well......... :nonod:
shakedown067
Sinister C4
Hmm, you have a good CPA? I wonder how much you could write the car off as a business loss (and lost gains in business)?
Hmm, you have a good CPA? I wonder how much you could write the car off as a business loss (and lost gains in business)?
I'm retired. Not much income to have to be sheltered with write offs, I'm afraid.
Certainly none coming from this site.........

I asked this question about the position of the cats versus the X-pipe to LGM. Anthony says that I would get slightly more torque with the X-pipe right off of the header collectors. If I were using cats and rear O2s, then for their sake, the X-pipe would need to be AFTER the cats.
mickeystoysz16
I have stripes
Just a suggestion that when you have the exhaust and O2 sensors sorted out the way you want them think about having it welded. That should solve the leaks.
Just a suggestion that when you have the exhaust and O2 sensors sorted out the way you want them think about having it welded. That should solve the leaks.
Man, I dunno about that. That means when it comes time to replace the clutch, you have to cut off the exhaust to get to it. Then either buy new or reweld it back together again.
I think I may have fixed the leaks at the collectors/X-pipe today. On a hunch, I loosened the clamps fore and aft on the X-pipe and used a movement persuasion tool (hammer) to move the X-pipe forward about a quarter inch. Then when reclamping the pipes, I moved the clamps forward so they were tightening down on the lips of the X-pipe at the header collectors to hopefully seal there better. Seems to have worked, as I didn't see any leaks there when I ran the engine for a while. I've still got the cat back flanges to tackle, so hopefully the new gaskets will be in tomorrow. I'll crank it up then and look over those forward exhaust connections again at that time.
are you now getting the correct O2 sensor readings?
Well, I hooked up the laptop today to run a short scan while checking out some other things. Had an issue with HPtuners, though. I had to "upgrade" to version 2.23 (and I use that term loosely, since the new version has been in beta stage since 2008), and evidently the config files I was using in 2.22 aren't compatible. The scan worked, but not all values were captured, apparently. But at least I could see that the O2s seem to be working as they should. More or less...
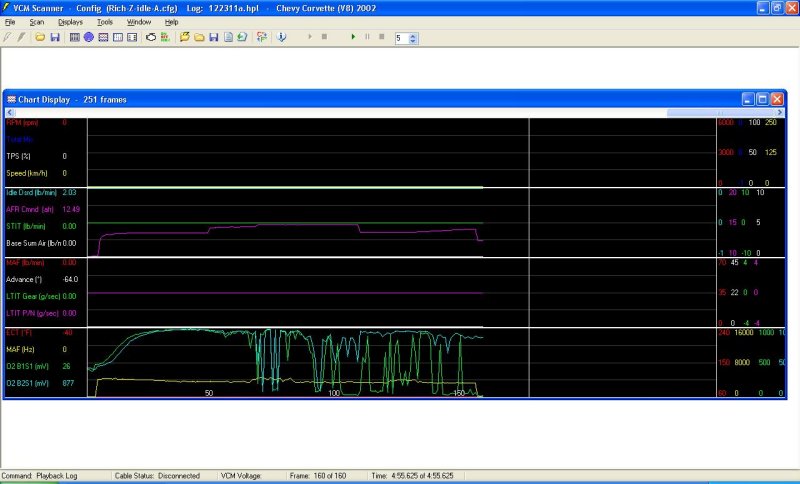
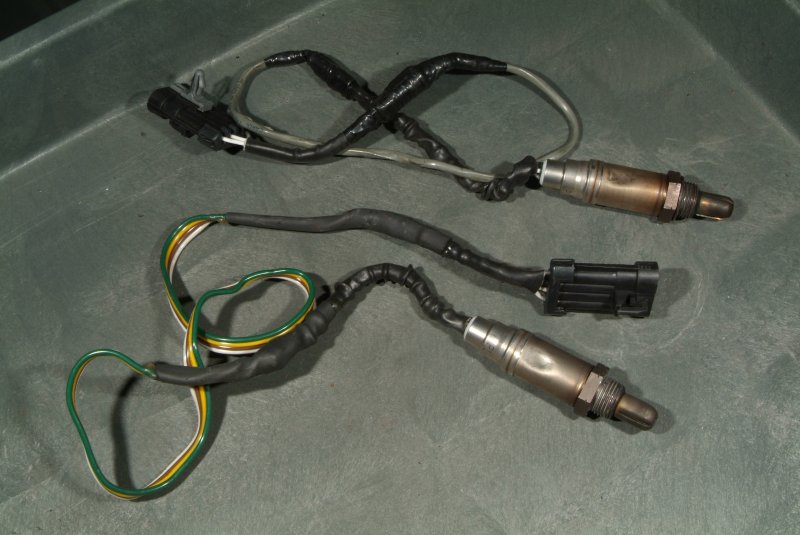
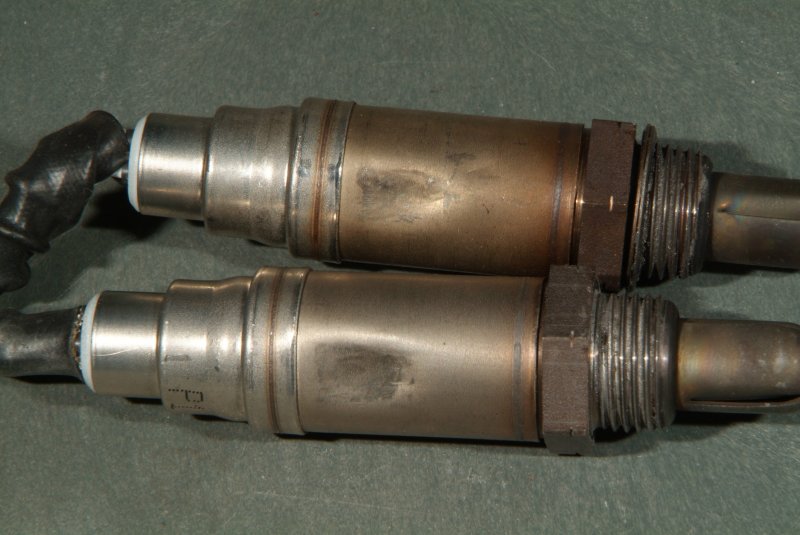
BTW, the old O2 sensors must be the new fangled *dented* variety. Probably goes well with the spliced cables on them....
Been leaning more and more towards using EFILive instead of HPTuners for tuning. Some things about HPTuners just rubs me the wrong way. For instance, their latest upgrade is version 2.23 which was released as a beta version in 2008. It is STILL a beta version 3 years later. When I installed that version (because someone sent me a file that required it), I then found out that the configs I had created in the past in the older version weren't compatible. Darn sloppy and lazy programming to not have the new version accommodate the older configs, if you ask me. I got aggravated and just reverted back to the old version. And that got me to looking at EFILive again.
Besides, HPTuners was not at all helpful when I related the issues with my car and the blown PCMs. They said I would have to buy a new license regardless of the fact that my current one for my car was now completely worthless. EFILive, on the other hand, simply issue me a new license to compensate.
So with that in mind, I've been looking over this wideband stuff. I noticed that the cable for EFILive has a connector to utilize a serial connection from a wideband controller. Looking further into this I read of some people having issues using an analog signal from their wideband. Seems like nothing is black and white any more.... :ack2: Even when you think it is, it just means you haven't researched it enough to find the gray.
In any event, I was looking over this ZT-3 unit from Zeitronix, reading the install procedure and saw this blurb:
Well, that would be a challenge with the STS rear mount turbos. With that in mind, will the results I see from a wideband be accurate?
Besides, HPTuners was not at all helpful when I related the issues with my car and the blown PCMs. They said I would have to buy a new license regardless of the fact that my current one for my car was now completely worthless. EFILive, on the other hand, simply issue me a new license to compensate.
So with that in mind, I've been looking over this wideband stuff. I noticed that the cable for EFILive has a connector to utilize a serial connection from a wideband controller. Looking further into this I read of some people having issues using an analog signal from their wideband. Seems like nothing is black and white any more.... :ack2: Even when you think it is, it just means you haven't researched it enough to find the gray.
In any event, I was looking over this ZT-3 unit from Zeitronix, reading the install procedure and saw this blurb:
Never position the oxygen sensor on the high-pressure side of the turbocharger.
Well, that would be a challenge with the STS rear mount turbos. With that in mind, will the results I see from a wideband be accurate?
navy2kcoupe
!ereH nI depparT m'I pleH
In any event, I was looking over this ZT-3 unit from Zeitronix, reading the install procedure and saw this blurb:
Well, that would be a challenge with the STS rear mount turbos. With that in mind, will the results I see from a wideband be accurate?
Sounds like a call to Zeitronix is in order..........
Andy :wavey:
Merry Christmas Rich and Connie!
Dot and Andy
I pulled off the ignition stuff today to replace everything. I noted that there were NGK TR6 spark plugs in place, which is what I am also replacing them with. However the gap on the old plugs was .022 to .025, with most of them at the .022 setting. Nearly everyone I have seen recommends .032 to .035 on those plugs, so I have the new ones set at .035. I'm curious to see if that will make much of a difference in how the engine runs. Seems to me it should, because that small gap could have been causing incomplete combustion in the cylinders.
I wasn't able to put everything back together again today because the bolts attaching the coils to the valve covers are too long. The mounting tabs on the stock coils are about a quarter inch thinner than the tabs on those MSD coils. So this gets shelved till I can run out on Monday to get shorter screws, standoffs, or washers.
Supposed to rain tomorrow (Christmas) so maybe I'll be in the garage again. The exhaust gaskets came in just a short bit ago, so many I can finish up the exhaust stuff.
Benjamin
New member
I pulled off the ignition stuff today to replace everything. I noted that there were NGK TR6 spark plugs in place, which is what I am also replacing them with. However the gap on the old plugs was .022 to .025, with most of them at the .022 setting. Nearly everyone I have seen recommends .032 to .035 on those plugs, so I have the new ones set at .035. I'm curious to see if that will make much of a difference in how the engine runs. Seems to me it should, because that small gap could have been causing incomplete combustion in the cylinders.
.
IMHO I would gap them at a smaller gap like the .022-.025 range. Under boost @ .035 the spark might be "blown out" and can cause mis-fires. on Nitrous cars we always lower the gap from .045 to .032 and this is on "stock" cars making a 300ish HP or so with Nitrous on stock compression and ignition system.
IMHO I would gap them at a smaller gap like the .022-.025 range. Under boost @ .035 the spark might be "blown out" and can cause mis-fires. on Nitrous cars we always lower the gap from .045 to .032 and this is on "stock" cars making a 300ish HP or so with Nitrous on stock compression and ignition system.
Believe me I did a lot of checking around, and it seems that you need to take an average out of all of the recommendations that people will make. But generally for LS engines with boost under 12psi with TR6 plugs, a gap of .032 to .035 was the range most often recommended. On full blown race cars and cars running 20+psi, yeah, a smaller gap is recommended. My boost springs are only 10lbs, and CR is at 9.8:1.
But also, it appears that each individual engine can have it's own preference for plug style, construction, heat range, and gap. All I know at this point is that my engine is not running right concerning throttle response, and something seems amiss in the 1500 to 2000 rpm range. Quite a few people have indicated issues with those MSD coils, so they are going. The spark plug wires on there are mediocre, at best, so they are going. Might as well replace the spark plugs with ones most commonly recommended and gap them were most people recommend they be set at while I am doing this.
I need to get better pics of the spark plugs to show. The depth of field on the first set of pics I took sucks. But from what I can see, they are showing the engine is running too rich. At least in my limited novice opinion.
RevXtreme 1
www.revxtreme.com
TR6's are a bit hot for 15# of boost as well....we go one colder for safety and gap at 25-28 at that boost.
TR6's are a bit hot for 15# of boost as well....we go one colder for safety and gap at 25-28 at that boost.
As I mentioned, I am running 10 lbs of boost, not 15. Actually that's what the springs are set at, so quite likely at the engine, it's not even 10 psi...
Well, it started out as a good day.
I replaced the spark plugs, spark plug wires, put cool socks on the wires, and replaced the coil packs with stock ones. Then I pulled out the MAF and sprayed it down good with MAF cleaner. Aaron had gotten oil into the air intake a couple of times, so I wanted to make certain the MAF was nice and clean and not causing me additional issues.
Then I pulled off the cat back pipes and put on new gaskets. BTW, the 2.5 inch gaskets I got from RockAuto are much better and thicker than the ones I got from Summit. I slapped on some gasket sealant on both sides of the gaskets then put the pipes back together again. Cranked up the engine, put it up on the lift, and everything seemed to be just fine. Engine ran fine, so I didn't screw anything up in the ignition system, and NO leaks in the exhaust....
Yep, things were looking up...
But then started going down hill rapidly.
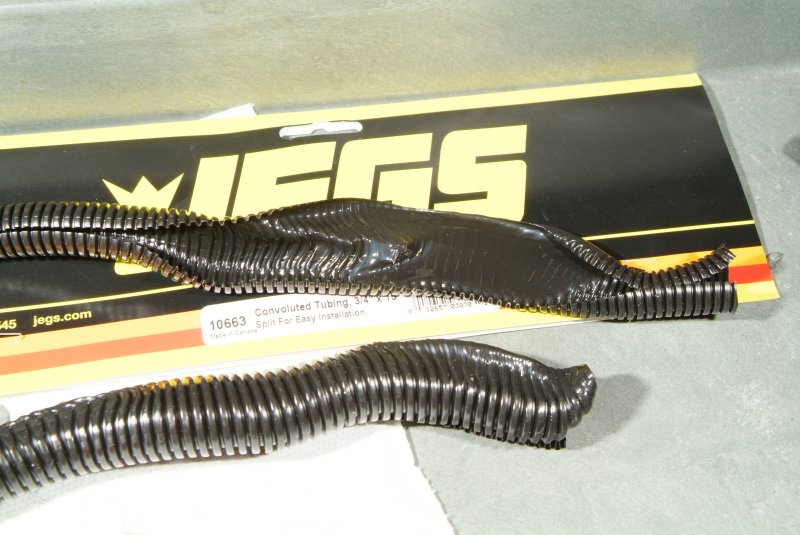
I checked under the hood to make sure everything was still holding up, and I noticed that the convoluted tubing (I got this stuff from JEGS) I had put on some of the wire harnesses (that are just being held together with wrapped electrical tape) didn't fare too well with the heat. The ones right at the lower edge of the valve covers, even though they were touching any metal, after just 12 minutes of runtime, were about to become puddles of melted plastic....
Wonderful......
Oh well..... I decided to tackle that rattling turbo pipe running up the passenger side of the car, so I pulled the wheels on that side and started removing wheel well panels that looked like they might need to be out of the way. That was when I noticed something in the rear quarter panel and at first thought something was building a nest near my differential. No, worse, MUCH worse...
Apparently Aaron left the brake line there rubbing against the inside boot on the differential half shaft, and the friction eventually wore through the boot dropping lubricant onto the rear cradle through the slit. I'm not sure if the brake line itself has been damaged, as I haven't cleaned up that mess yet.
So yeah, something else I need to fix now. :banghead: First I have to figure out if this is something I can even do myself here.
Oh yeah, the icing to the cake was that I had bought a flexible shaft viewer so I could poke around in places I really can't see with the naked eye as a Christmas present for myself, and today was the first time I even opened up the box. Figured this would be a good time to try it out and get a good bird's eye view of that leaking half shaft boot. Yeah, the SOB doesn't work. No screen display at all. It powers up and the light at the end of the shaft works, but the screen itself, nothing...
:ahh: :ahh: :ahh:
I replaced the spark plugs, spark plug wires, put cool socks on the wires, and replaced the coil packs with stock ones. Then I pulled out the MAF and sprayed it down good with MAF cleaner. Aaron had gotten oil into the air intake a couple of times, so I wanted to make certain the MAF was nice and clean and not causing me additional issues.
Then I pulled off the cat back pipes and put on new gaskets. BTW, the 2.5 inch gaskets I got from RockAuto are much better and thicker than the ones I got from Summit. I slapped on some gasket sealant on both sides of the gaskets then put the pipes back together again. Cranked up the engine, put it up on the lift, and everything seemed to be just fine. Engine ran fine, so I didn't screw anything up in the ignition system, and NO leaks in the exhaust....
Yep, things were looking up...
But then started going down hill rapidly.
I checked under the hood to make sure everything was still holding up, and I noticed that the convoluted tubing (I got this stuff from JEGS) I had put on some of the wire harnesses (that are just being held together with wrapped electrical tape) didn't fare too well with the heat. The ones right at the lower edge of the valve covers, even though they were touching any metal, after just 12 minutes of runtime, were about to become puddles of melted plastic....
Wonderful......
Oh well..... I decided to tackle that rattling turbo pipe running up the passenger side of the car, so I pulled the wheels on that side and started removing wheel well panels that looked like they might need to be out of the way. That was when I noticed something in the rear quarter panel and at first thought something was building a nest near my differential. No, worse, MUCH worse...
Apparently Aaron left the brake line there rubbing against the inside boot on the differential half shaft, and the friction eventually wore through the boot dropping lubricant onto the rear cradle through the slit. I'm not sure if the brake line itself has been damaged, as I haven't cleaned up that mess yet.
So yeah, something else I need to fix now. :banghead: First I have to figure out if this is something I can even do myself here.
Oh yeah, the icing to the cake was that I had bought a flexible shaft viewer so I could poke around in places I really can't see with the naked eye as a Christmas present for myself, and today was the first time I even opened up the box. Figured this would be a good time to try it out and get a good bird's eye view of that leaking half shaft boot. Yeah, the SOB doesn't work. No screen display at all. It powers up and the light at the end of the shaft works, but the screen itself, nothing...
:ahh: :ahh: :ahh:
RevXtreme 1
www.revxtreme.com
You can replace the boot yourself. The side you need to do remove the wheels/tire, loosen the control arm nut & remove, then using a pickle fork pry it while hitting the bracket it seats into with a large hammer. Should pop right out. Then you can pivot the entire rear hub assy. The lower ball joint removes the same way only larger and harder. You may need a short allen wrench to put in the end to hold in place so the lock nut can be removed. Most are 19 & 21 mm I think.
Then remove the axle retaining nut from the hub and on the trans/diff side use a large pry bar and the inner part of the axle will pop right out (a retaining ring holds it in place). Then supporting the outer hub so it swings out drive the outer part of the axle back through the hub spline and you will be able to remove the entire axle.
Then careful not to damage the good boot, remove the bands that secure the ripped one. You will be able to see how it is held together with the boot slid back. (another inner ring type). When you separate the CV joint the ball bearings will fall. Be ready...dont loose them! Pull the old boot off the shaft and there will be a mess of grease. Clean it all out with brake clean (several cans) and slide the new small band on the shaft, then the new boot, reassemble the CV joint and with the cleaned ball bearings. Stuff and pack it all with new grease (dont be stingy) and then snap it back together and install the large band. Reinstall in reverse of removal. The axle will need to be forced back into the diff and you will here a sharp snap as it seats. All done and good as new.
Looking back at my posts concerning Aaron and his die-hard supporters attacking me for trying to point out the obvious really gives me no joy that I was right.....but the past is the past.
You still know you can ask for help on any of it....there is still a MAJOR issue with how the crankcase evac is now that will result in greatly reduced engine life, but I can't force you to see the light and do it right so that will be another hard learned frustrating & expensive lesson to come.
Good luck.
Thanks Tracy, but I've decided to replace both half shafts. Hell, everything else is new on that car, so why stop here and now? Everyone tells me replacing the half shafts is pretty easy to do. I am going to order new ones and in the meantime try to have any tools I need here ready for when they show up. The real pisser about this was that I was feeling pretty good thinking that I nearly had the hardware stuff squared away (except for the fuel system) and would be ready to get to the tuning stuff by this weekend. Honestly, see that ruined boot was a real kick in the nuts to me.
Yes, I admit that I put too much faith into Aaron. Even Connie, who is a much better judge of character than I am, is pretty shocked at how this turned out with him. All things considered, I believe I am best off just not trusting anyone any longer. Trusting people just really hasn't worked out all that well for me.
Yes, I admit that I put too much faith into Aaron. Even Connie, who is a much better judge of character than I am, is pretty shocked at how this turned out with him. All things considered, I believe I am best off just not trusting anyone any longer. Trusting people just really hasn't worked out all that well for me.