• Got the Contributing Memberships stuff finally worked out and made up a thread as a sort of "How-To" to help people figure out how to participate. So if you need help figuring it out, here's the thread you need to take a look at -> http://www.corvetteflorida.com/forums/showthread.php?t=3581 Thank you, everyone! Rich Z.

427 engine (part 2) - RHS block

Ratcheting GearWrench wont fit due to the tight area. You may also need to cut the end off of a allen wrench to fit in the end of the ball-joint stud if it starts to slip. You can use the open-end part of the wrench on the nut.
 
Ratcheting GearWrench wont fit due to the tight area. You may also need to cut the end off of a allen wrench to fit in the end of the ball-joint stud if it starts to slip. You can use the open-end part of the wrench on the nut.

Hmm, rats. I've gotten spoiled by the ratcheting Gearwrench wrenches...

With the half shaft out, a regular allen wrench should fit into that stud just fine. But yeah, if the shaft were in, it would be a bugger to get to....

BTW, how do you torque these stud nuts if you can't use a socket on them?
 
Just get them as tight as you can w/a open end wrench and we have never had any come loose in all the years. :thumbsup:

Is that what is known as "torque to yield"? I've often wondered if the "yield" part of that meant the person doing the torquing, or the part being torqued. Basically which one gives up first.
 
Didn't do a whole lot today on the car. Connie and I drove out to talk to Ryan at SS Performance since the local Corvette club was having a get together out there. Looks like I'm going to be needing a new shop to take my vehicles to, as the last two just didn't work out well. Looks like he has a nice shop out there, so we'll see how it goes.

Anyway, all I did on the car was to get the knuckle off of the lower ball joint and then get the hub out of the knuckle. Wasn't too tough, but I had to take the knuckle on and off of the ball joints several times to hold it stable while I would remove the bolts holding the hub in place. They were permatexed in pretty solidly.

So here's a question. Should I be using a Permatex thread locker on all these bolts and nuts?

Oh, btw, the nut on the lower ball joint was not on very tight at all. Just as was the case with the upper ball joint. So much for this stuff having all been checked.....

Now when I go to put this stuff all back together again, just what does THIS mean concerning the torque specs?
Lower Control Arm Ball Joint Stud Nut (1st Pass) 20 N·m 15 lb ft
Lower Control Arm Ball Joint Stud Nut (2nd Pass) 3 ½ flats
Lower Control Arm Ball Joint Stud Nut (Final Pass) 70 N·m 52 lb ft

What does "3 1/2 flats" mean?

Then on the upper ball joint, I see:
Upr Control Arm Ball Joint Stud Nut (1st Pass) 20 N·m 15 lb ft
Upr Control Arm Ball Joint Stud Nut (2nd Pass) 250 deg
Upr Control Arm Ball Joint Stud Nut (Final Pass) 55 N·m 41 lb ft

So what does "250 deg" mean there?

Anyway, I'm going to be cleaning up everything there on the suspension before putting it all back together again. Might as well get the crud off of it all while it's easy to get to.
 
Interesting.... I'm browsing through the 2002 Corvette service manuals trying to find some info on the wiring info for the fuel system and happened to stumble upon a section called "Heated Oxygen Sensor (HO2S) Wiring Repairs".

I'll quote the pertinent section mentioned there...

Notice: Do not solder repairs under any circumstances as this could result in the air reference being obstructed.

If the heated oxygen sensor pigtail wiring, connector, or terminal is damaged the entire oxygen sensor assembly must be replaced. Do not attempt to repair the wiring, connector, or terminals. In order for the sensor to function properly it must have a clean air reference. This clean air reference is obtained by way of the oxygen sensor signal and heater wires. Any attempt to repair the wires, connectors or terminals could result in the obstruction of the air reference and degrade oxygen sensor performance.

This reference is found on page 8-31 of the service manual #3.

So much for Aaron's claim that soldering in trailer hitch wire is perfectly acceptable because "wire is just wire".
 
Was over in the garage today just puttering around with the car, cleaning up stuff and looking for more wires hanging too close to the headers to try to wrap them up to keep the heat from affecting them.

Found a few more issues that need to be noted....

Here's another part of that plastic shield behind the left from fender that got broken, apparently from Aaron tugging on the fender to get the PCM out for Jim to program on the workbench. With all this breakage that took place, I sure wish they had just done the tuning through the OBD port
broken_fender_tab_01.jpg


Next I noticed that one of the two screws to the right of the TAC module on the PCM had not been put into place.
pcm_missing bolt_01.jpg


Looking further, I found that the single screw to the right of the TAC module was missing as well, so that module was pretty much just flapping around on the PCM. I couldn't get a pic of the actual screw, but the arrow shows where it is located.
pcm_missing bolt_02.jpg


Seems to me that the wiring in there is pretty much a mess as well. Sure wish Aaron had cleaned up that bird's nest when he was done in there.

Next I found one of the bolts holding the STS scavenge pump onto the frame was missing.
scavenge_missing_bolt_01.jpg


Now, with the hub out of the knuckle, I was able to get a much better shot of that damaged wheel speed sensor that was on the left rear wheel.
speed_sensor_cable_02.jpg


Lastly (for now, anyway), can anyone tell me what this doohicky near the starter is and how I can go about tightening it to fix that oil leak? Does that cable end come out, and if so, how? It looks like the thing is only made of plastic, so I don't want to try to shoehorn a wrench into there to try to tighten it. With that connector out, I may have a socket that would work on it.
oil_leak_02.jpg
 
Go to your parts store and have them look it up on there computer. When they find it ask if they have one in stock you can look at. If so you can actually see what it is and how to deal with it.
 
I found out that it's an oil level sensor. Has a sort of rod that runs into the oil pan and is sealed with a large O-ring. The electrical connector is held in place with a latch that is accessible though a slot at the 2 o-clock position in the picture (not really visible, however). I was able to get the connector unlatched with a right angle dental pick, then put a socket on it and tightened it about an eighth of a turn. I'll just have to see if that seals it up, otherwise I'll need to buy a new one and install it next time I change the oil in the engine.
 

Attachments

  • oil_level_sensor_01.jpg
    oil_level_sensor_01.jpg
    4.2 KB · Views: 163
  • oil_level_sensor_02.jpg
    oil_level_sensor_02.jpg
    11.2 KB · Views: 173
if it seals with an o-ring I wouldn't put it past Harwood to reuse the factory o-ring instead of putting a new one on "just because"

IMHO unless the seal is made to be reusable then it shouldn't be reused once it has been torqued down initially.
 
if it seals with an o-ring I wouldn't put it past Harwood to reuse the factory o-ring instead of putting a new one on "just because"

IMHO unless the seal is made to be reusable then it shouldn't be reused once it has been torqued down initially.

I've been checking around, and some people have indicated that the sensor can leak through the center around the o-ring itself. So quite likely, I would just go ahead and order the entire sensor with the new seal, rather than just getting a new seal, and finding that it STILL leaks. Heck, it's only $19.00, so I feel like I'm getting off lightly with this one.....
 
if it seals with an o-ring I wouldn't put it past Harwood to reuse the factory o-ring instead of putting a new one on "just because"

IMHO unless the seal is made to be reusable then it shouldn't be reused once it has been torqued down initially.

BTW, I was thinking about this, and I feel I need to point out that the engine was pulled and the oil pan pulled off while my car was in Aaron's care. Granted he farmed that work out to another shop, but the possibility remains that this sensor was removed at that time, and then simply put back in using the same o-ring seal. Furthermore, Aaron specifically stated to me that there were no oil leaks at all from the engine, and yet there is this obvious, albeit slow, oil leak coming from this sensor that Aaron SHOULD have at least noticed. At this point, I don't know who CAUSED the leak, but the fact remains that the leak still existed after the car was on Aaron's watch.

Furthermore, when the engine was pulled, the heads were removed and Aaron told me they were resurfaced, which he claims is his SOP when dealing with a blown head gasket. As such, the valve train was certainly removed, and it has to be noted that afterwards a rocker arm shaft broke, and Aaron discovered that the valves were adjusted two full turns too tightly. Sorry, but as attractive as that scapegoat may appear to quite a few people, this all just cannot be laid as blame on Chris Harwood. Not 14 months after Harwood last laid hands on the car, in my opinion.
 
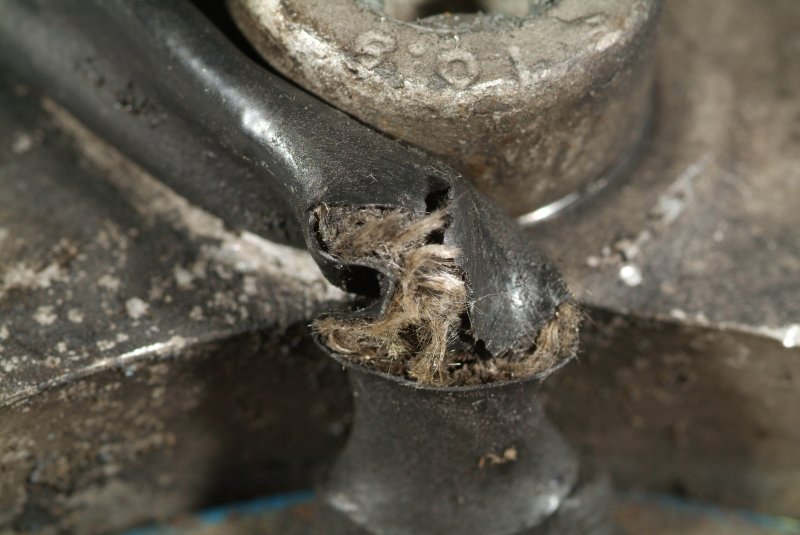
Hell, Rich, after the last few posts by you........it's no wonder that Aaron was
"antsy" when you drove the car home. All of those sloppy, half done, repairs are
a sure guarantee of a "train wreck". I would be willing to bet that he was
wearing Depends when you took the car home. I would have been if I returned
a car in that condition. BUT............on the bright and good news side........it's now
at your place where you can work on it, AND DO THE JOB RIGHT! It might be a
real pain in the ass, but when you're done with it, there will be some pride in
doing it right as well as some satisfaction in knowing that it will be reliable. All
of the help available to you on this, and other, forums should get you through
the problems and help you to learn more about your car. Been a rough couple of
years, but now that you have the car back and are tackling the problems yourself,
the light at the end of the tunnel is getting brighter and bigger and it AIN'T NO
TRAIN COMING AT YOU EITHER! Oh yeah, and one other thing..........I ain't
rooting for the Ravens this Sunday. If you're a Ravens fan, you're on the other
side of the stadium from me! :D
Andy Anderson :wavey:
 
HAH! Honestly, I don't give a flip about professional (or even college) sports. Not since I was a kid and figured out that it's just a business and doesn't have a damn thing to do with local boys playing against some team composed of other town's local boys. Heck, you might as well stand out on the street and root for Lowe's over Home Depot, or McDonald's over Burger King...... :rofl1:
 
Sorry I have been gone a few days....but here are some answers:

Torque to yield is in referance to special bolts (mainly head bolts, main cap bolts, and rod bolts) where the bolt is torqued to spec and then a certain degrees past where the bolt begins to stretch, or "yield". Standard in the industry now.

No loctite needed on the balljoint & end joint nuts...they have locking nuts that secure them.

A "flat" is the flat side of a nut or bolt head. Turning 3 "flats" is tightning so the flat side has rotated 3 positions. Same as X amount of degrees past torque spec would be.

The oil level sensor is cheap, replace it.

If the heads or deck was surfaced, then you need to redo valvetrain geometry to acheive the proper wipe pattern and pre-load on the lifters. Thats most likely what broke the rocker.

You will need both a adjustable pushrod legnth checker and someone to look carefulley at the wipe patter. The LS motors are non adjustable rockers and even with adjustable aftermarket ones push rod legnth and wipe pattern can NEVER be determined prior to fianal assy. Most shops "guess" and then say "the sewwing machine/lifter noise is normal". Not true. Even a pretty radical build should have no valvetrain noise louder than stock. Just like degreeing a cam. Most will come close dot-to-dot, but NEVER trust they are. Always degree the cam.

Your pics sure paint a story on the skills and care NOT available during this build. Absolutely horrible. You are doing a good job so far.

And I still dont understand taking the PCM out to bench flash it? Always use the OBDII port unless it is a ong distance flash where the car is not available.
 
And I still dont understand taking the PCM out to bench flash it? Always use the OBDII port unless it is a ong distance flash where the car is not available.

I asked Aaron about this after learning that 3 PCMs hot gotten blown, wondering if perhaps pulling them from the car and laying them on a bench might have contributed to the destruction via static discharges. He told me this was pretty standard and was actually safer than programming via the OBD port. Certainly wasn't "safer" for my front fender.... :rolleyes:

Speaking of that front fender. I had asked Aaron several times to fix the broken tab underneath. Well I have to admit, his "fix" wasn't exactly what I had in mind....
screw_01.jpg


Not to mention that the fender was jammed up against one of the hose clamp screws on the turbo piping behind it, bowing it noticeably outwards. Darn wonder the paint didn't get cracked there too...
screw_02.jpg
 
Decided to tackle that broken wheelwell section for the front fender today. Bought a small section of aluminum flashing that I folded over and cut to size. Then filled this aluminum "sandwich" with JB weld and clamped it in place...

wheelwell_fix_01.jpg


wheelwell_fix_02.jpg


When the JB weld has hardened, I can then see where the hole needs to be drilled, then I can drill the hole, and mount a nut on it so I can run a screw through it to tighten down the fender at that point when I put if back together again. I really can't do anything about the later broken section I found, as there doesn't seem to be any way to get to it to work on it without taking the fender off. So I'm hoping it won't be an issue that I can just ignore for now.

Been also doing a few odds and ends to clean up the mess from the car being abused at shops the last couple of years. Been cleaning up the control arms to get the crud off of them...

control_arms_01.jpg


And I painted the center section of the rotor I have pulled off after getting the rust off with a wire brush...

rotor_paint_01.jpg


I bought a knuckle with upper ball joint from a guy to replace mine, since it's possible the ball joint on the side I'm working on got damaged because of the ball joint nut not being tightened down properly. So I'm still waiting for that to come in before I can finish up with the half shaft install on the passenger side, and then get started on the driver's side shaft. Hopefully I won't find anything else on the driver's side that needs to be replaced.

So I'm pretty much just doing odds and ends on the car while waiting for that part to arrive.
 
Got that section of the fender support fixed. I put in an aluminum pop rivet and then drilled a hole to fit the sliding threaded nut onto for the bolt that goes through the tab on the fender. Seems sturdy enough now...

fender_fix_03.jpg


I'm hoping I can do something similar to fix that broken tab underneath the edge of the fender at the bottom close to the door. That might be more of a challenge.....
 
I'm thinking I might as well go ahead and replace those rubber brake lines with SS braided ones. I'm sure they are the original ones that came on the car when it was new, and no telling if they may have taken any abuse over the past two years. So while I've got the wheels off, perhaps I should just do this now..... They certainly don't last forever anyway.
 
Back
Top